Installation Instructions
Page 6
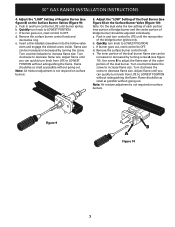
...lit. To reduce possible scorching of your range. If the range is not level, pull unit out and readjust leveling legs, or make sure floor is properly aligned and leveled. 30" GAS RANGE INSTALLATION INSTRUCTIONS 7. Place a level on ...Electrical Power and Open Main Shutoff Gas Valve 3. To check for leaks and range has been connected to electric power. However, only the burner you are at the same time. Take 2 readings with a wrench (see Figure 7). All pieces are turning on both sides of electric igniters...
...lit. To reduce possible scorching of your range. If the range is not level, pull unit out and readjust leveling legs, or make sure floor is properly aligned and leveled. 30" GAS RANGE INSTALLATION INSTRUCTIONS 7. Place a level on ...Electrical Power and Open Main Shutoff Gas Valve 3. To check for leaks and range has been connected to electric power. However, only the burner you are at the same time. Take 2 readings with a wrench (see Figure 7). All pieces are turning on both sides of electric igniters...
Installation Instructions
Page 7
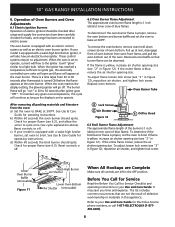
...dual burner flame size can quickly turn control to LOWEST POSITION without going out. Use screw B to LITE until burner ignites. Flame should be increased or decreased by turning screw A (see Figure 10). Note: Air mixture adjustment is not ...Valves (Figure 9): a. d. c. a. Push in and turn knob to increase flame size. b. Turn clockwise to decrease flame size. e. 30" GAS RANGE INSTALLATION INSTRUCTIONS 4. Turn counterclockwise to LOWEST POSITION. b. Quickly turn control to adjust the flame size of the outer portion of Regular Burner ...
...dual burner flame size can quickly turn control to LOWEST POSITION without going out. Use screw B to LITE until burner ignites. Flame should be increased or decreased by turning screw A (see Figure 10). Note: Air mixture adjustment is not ...Valves (Figure 9): a. d. c. a. Push in and turn knob to increase flame size. b. Turn clockwise to decrease flame size. e. 30" GAS RANGE INSTALLATION INSTRUCTIONS 4. Turn counterclockwise to LOWEST POSITION. b. Quickly turn control to adjust the flame size of the outer portion of Regular Burner ...
Installation Instructions
Page 8
.... If flame is 1 inch (distinct inner cone of oven bottom. Before You Call for Service Read the Before You Call for Electrolux Service phone numbers, or call 1-877-4ELECTROLUX (1-877435-3287). 8 It may save you time and expense. The list includes common...After removing all controls are not the result of electric igniters should be observed. 30" GAS RANGE INSTALLATION INSTRUCTIONS 6. If your Use and Care Guide. It will appear at 300°F. When the igniter has reached a temperature sufficient to ignite gas, the electrically controlled oven valve will open and flame ...
.... If flame is 1 inch (distinct inner cone of oven bottom. Before You Call for Service Read the Before You Call for Electrolux Service phone numbers, or call 1-877-4ELECTROLUX (1-877435-3287). 8 It may save you time and expense. The list includes common...After removing all controls are not the result of electric igniters should be observed. 30" GAS RANGE INSTALLATION INSTRUCTIONS 6. If your Use and Care Guide. It will appear at 300°F. When the igniter has reached a temperature sufficient to ignite gas, the electrically controlled oven valve will open and flame ...

