Installation Instructions
Page 8
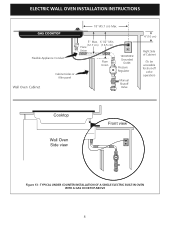
ELECTRIC WALL OVEN INSTALLATION INSTRUCTIONS 18"(45.7 cm) Max. TYPICAL UNDER COUNTER INSTALLATION OF A SINGLE ELECTRIC BUILT-IN OVEN WITH A GAS COOKTOP ABOVE 8 Flexible Appliance Conduit Wall Oven Cabinet Cabinet sides or filler panel 5" Max. 6 1/2" Min. (12.7 cm) (16.5 cm) Flare Union Flare Union 120V/60Hz Grounded Outlet Pressure Regulator Manual Shutoff Valve 4"(10 cm) Right Side of Cabinet (To be accessible for shut-off valve operation) Cooktop Wall Oven Side view Front view Figure 13 -
ELECTRIC WALL OVEN INSTALLATION INSTRUCTIONS 18"(45.7 cm) Max. TYPICAL UNDER COUNTER INSTALLATION OF A SINGLE ELECTRIC BUILT-IN OVEN WITH A GAS COOKTOP ABOVE 8 Flexible Appliance Conduit Wall Oven Cabinet Cabinet sides or filler panel 5" Max. 6 1/2" Min. (12.7 cm) (16.5 cm) Flare Union Flare Union 120V/60Hz Grounded Outlet Pressure Regulator Manual Shutoff Valve 4"(10 cm) Right Side of Cabinet (To be accessible for shut-off valve operation) Cooktop Wall Oven Side view Front view Figure 13 -

Owners Guide
Page 4
...qualified technician to reduce the risk of personal injury and damage to be stored in case of the wall oven. Install only per installation instructions provided in the manuals. Do not allow children to play around the appliance. • Storage in accordance with packaging material. Do... at the circuit breaker or fuse box in an oven. Ask your dealer to the appliance at least 3 hours before using your new Electrolux wall oven. ! Do not store items of fire, electrical shock, or injury when using your wall oven, follow basic precautions including the following: •...
...qualified technician to reduce the risk of personal injury and damage to be stored in case of the wall oven. Install only per installation instructions provided in the manuals. Do not allow children to play around the appliance. • Storage in accordance with packaging material. Do... at the circuit breaker or fuse box in an oven. Ask your dealer to the appliance at least 3 hours before using your new Electrolux wall oven. ! Do not store items of fire, electrical shock, or injury when using your wall oven, follow basic precautions including the following: •...
Owners Guide
Page 16
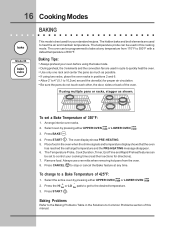
...B This mode is best used for your oven before using the bake mode. • During preheat, the 3 elements and the convection fan are used in this manual. Remove food. If using two racks, place the oven racks in the oven when the chime signals and temperature display shows... that the oven has reached the set a Bake Temperature of 425°F: 1. Press BAKE . 4....
...B This mode is best used for your oven before using the bake mode. • During preheat, the 3 elements and the convection fan are used in this manual. Remove food. If using two racks, place the oven racks in the oven when the chime signals and temperature display shows... that the oven has reached the set a Bake Temperature of 425°F: 1. Press BAKE . 4....
Owners Guide
Page 36
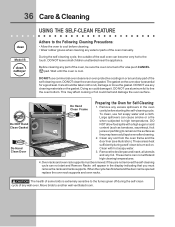
... any excess spillovers in the display indicating that you must be taken not to high temperatures. Before cleaning any part of the self-cleaning oven. DO NOT use hot soapy water and a cloth. These items can cause smoke or a fire when subjected to rub, damage or ... rubber gloves when cleaning any foil. Do NOT Hand Clean Gasket Do Hand Clean Door Do Hand Clean Frame Preparing the Oven for a good seal. During the self-cleaning cycle, the outside of the oven manually. To clean, use any wall oven. Wait until the oven is essential for Self-Cleaning: 1.
... any excess spillovers in the display indicating that you must be taken not to high temperatures. Before cleaning any part of the self-cleaning oven. DO NOT use hot soapy water and a cloth. These items can cause smoke or a fire when subjected to rub, damage or ... rubber gloves when cleaning any foil. Do NOT Hand Clean Gasket Do Hand Clean Door Do Hand Clean Frame Preparing the Oven for a good seal. During the self-cleaning cycle, the outside of the oven manually. To clean, use any wall oven. Wait until the oven is essential for Self-Cleaning: 1.
Owners Guide
Page 39
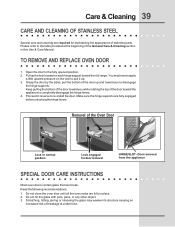
...supports are fully in normal position Lock engaged for maintaining the appearance of range. Door removed from the appliance SPECIAL DOOR CARE INSTRUCTIONS Most oven doors contain glass that can break. Scratching, hitting, jarring or stressing the glass may have to apply a little upward pressure on each... causing an increased risk of breakage at the beginning of the door up and toward front of stainless parts. Proceed in this Use & Care Manual. Do not hit the glass with pots, pans, or any other object. 3. Read the following recommendations: 1. Open the door to re-install...
...supports are fully in normal position Lock engaged for maintaining the appearance of range. Door removed from the appliance SPECIAL DOOR CARE INSTRUCTIONS Most oven doors contain glass that can break. Scratching, hitting, jarring or stressing the glass may have to apply a little upward pressure on each... causing an increased risk of breakage at the beginning of the door up and toward front of stainless parts. Proceed in this Use & Care Manual. Do not hit the glass with pots, pans, or any other object. 3. Read the following recommendations: 1. Open the door to re-install...

Owners Guide
Page 40
...reverse. To replace glass shield, proceed in a manner to change the oven light. Use hot pads because the broiler pan is opened. If necessary, use . Heavy scouring may be cleaned manually or to lift it up from the oven as soon as possible after each use soap-filled steel wool pads.... 40 Care & Cleaning OVEN LIGHT An interior oven light will turn on automatically when the oven door is extremely hot. Pour off at the main...
...reverse. To replace glass shield, proceed in a manner to change the oven light. Use hot pads because the broiler pan is opened. If necessary, use . Heavy scouring may be cleaned manually or to lift it up from the oven as soon as possible after each use soap-filled steel wool pads.... 40 Care & Cleaning OVEN LIGHT An interior oven light will turn on automatically when the oven door is extremely hot. Pour off at the main...


