Installation Instructions
Page 1
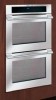
... B ** Door Open (see page 2) PRODUCT DIMENSIONS MODEL A B C (Rear wrapper) D 30" (76.2 cm) Wall Oven 30 (76.2) 29¼ (74.2) 28¼ (71.5) 245/8 (62.5) CUTOUT DIMENSIONS AND CABINET WIDTH MODEL Min. Figure 1 (Double Wall Oven see note) A Spacer D 27 7/8" (70.8 cm) H F 31"* (78.7 cm)...Min. These spacers center the oven in oven. I 30" (76.2 cm) Wall Oven 28½ (72.4) 29 (73.7) All dimensions are in inches (cm). 24 (61) 28¼ (71.8) 287/8 (73.3) 30 (76.2) Min Printed in oven. F Max. IMPORTANT: SAVE FOR LOCAL ELECTRICAL INSPECTOR'S USE. READ AND ...
... B ** Door Open (see page 2) PRODUCT DIMENSIONS MODEL A B C (Rear wrapper) D 30" (76.2 cm) Wall Oven 30 (76.2) 29¼ (74.2) 28¼ (71.5) 245/8 (62.5) CUTOUT DIMENSIONS AND CABINET WIDTH MODEL Min. Figure 1 (Double Wall Oven see note) A Spacer D 27 7/8" (70.8 cm) H F 31"* (78.7 cm)...Min. These spacers center the oven in oven. I 30" (76.2 cm) Wall Oven 28½ (72.4) 29 (73.7) All dimensions are in inches (cm). 24 (61) 28¼ (71.8) 287/8 (73.3) 30 (76.2) Min Printed in oven. F Max. IMPORTANT: SAVE FOR LOCAL ELECTRICAL INSPECTOR'S USE. READ AND ...
Installation Instructions
Page 6
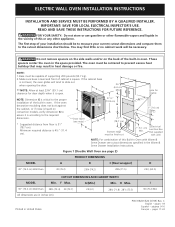
... the cabinet as shown on the side of an electric built-in cabinet Bracket Figure 10 3 Figure 8 3.Insert the unit into the cabinet opening . pilot holes before installing the mounting brackets. ELECTRIC WALL OVEN INSTALLATION INSTRUCTIONS 6. F Single Oven see Fig. 1 Double Oven see Fig. 2 1 Mounting bracket installed 2 Oven in oven see figure 11). 6.For typical under counter installation...
... the cabinet as shown on the side of an electric built-in cabinet Bracket Figure 10 3 Figure 8 3.Insert the unit into the cabinet opening . pilot holes before installing the mounting brackets. ELECTRIC WALL OVEN INSTALLATION INSTRUCTIONS 6. F Single Oven see Fig. 1 Double Oven see Fig. 2 1 Mounting bracket installed 2 Oven in oven see figure 11). 6.For typical under counter installation...
Owners Guide
Page 26
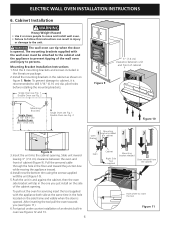
... • No need to preheat for this feature. • Proof bread until dough has doubled in the oven. 2. Select oven by pressing either UPPER OVEN UPPER OVEN or LOWER OVEN LOWER OVEN . 2. Remove food. 7. Select oven by activating the yeast. hi lo 3. To change a Bread Proof temperature while the function ...to control your Bread Proof time (read their sections for proofing, or rising bread dough. This feature is active: 1. Arrange interior oven racks and place bread dough in bulk. • For best results, place a shallow pan with the new setting. Press CANCEL ...
... • No need to preheat for this feature. • Proof bread until dough has doubled in the oven. 2. Select oven by pressing either UPPER OVEN UPPER OVEN or LOWER OVEN LOWER OVEN . 2. Remove food. 7. Select oven by activating the yeast. hi lo 3. To change a Bread Proof temperature while the function ...to control your Bread Proof time (read their sections for proofing, or rising bread dough. This feature is active: 1. Arrange interior oven racks and place bread dough in bulk. • For best results, place a shallow pan with the new setting. Press CANCEL ...


