Specification sheet
Page 1
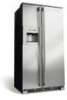
...filtration systems available offer fresher, cleaner air, ice and water. Theatre Lighting Transition lighting that is made simple and easy. Ft. COUNTER-DEPTH REFRIGERATOR CAPACITIES Total Capacity Fresh Food Volume Freezer Volume Total Shelf Area Fresh Food Shelf Area Freezer Shelf Area 22.6 Cu. PN # 4480* ... 1 1 3 Yes Yes INSTALLATION Adjustable Rollers Yes Door Stops Yes ACCESSORIES Collar Kit - Ft. 14.06 Cu. PN # ECK23CDS* Louvered Trim Kit - Counter-Depth Refrigerator E23CS78HPS professional series Shown with ease, extending completely for safe operation.
...filtration systems available offer fresher, cleaner air, ice and water. Theatre Lighting Transition lighting that is made simple and easy. Ft. COUNTER-DEPTH REFRIGERATOR CAPACITIES Total Capacity Fresh Food Volume Freezer Volume Total Shelf Area Fresh Food Shelf Area Freezer Shelf Area 22.6 Cu. PN # 4480* ... 1 1 3 Yes Yes INSTALLATION Adjustable Rollers Yes Door Stops Yes ACCESSORIES Collar Kit - Ft. 14.06 Cu. PN # ECK23CDS* Louvered Trim Kit - Counter-Depth Refrigerator E23CS78HPS professional series Shown with ease, extending completely for safe operation.

Specification sheet
Page 2
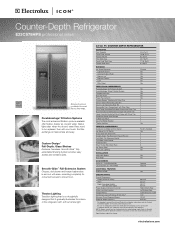
... 70 1/4" (B) 36" (C) 25" 281/2" Standard Depth Top View Recessed water line Recessed electrical outlet 24" Cabinet Allow 1" min. clearance at Electrolux Home Products, Inc. Optional Water Supply Installation Kits available. • Adjustable front rollers to installation. Optional Accessories • Collar Kit - (PN ... at rear for optimum 120° to household water supply line plus 7 additional feet. Counter-Depth Refrigerator E23CS78HPS professional series Standard Refrigerator Depth vs. Note: For planning purposes only. mean we are required. (Refer to Louvered Trim Kit...
... 70 1/4" (B) 36" (C) 25" 281/2" Standard Depth Top View Recessed water line Recessed electrical outlet 24" Cabinet Allow 1" min. clearance at Electrolux Home Products, Inc. Optional Water Supply Installation Kits available. • Adjustable front rollers to installation. Optional Accessories • Collar Kit - (PN ... at rear for optimum 120° to household water supply line plus 7 additional feet. Counter-Depth Refrigerator E23CS78HPS professional series Standard Refrigerator Depth vs. Note: For planning purposes only. mean we are required. (Refer to Louvered Trim Kit...
Specification sheet
Page 3
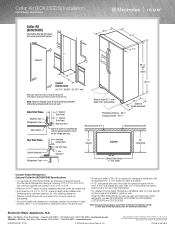
...Refrigerator installation, refer to model-specific product page and installation guide on web. • Collar Kit (PN # ECK23CDS) can also be used , then 1/4" of side panel will be installed flush with kit or on the web at Electrolux Home Products, Inc. Collar Kit (ECK23CDS) Installation E23CS78HPS... in the U.S.A. width Counter-Depth Refrigerator Optional Collar Kit (ECK23CDS) Specifications • To use Collar Kit (PN # ECK23CDS), an enclosure is required for refrigerator installation with Electrolux ICON® refrigerator models E23CS75DSS, E23CS78EPS, E23CS78ESS, E23CS78GPS...
...Refrigerator installation, refer to model-specific product page and installation guide on web. • Collar Kit (PN # ECK23CDS) can also be used , then 1/4" of side panel will be installed flush with kit or on the web at Electrolux Home Products, Inc. Collar Kit (ECK23CDS) Installation E23CS78HPS... in the U.S.A. width Counter-Depth Refrigerator Optional Collar Kit (ECK23CDS) Specifications • To use Collar Kit (PN # ECK23CDS), an enclosure is required for refrigerator installation with Electrolux ICON® refrigerator models E23CS75DSS, E23CS78EPS, E23CS78ESS, E23CS78GPS...

Specification sheet
Page 4
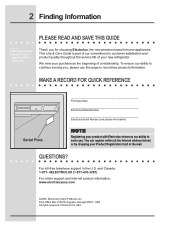
... quality at electroluxicon.com for Trim Kit assembly. • For detailed Counter-Depth Refrigerator installation, refer to improve our products. Louvered Trim Kit (4480) Installation E23CS78HPS, E23CS78HSS 26 7/8" Recessed water line Recessed electrical outlet 24" Cabinet Top View 25...8226; To use Louvered Trim Kit (PN # 4480), an enclosure is required around Counter-Depth Refrigerator having an opening of 80-3/4" H x 37-1/4" W with Electrolux ICON® refrigerator models E23CS75DSS, E23CS78EPS, E23CS78ESS, E23CS78GPS and E23CS78GSS. Printed in 90° open position 23 5/8" ...
... quality at electroluxicon.com for Trim Kit assembly. • For detailed Counter-Depth Refrigerator installation, refer to improve our products. Louvered Trim Kit (4480) Installation E23CS78HPS, E23CS78HSS 26 7/8" Recessed water line Recessed electrical outlet 24" Cabinet Top View 25...8226; To use Louvered Trim Kit (PN # 4480), an enclosure is required around Counter-Depth Refrigerator having an opening of 80-3/4" H x 37-1/4" W with Electrolux ICON® refrigerator models E23CS75DSS, E23CS78EPS, E23CS78ESS, E23CS78GPS and E23CS78GSS. Printed in 90° open position 23 5/8" ...
Owners Guide
Page 2
...is part of our commitment to record key product information. You can register online (at the Internet address below) or by dropping your new refrigerator. Printed in the U.S. Thank you . Post Office Box 212378, Augusta, Georgia 30917, USA All rights reserved. 2 Finding Information PLEASE ... USA and Canada: 1-877- 4ELECTROLUX (1-877-435-3287) For online support and Internet product information: www.electroluxusa.com ©2006 Electrolux Home Products, Inc. We view your sales receipt to this page to customer satisfaction and product quality throughout the service life of your...
...is part of our commitment to record key product information. You can register online (at the Internet address below) or by dropping your new refrigerator. Printed in the U.S. Thank you . Post Office Box 212378, Augusta, Georgia 30917, USA All rights reserved. 2 Finding Information PLEASE ... USA and Canada: 1-877- 4ELECTROLUX (1-877-435-3287) For online support and Internet product information: www.electroluxusa.com ©2006 Electrolux Home Products, Inc. We view your sales receipt to this page to customer satisfaction and product quality throughout the service life of your...
Owners Guide
Page 3
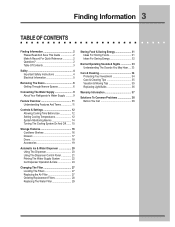
... Quick Reference 2 Questions 2 Table Of Contents 3 Safety 4 Important Safety Instructions 4 Electrical Information 5 Removing The Doors 6 Getting Through Narrow Spaces 6 Connecting The Water Supply 9 About Your Refrigerator's Water Supply .......... 9 Feature Overview 11 Understanding Features And Terms 11 Controls & Settings 12 Allowing Cooling Time Before Use 12 Setting Cooling Temperatures 12 System-Monitoring...
... Quick Reference 2 Questions 2 Table Of Contents 3 Safety 4 Important Safety Instructions 4 Electrical Information 5 Removing The Doors 6 Getting Through Narrow Spaces 6 Connecting The Water Supply 9 About Your Refrigerator's Water Supply .......... 9 Feature Overview 11 Understanding Features And Terms 11 Controls & Settings 12 Allowing Cooling Time Before Use 12 Setting Cooling Temperatures 12 System-Monitoring...
Owners Guide
Page 4
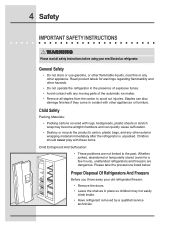
... use gasoline, or other flammable liquids, near this or any other appliances or furniture. Please take the precautions listed below. Proper Disposal Of Refrigerators And Freezers Before you throw away your new Electrolux refrigerator. Whether junked, abandoned or temporarily stored (even for warnings regarding flammability and other hazards. • Do not operate the...
... use gasoline, or other flammable liquids, near this or any other appliances or furniture. Please take the precautions listed below. Proper Disposal Of Refrigerators And Freezers Before you throw away your new Electrolux refrigerator. Whether junked, abandoned or temporarily stored (even for warnings regarding flammability and other hazards. • Do not operate the...

Owners Guide
Page 5
... shock hazards. Always grip the plug firmly, and pull straight out from the receptacle to prevent damaging the power cord. • Unplug the refrigerator before cleaning and before replacing a light bulb to ensure that your warranty. • Do not plug the unit into an outlet controlled by ...on the power cord. It must follow these guidelines to avoid electrical shock. • Performance may be replaced by 10% or more. Operating the refrigerator with local codes and ordinances. Safety 5 ELECTRICAL INFORMATION ! Do not use an extension cord or adapter plug. • If the power cord ...
... shock hazards. Always grip the plug firmly, and pull straight out from the receptacle to prevent damaging the power cord. • Unplug the refrigerator before cleaning and before replacing a light bulb to ensure that your warranty. • Do not plug the unit into an outlet controlled by ...on the power cord. It must follow these guidelines to avoid electrical shock. • Performance may be replaced by 10% or more. Operating the refrigerator with local codes and ordinances. Safety 5 ELECTRICAL INFORMATION ! Do not use an extension cord or adapter plug. • If the power cord ...

Owners Guide
Page 6
... will not fit through an entrance area, you can reduce its size by measuring the entrance. 6 Removing The Doors GETTING THROUGH NARROW SPACES If your refrigerator will need the following tools: Tools Necessary: AND Phillips™ Head OR Socket Wrench Set OR Adjustable Wrench 3/8" Fixed Wrench To prepare for removing the...
... will not fit through an entrance area, you can reduce its size by measuring the entrance. 6 Removing The Doors GETTING THROUGH NARROW SPACES If your refrigerator will need the following tools: Tools Necessary: AND Phillips™ Head OR Socket Wrench Set OR Adjustable Wrench 3/8" Fixed Wrench To prepare for removing the...

Owners Guide
Page 7
... hinge. Once both doors are set it aside. 3 Remove the three bottom hinge screws and hinge if necessary. ! Lift the door off . To reinstall the refrigerator door, reverse the above steps. CAUTION Be sure doors are in a secure position where they cannot fall and cause personal injury. This makes reinstallation easier... a half-inch and lift it off of the bottom hinge and and set aside in place, also replace the top hinge cover. To remove the refrigerator door: 1 Trace lightly around the door's top hinge with a pencil.
... hinge. Once both doors are set it aside. 3 Remove the three bottom hinge screws and hinge if necessary. ! Lift the door off . To reinstall the refrigerator door, reverse the above steps. CAUTION Be sure doors are in a secure position where they cannot fall and cause personal injury. This makes reinstallation easier... a half-inch and lift it off of the bottom hinge and and set aside in place, also replace the top hinge cover. To remove the refrigerator door: 1 Trace lightly around the door's top hinge with a pencil.
Owners Guide
Page 9
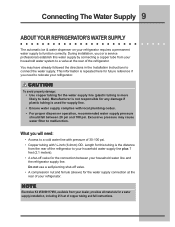
...8226; Copper tubing with local plumbing codes. • For proper dispenser operation, recommended water supply pressure should fall between your refrigerator. You may cause water filter to connect the water supply. Length for the connection between 20 psi and 100 psi. ... with ¼-inch (6.4mm) OD. NOTE Electrolux Kit #53039117950, available from your dealer, provides all materials for a water supply installation, including 25 feet of the refrigerator to leak). During installation, you will need to relocate your refrigerator requires a permanent water supply to a valve at...
...8226; Copper tubing with local plumbing codes. • For proper dispenser operation, recommended water supply pressure should fall between your refrigerator. You may cause water filter to connect the water supply. Length for the connection between 20 psi and 100 psi. ... with ¼-inch (6.4mm) OD. NOTE Electrolux Kit #53039117950, available from your dealer, provides all materials for a water supply installation, including 25 feet of the refrigerator to leak). During installation, you will need to relocate your refrigerator requires a permanent water supply to a valve at...
Owners Guide
Page 10
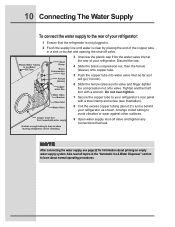
Also read all topics in a sink or bucket and opening the shut-off valve and tighten any connections that the refrigerator is not plugged in. 2 Flush the supply line until water is clear by placing the end of the copper tube in the "Automatic Ice & Water... or wear against other surfaces. 9 Open water supply shut-off valve. 3 Unscrew the plastic cap from the water valve inlet at the rear of your refrigerator: 1 Ensure that leak. Arrange coiled tubing to learn about normal operating procedures. NOTE After connecting the water supply, see illustration). 8 Coil the excess copper tubing...
Also read all topics in a sink or bucket and opening the shut-off valve and tighten any connections that the refrigerator is not plugged in. 2 Flush the supply line until water is clear by placing the end of the copper tube in the "Automatic Ice & Water... or wear against other surfaces. 9 Open water supply shut-off valve. 3 Unscrew the plastic cap from the water valve inlet at the rear of your refrigerator: 1 Ensure that leak. Arrange coiled tubing to learn about normal operating procedures. NOTE After connecting the water supply, see illustration). 8 Coil the excess copper tubing...
Owners Guide
Page 11
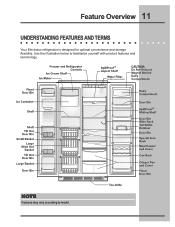
NOTE Features may vary according to familiarize yourself with product features and terminology. Use the illustration below to model. Feature Overview 11 UNDERSTANDING FEATURES AND TERMS Your Electrolux refrigerator is designed for optimal convenience and storage flexibility.
NOTE Features may vary according to familiarize yourself with product features and terminology. Use the illustration below to model. Feature Overview 11 UNDERSTANDING FEATURES AND TERMS Your Electrolux refrigerator is designed for optimal convenience and storage flexibility.
Owners Guide
Page 12
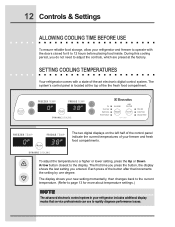
12 Controls & Settings ALLOWING COOLING TIME BEFORE USE To ensure reliable food storage, allow your refrigerator includes additional display modes that increments the setting by one degree. The system's control panel is located at the factory. Each...electronic digital control system. During this cooling period, you entered. SETTING COOLING TEMPERATURES Your refrigerator comes with the doors closed for more about temperature settings.) NOTE The advanced electronic control system in your refrigerator and freezer to the display. The first time you press the button, the display ...
12 Controls & Settings ALLOWING COOLING TIME BEFORE USE To ensure reliable food storage, allow your refrigerator includes additional display modes that increments the setting by one degree. The system's control panel is located at the factory. Each...electronic digital control system. During this cooling period, you entered. SETTING COOLING TEMPERATURES Your refrigerator comes with the doors closed for more about temperature settings.) NOTE The advanced electronic control system in your refrigerator and freezer to the display. The first time you press the button, the display ...
Owners Guide
Page 13
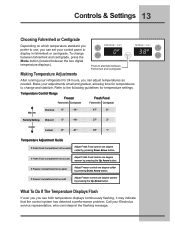
... use, you can set your control panel to change between fahrenheit and centigrade, press the Mode button (located between Fahrenheit and Centigrade After running your refrigerator for temperature settings. Make your Electrolux service representative, who can interpret the flashing message.
... use, you can set your control panel to change between fahrenheit and centigrade, press the Mode button (located between Fahrenheit and Centigrade After running your refrigerator for temperature settings. Make your Electrolux service representative, who can interpret the flashing message.

Owners Guide
Page 14
14 Controls & Settings SYSTEM-MONITORING ALARMS Indicator Lights Alarm Reset Button The electronic control system continuously monitors your refrigerator/freezer for assistance. If cooling does not stabilize toward the current temperature settings. Door Ajar Flashing Green 9 Freezer or Fresh Food door has... button to signal other conditions. Press Alarm Reset button to turn off alarm and again to Alarms (Audible Tones & Indicator Lights) Your refrigerator's control system can convey the following information through audible tones and the alarm indicator lights.
14 Controls & Settings SYSTEM-MONITORING ALARMS Indicator Lights Alarm Reset Button The electronic control system continuously monitors your refrigerator/freezer for assistance. If cooling does not stabilize toward the current temperature settings. Door Ajar Flashing Green 9 Freezer or Fresh Food door has... button to signal other conditions. Press Alarm Reset button to turn off alarm and again to Alarms (Audible Tones & Indicator Lights) Your refrigerator's control system can convey the following information through audible tones and the alarm indicator lights.

Owners Guide
Page 15
... On/Off button. Please order new one of the three filter status lights displays, indicating one . Checking the Air Filter Status Your refrigerator's fresh food air filter needs to be reactivated by pressing the Alarm Reset button. Change Filter Air filter is about 80 percent used .... The On indicator light remains off the status light. Once you disable the alarm system, you disconnect and reconnect your refrigerator's power cord. You can monitor the need changing. Order Filter Air filter is 100 percent used . Controls & Settings 15 Using The Alarm...
... On/Off button. Please order new one of the three filter status lights displays, indicating one . Checking the Air Filter Status Your refrigerator's fresh food air filter needs to be reactivated by pressing the Alarm Reset button. Change Filter Air filter is about 80 percent used .... The On indicator light remains off the status light. Once you disable the alarm system, you disconnect and reconnect your refrigerator's power cord. You can monitor the need changing. Order Filter Air filter is 100 percent used . Controls & Settings 15 Using The Alarm...
Owners Guide
Page 16
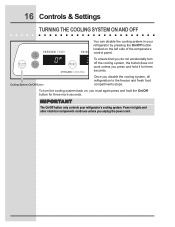
... lights and other electrical components continues unless you unplug the power cord. IMPORTANT The On/Off button only controls your refrigerator by pressing the On/Off button located on , you must again press and hold it for three more seconds. To ensure that you do not ... the On/Off button for three seconds. 16 Controls & Settings TURNING THE COOLING SYSTEM ON AND OFF You can disable the cooling system in your refrigerator's cooling system.
... lights and other electrical components continues unless you unplug the power cord. IMPORTANT The On/Off button only controls your refrigerator by pressing the On/Off button located on , you must again press and hold it for three more seconds. To ensure that you do not ... the On/Off button for three seconds. 16 Controls & Settings TURNING THE COOLING SYSTEM ON AND OFF You can disable the cooling system in your refrigerator's cooling system.

Owners Guide
Page 17
... inserting the mounting bracket hooks into the desired support slots. 5 Lower the shelf and lock into position. Tighten spacers to remove shelf. 1 2 3 1 Shelf Features Your refrigerator includes SpillSafeTM glass shelves, which attach to catch and hold the shelf in stops allow. To secure the shelf in a new location, remember to securely...
... inserting the mounting bracket hooks into the desired support slots. 5 Lower the shelf and lock into position. Tighten spacers to remove shelf. 1 2 3 1 Shelf Features Your refrigerator includes SpillSafeTM glass shelves, which attach to catch and hold the shelf in stops allow. To secure the shelf in a new location, remember to securely...
Owners Guide
Page 18
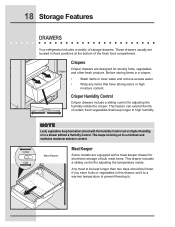
... Humidity Control Crisper drawers include a sliding control for adjusting the humidity inside . NOTE Leafy vegetables keep longer in high humidity. 18 Storage Features DRAWERS Your refrigerator includes a variety of bulk meat items. This drawer includes a sliding control for adjusting the temperature inside the crisper. If you store fruits or vegetables in...
... Humidity Control Crisper drawers include a sliding control for adjusting the humidity inside . NOTE Leafy vegetables keep longer in high humidity. 18 Storage Features DRAWERS Your refrigerator includes a variety of bulk meat items. This drawer includes a sliding control for adjusting the temperature inside the crisper. If you store fruits or vegetables in...


