
Owners Guide
Page 2
... Vacuum Cleaner Refer to Quick Start Guide for shipping damage. Each unit is needed. How to Clear a Blockage 5 Hose blockages. Follow caution information wherever you see this information Write the model, type and serial number here: Date of Vacuum Cleaner 2 Maintenance Information 2 Disposable dust bag and filter. Table of Contents Important Safeguards 1 How to Identify Parts of purchase (keep your Eureka vacuum cleaner. How to Maintain Your Vacuum Cleaner 4 Maintain brush roll, replace brush roll or EXT-U belt, and change light...
... Vacuum Cleaner Refer to Quick Start Guide for shipping damage. Each unit is needed. How to Clear a Blockage 5 Hose blockages. Follow caution information wherever you see this information Write the model, type and serial number here: Date of Vacuum Cleaner 2 Maintenance Information 2 Disposable dust bag and filter. Table of Contents Important Safeguards 1 How to Identify Parts of purchase (keep your Eureka vacuum cleaner. How to Maintain Your Vacuum Cleaner 4 Maintain brush roll, replace brush roll or EXT-U belt, and change light...

Owners Guide
Page 3
... the motor or the brush roll at any opening blocked; Do not run vacuum cleaner over cord. Keep cord away from openings and moving parts. • Do not place vacuum cleaner on furniture or stairs as the brush roll may be present. • Store your work area well lighted. • Unplug electrical appliances before vacuuming them. • Unplug before using attachments. • Do not pick up flammable or combustible liquids such as a handle. Keep hair...
... the motor or the brush roll at any opening blocked; Do not run vacuum cleaner over cord. Keep cord away from openings and moving parts. • Do not place vacuum cleaner on furniture or stairs as the brush roll may be present. • Store your work area well lighted. • Unplug electrical appliances before vacuuming them. • Unplug before using attachments. • Do not pick up flammable or combustible liquids such as a handle. Keep hair...

Owners Guide
Page 4
...or replace monthly Pre-motor filter Remove dust cup; replace dust cup. Do not use the vacuum cleaner without disposable dust bag and motor filter in cup. Check regularly; Disposable bag style PL Place new bag inside dust cup) Stair carrying handle Headlight (available on some models) Brush roll cover Nested crevice tool & extension wand Pre-motor filter (behind dust cup) Power switch Handle release Belt view window Handle with Power Paw® (available on some models) Lower cord retainer Upper cord retainer Hose support Power cord Dusting brush Carrying handle & cord wrap Hose...
...or replace monthly Pre-motor filter Remove dust cup; replace dust cup. Do not use the vacuum cleaner without disposable dust bag and motor filter in cup. Check regularly; Disposable bag style PL Place new bag inside dust cup) Stair carrying handle Headlight (available on some models) Brush roll cover Nested crevice tool & extension wand Pre-motor filter (behind dust cup) Power switch Handle release Belt view window Handle with Power Paw® (available on some models) Lower cord retainer Upper cord retainer Hose support Power cord Dusting brush Carrying handle & cord wrap Hose...

Owners Guide
Page 5
... tool into opening on end of hose. Handle must be in upright position to ensure that brush roll is a registered trademark of vacuum. 2) Place dusting brush on vacuum base after using accessories. The Power Paw name is lifted off vacuum before removing debris from vacuum base. 2) Grasp crevice tool near ridges and pull apart. 3) Turn ridge end to Use Accessories ! Replace hose end into wand and place on end of hose, wand or crevice tool. ENGLISH Dusting Brush Use...
... tool into opening on end of hose. Handle must be in upright position to ensure that brush roll is a registered trademark of vacuum. 2) Place dusting brush on vacuum base after using accessories. The Power Paw name is lifted off vacuum before removing debris from vacuum base. 2) Grasp crevice tool near ridges and pull apart. 3) Turn ridge end to Use Accessories ! Replace hose end into wand and place on end of hose, wand or crevice tool. ENGLISH Dusting Brush Use...

Owners Guide
Page 6
...., Type 904. 3) Push in base and push into base (Fig. 5). Fig. 1 Fig. 2 4) Remove brush roll and belt. Replace if worn, cut or out of brush roll to lower handle flat onto floor (Fig. 1). 2) Remove 2 screws from brush roll periodically. ! Secure right end cap into place. 6) Rotate brush roll 2 turns to Maintain Your Vacuum Cleaner ! Make sure vacuum is turned off and power cord is unplugged Maintain Brush Roll Motor can become hot with normal use. Fig...
...., Type 904. 3) Push in base and push into base (Fig. 5). Fig. 1 Fig. 2 4) Remove brush roll and belt. Replace if worn, cut or out of brush roll to lower handle flat onto floor (Fig. 1). 2) Remove 2 screws from brush roll periodically. ! Secure right end cap into place. 6) Rotate brush roll 2 turns to Maintain Your Vacuum Cleaner ! Make sure vacuum is turned off and power cord is unplugged Maintain Brush Roll Motor can become hot with normal use. Fig...

Owners Guide
Page 7
... Canada: 1-800-282-2886 Electrolux Home Care North America Service Division 5855 Terry Fox Way Mississauga, Ontario L5V 3E4 Obtaining Warranty Service Outside Your Community You must return the vacuum or vacuum part along with "proof of this vacuum cleaner to you specific legal rights. When returning parts for repair, please include the model, type and serial number located on the rating plate on how long an implied...
... Canada: 1-800-282-2886 Electrolux Home Care North America Service Division 5855 Terry Fox Way Mississauga, Ontario L5V 3E4 Obtaining Warranty Service Outside Your Community You must return the vacuum or vacuum part along with "proof of this vacuum cleaner to you specific legal rights. When returning parts for repair, please include the model, type and serial number located on the rating plate on how long an implied...

Owners Guide
Page 8
... vacuum base. • Replace dust bag; Page 4 • Check brush roll for a possible source of shape belt. clean and/or change filter. • If picking up fine dust, the dust bag may not look full, but a fine substance tends to a Eureka authorized service center for filter maintenance. Page 4 • Remove clogs from the hose that protects the vacuum in and turn vacuum on power switch to use the vacuum. Check & clean debris to reduce suction when it blocks air flow through the filter. Check...
... vacuum base. • Replace dust bag; Page 4 • Check brush roll for a possible source of shape belt. clean and/or change filter. • If picking up fine dust, the dust bag may not look full, but a fine substance tends to a Eureka authorized service center for filter maintenance. Page 4 • Remove clogs from the hose that protects the vacuum in and turn vacuum on power switch to use the vacuum. Check & clean debris to reduce suction when it blocks air flow through the filter. Check...
Quick Start Guide
Page 1
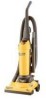
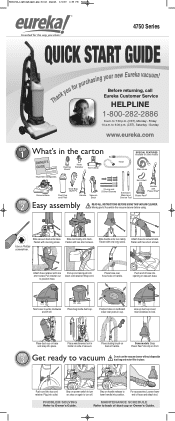
... OWNER'S GUIDE REGISTRATION Dusting Brush Hose Retainer Tool Caddy Hose SPECIAL FEATURES Available on handle. Place dusting brush on vacuum base. PN81158_LightspBagQS.qxp:front englsh 3/4/09 4:59 PM Page 1 4750 Series QUICK START GUIDE Thank you for purchasing your new Eureka vacuum! to lower handle into place. to lock. Do not use the vacuum cleaner without disposable dust bag and motor filter in cardboard collar over hose hook on some models Stair Hose 2STEP Important Safeguards Ext-U Belt Vacuum Base Dust Bag...
... OWNER'S GUIDE REGISTRATION Dusting Brush Hose Retainer Tool Caddy Hose SPECIAL FEATURES Available on handle. Place dusting brush on vacuum base. PN81158_LightspBagQS.qxp:front englsh 3/4/09 4:59 PM Page 1 4750 Series QUICK START GUIDE Thank you for purchasing your new Eureka vacuum! to lower handle into place. to lock. Do not use the vacuum cleaner without disposable dust bag and motor filter in cardboard collar over hose hook on some models Stair Hose 2STEP Important Safeguards Ext-U Belt Vacuum Base Dust Bag...

