Datasheet
Page 1
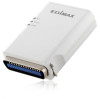
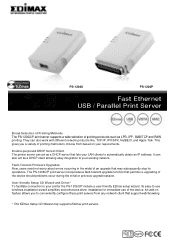
...use of the device. PS-1206U PS-1206P Fast Ethernet USB / Parallel Print Server Broad Selection of Printing Methods The PS-1206U/P print server supports a wide selection of printing protocols such as a DHCP client allowing easy integration to your existing network. The PS-1206U/P print server incorporates a fault-tolerant ...occur during the initial or previous upgrade session. They can act as a DHCP server that support web-browsing. * The EZmax Setup CD Wizard only supports Edimax print servers. User-friendly Setup CD Wizard and Driver* To facilitate connection to your requirements...
...use of the device. PS-1206U PS-1206P Fast Ethernet USB / Parallel Print Server Broad Selection of Printing Methods The PS-1206U/P print server supports a wide selection of printing protocols such as a DHCP client allowing easy integration to your existing network. The PS-1206U/P print server incorporates a fault-tolerant ...occur during the initial or previous upgrade session. They can act as a DHCP server that support web-browsing. * The EZmax Setup CD Wizard only supports Edimax print servers. User-friendly Setup CD Wizard and Driver* To facilitate connection to your requirements...
Quick Install Guide
Page 4
...maintenance required. Product Introduction Thank you can simply follow the procedures described in this print server. It offers printing flexibility and manageability on the network. This guide is the best network printing solutions for various common network operating systems such as: z Windows 2000/XP/2003... CD-ROM for more detail information. 3 If you can easily and instantly complete the settings for purchasing and using our print server. 1. This print server supports TCP/IP, NetBEUI, IPX/SPX, and AppleTalk protocols. If you have a simple network you find any problem, ...
...maintenance required. Product Introduction Thank you can simply follow the procedures described in this print server. It offers printing flexibility and manageability on the network. This guide is the best network printing solutions for various common network operating systems such as: z Windows 2000/XP/2003... CD-ROM for more detail information. 3 If you can easily and instantly complete the settings for purchasing and using our print server. 1. This print server supports TCP/IP, NetBEUI, IPX/SPX, and AppleTalk protocols. If you have a simple network you find any problem, ...

Quick Install Guide
Page 5
Package Contents This package contains the following components: z One Print Server z One Antenna (Only for PS-1206UWg & PS-1206PWg & PS-3207UWg) z One Power Adapter z One Quick Installation Guide z One CD-ROM (Including EZMax Installation Wizard and User's Guide) 4 2.
Package Contents This package contains the following components: z One Print Server z One Antenna (Only for PS-1206UWg & PS-1206PWg & PS-3207UWg) z One Power Adapter z One Quick Installation Guide z One CD-ROM (Including EZMax Installation Wizard and User's Guide) 4 2.
Quick Install Guide
Page 6
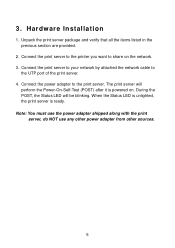
... Status LED will perform the Power-On-Self-Test (POST) after it is ready. Connect the print server to the printer you want to the UTP port of the print server. 4. Connect the power adapter to the print server. Unpack the print server package and verify that all the items listed in the previous section are provided. 2. The...
... Status LED will perform the Power-On-Self-Test (POST) after it is ready. Connect the print server to the printer you want to the UTP port of the print server. 4. Connect the power adapter to the print server. Unpack the print server package and verify that all the items listed in the previous section are provided. 2. The...
Quick Install Guide
Page 7
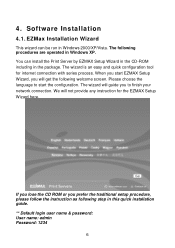
... are operated in this quick installation guide. ** Default login user name & password: User name: admin Password: 1234 6 EZMax Installation Wizard This wizard can install the Print Server by EZMAX Setup Wizard in the CD-ROM including in Windows 2000/XP/Vista. You can be run in the package. 4. Please choose the language...
... are operated in this quick installation guide. ** Default login user name & password: User name: admin Password: 1234 6 EZMax Installation Wizard This wizard can install the Print Server by EZMAX Setup Wizard in the CD-ROM including in Windows 2000/XP/Vista. You can be run in the package. 4. Please choose the language...
Quick Install Guide
Page 8
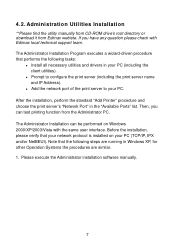
... printing function from Edimax webiste. Please execute the Administrator installation software manually. 7 The Administrator Installation Program executes a wizard-driven procedure that performs the following steps are similar. 1. z Add the network port of the print server to configure the print server (including the print server ...your PC (including the client utilities). After the installation, perform the standard "Add Printer" procedure and choose the print server's "Network Port" in Windows XP, for other Operation Systems the procedures are running in the "Available Ports" ...
... printing function from Edimax webiste. Please execute the Administrator installation software manually. 7 The Administrator Installation Program executes a wizard-driven procedure that performs the following steps are similar. 1. z Add the network port of the print server to configure the print server (including the print server ...your PC (including the client utilities). After the installation, perform the standard "Add Printer" procedure and choose the print server's "Network Port" in Windows XP, for other Operation Systems the procedures are running in the "Available Ports" ...

Quick Install Guide
Page 9
Please Click "Next". 3. 2. The "Print Server Utilities" window will be displayed. Please Click "Next" to install the utilities in the default folder or click "Change" to specify the destination folder where you would like to install the utilities. 8
Please Click "Next". 3. 2. The "Print Server Utilities" window will be displayed. Please Click "Next" to install the utilities in the default folder or click "Change" to specify the destination folder where you would like to install the utilities. 8
Quick Install Guide
Page 11
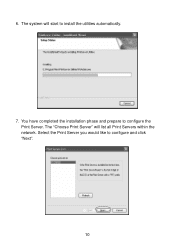
The system will list all Print Servers within the network. You have completed the installation phase and prepare to install the utilities automatically. 7. The "Choose Print Server" will start to configure the Print Server. Select the Print Server you would like to configure and click "Next". 10 6.
The system will list all Print Servers within the network. You have completed the installation phase and prepare to install the utilities automatically. 7. The "Choose Print Server" will start to configure the Print Server. Select the Print Server you would like to configure and click "Next". 10 6.
Quick Install Guide
Page 12
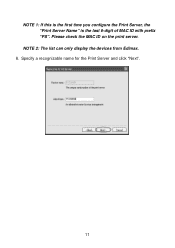
NOTE 2: The list can only display the devices from Edimax. 8. Specify a recognizable name for the Print Server and click "Next". 11 Please check the MAC ID on the print server. NOTE 1: If this is the first time you configure the Print Server, the "Print Server Name" is the last 6-digit of MAC ID with prefix "PS".
NOTE 2: The list can only display the devices from Edimax. 8. Specify a recognizable name for the Print Server and click "Next". 11 Please check the MAC ID on the print server. NOTE 1: If this is the first time you configure the Print Server, the "Print Server Name" is the last 6-digit of MAC ID with prefix "PS".
Quick Install Guide
Page 13
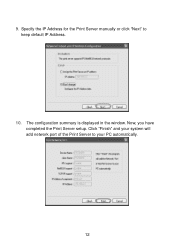
The configuration summary is displayed in the window. Click "Finish" and your system will add network port of the Print Server to keep default IP Address. 10. 9. Specify the IP Address for the Print Server manually or click "Next" to your PC automatically. 12 Now, you have completed the Print Server setup.
The configuration summary is displayed in the window. Click "Finish" and your system will add network port of the Print Server to keep default IP Address. 10. 9. Specify the IP Address for the Print Server manually or click "Next" to your PC automatically. 12 Now, you have completed the Print Server setup.
Quick Install Guide
Page 15
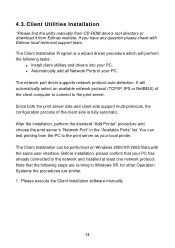
...performed on Windows 2000/XP/2003/Vista with Edimax local technical support team. Before installation, please confirm that the following tasks: z Install client utilities and drivers into your PC. Since both the print server side and client side support multi-protocols, ..., perform the standard "Add Printer" procedure and choose the print server's "Network Port" in Windows XP, for other Operation Systems the procedures are similar. 1. 4.3. The Client Installation can test printing from Edimax webiste. Client Utilities Installation *Please find the utility manually from...
...performed on Windows 2000/XP/2003/Vista with Edimax local technical support team. Before installation, please confirm that the following tasks: z Install client utilities and drivers into your PC. Since both the print server side and client side support multi-protocols, ..., perform the standard "Add Printer" procedure and choose the print server's "Network Port" in Windows XP, for other Operation Systems the procedures are similar. 1. 4.3. The Client Installation can test printing from Edimax webiste. Client Utilities Installation *Please find the utility manually from...
Quick Install Guide
Page 16
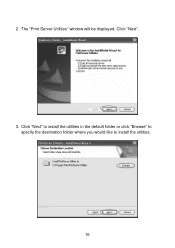
Click "Next" to install the utilities in the default folder or click "Browse" to specify the destination folder where you would like to install the utilities. 15 2. Click "Next". 3. The "Print Server Utilities" window will be displayed.
Click "Next" to install the utilities in the default folder or click "Browse" to specify the destination folder where you would like to install the utilities. 15 2. Click "Next". 3. The "Print Server Utilities" window will be displayed.
Quick Install Guide
Page 18
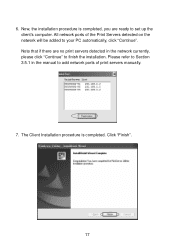
6. Now, the installation procedure is completed. The Client Installation procedure is completed, you are no print servers detected in the manual to add network ports of the Print Servers detected on the network will be added to set up the client's computer. Click "Finish". 17 Please refer to Section 3.5.1 in the network currently, please click "Continue" to finish the installation. All network ports of print servers manually. 7. Note that if there are ready to your PC automatically, click "Continue".
6. Now, the installation procedure is completed. The Client Installation procedure is completed, you are no print servers detected in the manual to add network ports of the Print Servers detected on the network will be added to set up the client's computer. Click "Finish". 17 Please refer to Section 3.5.1 in the network currently, please click "Continue" to finish the installation. All network ports of print servers manually. 7. Note that if there are ready to your PC automatically, click "Continue".
Quick Install Guide
Page 19
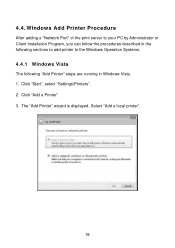
The "Add Printer" wizard is displayed. Windows Add Printer Procedure After adding a "Network Port" of the print server to your PC by Administrator or Client Installation Program, you can follow the procedures described in the following sections to add printer to the Windows Operation Systems. 4.4.1 Windows Vista The following "Add Printer" steps are running in Windows Vista. 1. Select "Add a local printer". 18 Click "Start", select "Settings\Printers". 2. 4.4. Click "Add a Printer". 3.
The "Add Printer" wizard is displayed. Windows Add Printer Procedure After adding a "Network Port" of the print server to your PC by Administrator or Client Installation Program, you can follow the procedures described in the following sections to add printer to the Windows Operation Systems. 4.4.1 Windows Vista The following "Add Printer" steps are running in Windows Vista. 1. Select "Add a local printer". 18 Click "Start", select "Settings\Printers". 2. 4.4. Click "Add a Printer". 3.
Quick Install Guide
Page 22
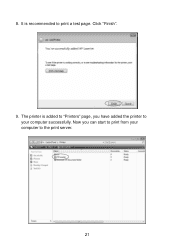
Click "Finish". 9. The printer is recommended to print a test page. It is added to "Printers" page, you can start to the print server. 21 Now you have added the printer to your computer to print from your computer successfully. 8.
Click "Finish". 9. The printer is recommended to print a test page. It is added to "Printers" page, you can start to the print server. 21 Now you have added the printer to your computer to print from your computer successfully. 8.
Quick Install Guide
Page 24
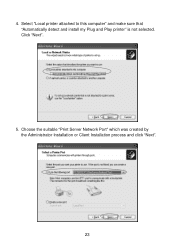
4. Choose the suitable "Print Server Network Port" which was created by the Administrator Installation or Client Installation process and click "Next". 23 Click "Next". 5. Select "Local printer attached to this computer" and make sure that "Automatically detect and install my Plug and Play printer" is not selected.
4. Choose the suitable "Print Server Network Port" which was created by the Administrator Installation or Client Installation process and click "Next". 23 Click "Next". 5. Select "Local printer attached to this computer" and make sure that "Automatically detect and install my Plug and Play printer" is not selected.
Quick Install Guide
Page 27
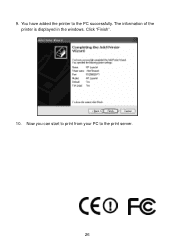
Click "Finish". 10. Now you can start to print from your PC to the PC successfully. The information of the printer is displayed in the windows. You have added the printer to the print server. 26 9.
Click "Finish". 10. Now you can start to print from your PC to the PC successfully. The information of the printer is displayed in the windows. You have added the printer to the print server. 26 9.
Manual
Page 1
Print Server Series PS-1207U/PS-1208UWg PS-1206U/PS-1206UWg PS-1206P/PS-1206PWg PS-3207U/PS-3207UWg User's Manual Version: 3.0 (July, 2007)
Print Server Series PS-1207U/PS-1208UWg PS-1206U/PS-1206UWg PS-1206P/PS-1206PWg PS-3207U/PS-3207UWg User's Manual Version: 3.0 (July, 2007)
Manual
Page 7
... 46 5.2 NetWare 3.x/4.x/5.x Installation & Setup 48 5.2.1 Installation Using PCONSOLE 48 Introduction 1 1.1 Product Introduction 1 1.2 Product Package 2 1.3 Network Printing Architecture 3 1.3.1 Print Server Network Functions 4 1.3.2 Network Printing Functions for Clients 5 1.3.3 Network Printing Functions for Network Server 7 1.4 Network Printing Environment 8 1.5 Contents of the User's Manual 10 1.6 Firmware & Printing Function 11 2. Windows Peer-to-Peer Network 13 3.1 System Architecture 13 3.2 EZMax Installation Wizard 15...
... 46 5.2 NetWare 3.x/4.x/5.x Installation & Setup 48 5.2.1 Installation Using PCONSOLE 48 Introduction 1 1.1 Product Introduction 1 1.2 Product Package 2 1.3 Network Printing Architecture 3 1.3.1 Print Server Network Functions 4 1.3.2 Network Printing Functions for Clients 5 1.3.3 Network Printing Functions for Network Server 7 1.4 Network Printing Environment 8 1.5 Contents of the User's Manual 10 1.6 Firmware & Printing Function 11 2. Windows Peer-to-Peer Network 13 3.1 System Architecture 13 3.2 EZMax Installation Wizard 15...

Manual
Page 8
Configuration Utility 59 7.1 Introduction 59 7.2 Search for All Available Print Server 61 7.3 Status of Print Server 62 7.4 Setup the Print Server 63 7.5 General Configuration 64 7.6 TCP/IP Configuration 65 7.7 Netware Print Server Configuration 67 7.8 AppleTalk Configuration 68 7.9 SNMP Configuration 69 7.10 SMB Configuration 70 7.11 System Configuration 71 7.12 Wireless Configuration 73 7.13 Wizard 83 7.14 Report ...
Configuration Utility 59 7.1 Introduction 59 7.2 Search for All Available Print Server 61 7.3 Status of Print Server 62 7.4 Setup the Print Server 63 7.5 General Configuration 64 7.6 TCP/IP Configuration 65 7.7 Netware Print Server Configuration 67 7.8 AppleTalk Configuration 68 7.9 SNMP Configuration 69 7.10 SMB Configuration 70 7.11 System Configuration 71 7.12 Wireless Configuration 73 7.13 Wizard 83 7.14 Report ...