
User Manual
Page 2
... stored in a retrieval system, or translated into any language or computer language, in the software. COPYRIGHT Copyright Edimax Technology Co., Ltd. Edimax Technology Co., Ltd. Any software described in this product, please refer to notify any defect in any form or by any ...particular purpose. The software and specifications are trademarks and/or registered trademarks of their purchase, the...
... stored in a retrieval system, or translated into any language or computer language, in the software. COPYRIGHT Copyright Edimax Technology Co., Ltd. Edimax Technology Co., Ltd. Any software described in this product, please refer to notify any defect in any form or by any ...particular purpose. The software and specifications are trademarks and/or registered trademarks of their purchase, the...
User Manual
Page 3
Contents Chapter 1: Introduction ...3 1.1 Product Features...3 1.2 Application ...3 1.3 Compatibility...4 1.4 System Requirements ...4 Chapter 2: Interfaces ...5 2.1 LEDs...5 2.2 Button ...6 2.3 Fast Ethernet Port ...6 Chapter 3:Utility Software Installation ...7 3.1 Win 8 ...7 3.2 Win XP/Vista / 7 ...14 Chapter 4: Using the Utility Software ...20 4.1 Main Tab ...20 4.2 Diagnostics Tab ...21 4.3 About Tab...22 Chapter 5: Group Button ...23 5.1 Forming a HomePlug AV Logical Network 23 5.2 Joining a Network ...24...
Contents Chapter 1: Introduction ...3 1.1 Product Features...3 1.2 Application ...3 1.3 Compatibility...4 1.4 System Requirements ...4 Chapter 2: Interfaces ...5 2.1 LEDs...5 2.2 Button ...6 2.3 Fast Ethernet Port ...6 Chapter 3:Utility Software Installation ...7 3.1 Win 8 ...7 3.2 Win XP/Vista / 7 ...14 Chapter 4: Using the Utility Software ...20 4.1 Main Tab ...20 4.2 Diagnostics Tab ...21 4.3 About Tab...22 Chapter 5: Group Button ...23 5.1 Forming a HomePlug AV Logical Network 23 5.2 Joining a Network ...24...
User Manual
Page 8
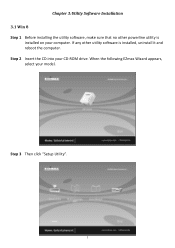
When the following EZmax Wizard appears, select your CD-ROM drive. If any other powerline utility is installed, uninstall it and reboot the computer. Step 2 Insert the CD into your model. Step 3 Then click "Setup Utility". 7 Chapter 3:Utility Software Installation 3.1 Win 8 Step 1 Before installing the utility software, make sure that no other utility software is installed on your computer.
When the following EZmax Wizard appears, select your CD-ROM drive. If any other powerline utility is installed, uninstall it and reboot the computer. Step 2 Insert the CD into your model. Step 3 Then click "Setup Utility". 7 Chapter 3:Utility Software Installation 3.1 Win 8 Step 1 Before installing the utility software, make sure that no other utility software is installed on your computer.

User Manual
Page 13
Step 11 After the installation is complete, click "Close". 12 Step 10 Select where you want to install the utility software, and then click "Next".
Step 11 After the installation is complete, click "Close". 12 Step 10 Select where you want to install the utility software, and then click "Next".
User Manual
Page 14
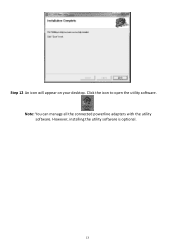
Note: You can manage all the connected powerline adapters with the utility software. Click the icon to open the utility software. Step 12 An icon will appear on your desktop. However, installing the utility software is optional. 13
Note: You can manage all the connected powerline adapters with the utility software. Click the icon to open the utility software. Step 12 An icon will appear on your desktop. However, installing the utility software is optional. 13
User Manual
Page 15
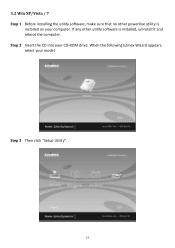
When the following EZmax Wizard appears, select your CD-ROM drive. Step 2 Insert the CD into your model. Step 3 Then click "Setup Utility". 14 3.2 Win XP/Vista / 7 Step 1 Before installing the utility software, make sure that no other utility software is installed on your computer. If any other powerline utility is installed, uninstall it and reboot the computer.
When the following EZmax Wizard appears, select your CD-ROM drive. Step 2 Insert the CD into your model. Step 3 Then click "Setup Utility". 14 3.2 Win XP/Vista / 7 Step 1 Before installing the utility software, make sure that no other utility software is installed on your computer. If any other powerline utility is installed, uninstall it and reboot the computer.

User Manual
Page 19
Step 7 Select where you confirm to install the utility software, and then click "Next". Step 8 If you want to install the utility, click "Next". 18
Step 7 Select where you confirm to install the utility software, and then click "Next". Step 8 If you want to install the utility, click "Next". 18

User Manual
Page 20
Step 10 An icon will appear on your desktop. However, installing the utility software is complete, click "Close". Note: You can manage all the connected powerline adapters with the utility software. Step 9 After the installation is optional. 19 Click the icon to open the utility software.
Step 10 An icon will appear on your desktop. However, installing the utility software is complete, click "Close". Note: You can manage all the connected powerline adapters with the utility software. Step 9 After the installation is optional. 19 Click the icon to open the utility software.

User Manual
Page 21
... provides a list of other remote powerline adapters. The upper panel displays local powerline adapters. By default, this column is blank. Click "Scan" and the utility software will perform an immediate scan of powerline adapters connected to the network. Select a device and click "Enter Password" to rename the device. The lower panel...
... provides a list of other remote powerline adapters. The upper panel displays local powerline adapters. By default, this column is blank. Click "Scan" and the utility software will perform an immediate scan of powerline adapters connected to the network. Select a device and click "Enter Password" to rename the device. The lower panel...

User Manual
Page 22
The upper panel displays technical data concerning the software and hardware on the host computer and the lower panel displays the history of all remote devices. 21 4.2 Diagnostics Tab The "Diagnostics" tab displays the system information and history of all remote devices.
The upper panel displays technical data concerning the software and hardware on the host computer and the lower panel displays the history of all remote devices. 21 4.2 Diagnostics Tab The "Diagnostics" tab displays the system information and history of all remote devices.

User Manual
Page 23
You can also enable or disable the autoscan function under "Preferences". 22 4.3 About Tab The "About" tab contains some basic information about the software.
You can also enable or disable the autoscan function under "Preferences". 22 4.3 About Tab The "About" tab contains some basic information about the software.