
Datasheet
Page 1
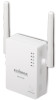
...network and Powerline network into standby mode to install any power socket. The HP-5101Wn offers easy, plug-and-play setup and provides super-fast Wi-Fi coverage - User-Friendly Setup Powerline adapters are subject to change without internet dead spot and no need ...Powerline adapter and a 300Mbps 802.11n wireless. Copyright © 2013 Edimax Technology Co. Energy Saving The HP-5102Wn supports the energy saving mode to any networking Ethernet-enable devices. All rights reserved. Edimax's HP-5101Wn AV500 Powerline Wireless Extender creates a 500Mbps high-speed network with excellent ...
...network and Powerline network into standby mode to install any power socket. The HP-5101Wn offers easy, plug-and-play setup and provides super-fast Wi-Fi coverage - User-Friendly Setup Powerline adapters are subject to change without internet dead spot and no need ...Powerline adapter and a 300Mbps 802.11n wireless. Copyright © 2013 Edimax Technology Co. Energy Saving The HP-5102Wn supports the energy saving mode to any networking Ethernet-enable devices. All rights reserved. Edimax's HP-5101Wn AV500 Powerline Wireless Extender creates a 500Mbps high-speed network with excellent ...
Datasheet
Page 2
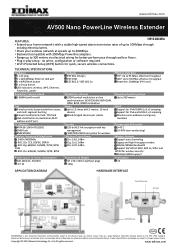
... 11g: 15±1.5dBm 11b: 16±1.5dBm Dimensions & Weight 87 x 59 x 30mm (without notice. www.edimax.com AV500 Nano PowerLine Wireless Extender FEATURES: HP-5101Wn • Extend your home network t with a stable high-speed data transmission rates of up to 500Mbps through existing... electrical wires. • Share your wireless network at the physical layer via electrical wiring for better performance through walls or floors. • Plug-n-play setup...
... 11g: 15±1.5dBm 11b: 16±1.5dBm Dimensions & Weight 87 x 59 x 30mm (without notice. www.edimax.com AV500 Nano PowerLine Wireless Extender FEATURES: HP-5101Wn • Extend your home network t with a stable high-speed data transmission rates of up to 500Mbps through existing... electrical wires. • Share your wireless network at the physical layer via electrical wiring for better performance through walls or floors. • Plug-n-play setup...
User Manual
Page 2
...in this manual is sold or licensed as is. The program is subject to notify any language or computer language, in the software. Edimax Technology Co., Ltd. For more than the costs of physically performing source distribution, a complete machine-readable copy of their respective holders. ...the entire cost of such revision or changes. reserves the right to revise this product, please refer to give you have purchased and the setup screen may be reproduced, transmitted, transcribed, stored in a retrieval system, or translated into any person of all rights reserved. all necessary ...
...in this manual is sold or licensed as is. The program is subject to notify any language or computer language, in the software. Edimax Technology Co., Ltd. For more than the costs of physically performing source distribution, a complete machine-readable copy of their respective holders. ...the entire cost of such revision or changes. reserves the right to revise this product, please refer to give you have purchased and the setup screen may be reproduced, transmitted, transcribed, stored in a retrieval system, or translated into any person of all rights reserved. all necessary ...
User Manual
Page 3
...Installation ...8 II-2. WPS Setup...15 II-4. WPA Radius ...30 III-4. Time Setting...41 III-6-2. Firmware Upgrade ...48 III-7-3. Installation ...50 IV-1.1 Win 8 ...50 IV-1.2 Win XP/Vista / 7 ...59 IV-2. LED Status ...6 I -3. Connecting to your HP-5101Wn 16 II-5. Leaving a...Tab ...67 V. Resetting the Wireless Extender 18 III. Basic Setting...24 III-3-1. CONTENTS I -5. Diagnostics Tab...66 IV-2-3. iQ Setup ...23 III-3. WPA Pre-shared Key...29 III-3-1-3. MAC Filtering ...36 III-6. BROWSER BASED CONFIGURATION INTERFACE 19 III-1. System ...
...Installation ...8 II-2. WPS Setup...15 II-4. WPA Radius ...30 III-4. Time Setting...41 III-6-2. Firmware Upgrade ...48 III-7-3. Installation ...50 IV-1.1 Win 8 ...50 IV-1.2 Win XP/Vista / 7 ...59 IV-2. LED Status ...6 I -3. Connecting to your HP-5101Wn 16 II-5. Leaving a...Tab ...67 V. Resetting the Wireless Extender 18 III. Basic Setting...24 III-3-1. CONTENTS I -5. Diagnostics Tab...66 IV-2-3. iQ Setup ...23 III-3. WPA Pre-shared Key...29 III-3-1-3. MAC Filtering ...36 III-6. BROWSER BASED CONFIGURATION INTERFACE 19 III-1. System ...

User Manual
Page 8
...a power socket, and confirm the power LED is on. 3. II-1. The PLC LED on . 2. II. Plug another Powerline adapter (HP-5101Wn) into standard wall sockets. The power and LAN LEDs should display on both Powerline adapters should indicate first that a Powerline connection is complete. ...It may be convenient to its preferred location after setup is established. See LED Status for HP-5101Wn LEDs. 8 Avoid using multi-socket adapters. Connect one Powerline adapter to your Powerline adapters in the same room...
...a power socket, and confirm the power LED is on. 3. II-1. The PLC LED on . 2. II. Plug another Powerline adapter (HP-5101Wn) into standard wall sockets. The power and LAN LEDs should display on both Powerline adapters should indicate first that a Powerline connection is complete. ...It may be convenient to its preferred location after setup is established. See LED Status for HP-5101Wn LEDs. 8 Avoid using multi-socket adapters. Connect one Powerline adapter to your Powerline adapters in the same room...
User Manual
Page 9
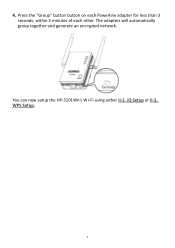
The adapters will automatically group together and generate an encrypted network. WPS Setup. 9 Press the "Group" button button on each Powerline adapter for less than 3 seconds, within 2 minutes of each other. You can now setup the HP-5101Wn's Wi-Fi using either II-2. iQ Setup or II-3. 4.
The adapters will automatically group together and generate an encrypted network. WPS Setup. 9 Press the "Group" button button on each Powerline adapter for less than 3 seconds, within 2 minutes of each other. You can now setup the HP-5101Wn's Wi-Fi using either II-2. iQ Setup or II-3. 4.

User Manual
Page 10
Use a Wi-Fi device (e.g. computer, tablet, smartphone) to search for a Wi-Fi network with the SSID "Edimax.Setup" and connect to begin the setup process. If you cannot access http://edimax.setup, please make sure your IP address. 10 Configuring your computer is set to use a dynamic IP address. iQ Setup 1. SSID: Edimax.Setup 2. Open a web browser and if you are unsure, see V-1. Select your language from the drop down menu and click "Get Started" to it. II-2. If you do not automatically arrive at the "Get Started" screen shown below, enter the URL http://edimax.setup.
Use a Wi-Fi device (e.g. computer, tablet, smartphone) to search for a Wi-Fi network with the SSID "Edimax.Setup" and connect to begin the setup process. If you cannot access http://edimax.setup, please make sure your IP address. 10 Configuring your computer is set to use a dynamic IP address. iQ Setup 1. SSID: Edimax.Setup 2. Open a web browser and if you are unsure, see V-1. Select your language from the drop down menu and click "Get Started" to it. II-2. If you do not automatically arrive at the "Get Started" screen shown below, enter the URL http://edimax.setup.
User Manual
Page 13
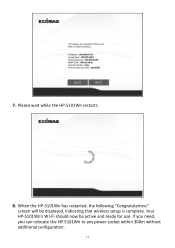
7. When the HP-5101Wn has restarted, the following "Congratulations" screen will be active and ready for use. Your HP-5101Wn's Wi-Fi should now be displayed, indicating that wireless setup is complete. Please wait while the HP-5101Wn restarts. 8. If you need, you can relocate the HP-5101Wn to any power socket within 300m without additional configuration. 13
7. When the HP-5101Wn has restarted, the following "Congratulations" screen will be active and ready for use. Your HP-5101Wn's Wi-Fi should now be displayed, indicating that wireless setup is complete. Please wait while the HP-5101Wn restarts. 8. If you need, you can relocate the HP-5101Wn to any power socket within 300m without additional configuration. 13
User Manual
Page 15
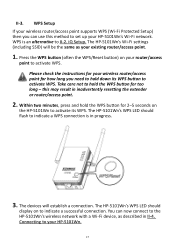
...alternative to your wireless router/access point for too long - The HP-5101Wn's WPS LED should flash to set up your existing router/access point. 1. WPS Setup If your router/access point to activate WPS. The HP-5101Wn's WPS LED should display on your wireless router/access point supports ...WPS (Wi-Fi Protected Setup) then you need to hold the WPS button for 2-5 seconds on the HP-5101Wn to the HP-5101Wn's wireless network with a Wi-Fi device, as your HP-5101Wn's Wi-Fi network. The devices will be the same as described...
...alternative to your wireless router/access point for too long - The HP-5101Wn's WPS LED should flash to set up your existing router/access point. 1. WPS Setup If your router/access point to activate WPS. The HP-5101Wn's WPS LED should display on your wireless router/access point supports ...WPS (Wi-Fi Protected Setup) then you need to hold the WPS button for 2-5 seconds on the HP-5101Wn to the HP-5101Wn's wireless network with a Wi-Fi device, as your HP-5101Wn's Wi-Fi network. The devices will be the same as described...

User Manual
Page 19
To access the browser based configuration interface, enter http://edimax.setup into the URL bar of a web browser on the left side of the wireless extender or run iQ Setup again using the drop down menu in II. You can further configure the settings of the screen to the extender's... is connected to navigate. You will be prompted for a username and password. CREATING A POWERLINE NETWORK or the included QIG, you have setup the wireless extender as detailed in the top right corner. 19 BROWSER BASED CONFIGURATION INTERFACE Once you can also change the language using the ...
To access the browser based configuration interface, enter http://edimax.setup into the URL bar of a web browser on the left side of the wireless extender or run iQ Setup again using the drop down menu in II. You can further configure the settings of the screen to the extender's... is connected to navigate. You will be prompted for a username and password. CREATING A POWERLINE NETWORK or the included QIG, you have setup the wireless extender as detailed in the top right corner. 19 BROWSER BASED CONFIGURATION INTERFACE Once you can also change the language using the ...

User Manual
Page 20
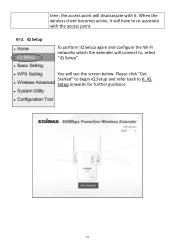
III-5. Configuration Tool 20 iQ Setup - Wireless Advanced - III-1. III-3. III-6. System Utility - III-4. Home - III-7. WPS Setting - - III-2. Basic Setting -
III-5. Configuration Tool 20 iQ Setup - Wireless Advanced - III-1. III-3. III-6. System Utility - III-4. Home - III-7. WPS Setting - - III-2. Basic Setting -
User Manual
Page 23
Please click "Get Started" to begin iQ Setup and refer back to , select "iQ Setup". When the wireless client becomes active, it . time, the access point will disassociate with it will have to re-associate with the access point. III-2. You will connect to II. iQ Setup onwards for further guidance. 23 iQ Setup To perform iQ Setup again and configure the Wi-Fi networks which the extender will see the screen below.
Please click "Get Started" to begin iQ Setup and refer back to , select "iQ Setup". When the wireless client becomes active, it . time, the access point will disassociate with it will have to re-associate with the access point. III-2. You will connect to II. iQ Setup onwards for further guidance. 23 iQ Setup To perform iQ Setup again and configure the Wi-Fi networks which the extender will see the screen below.

User Manual
Page 32
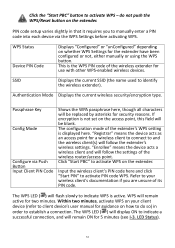
...point, please refer back to (II-3. The wireless extender supports two types of WPS for two compatible devices, they will automatically connect. WPS Setup). By default, the WPS Settings page displays settings for WPS between WPS compatible devices. WPS devices feature a WPS function which can activate WPS... on the wireless extender by pushing a WPS button on the screen. 32 III-4. WPS Setting WPS (Wi-Fi Protected Setup) is activated in the correct manner and at the correct time for wireless clients: PBC (Push Button Configuration) and PIN code. For PBC...
...point, please refer back to (II-3. The wireless extender supports two types of WPS for two compatible devices, they will automatically connect. WPS Setup). By default, the WPS Settings page displays settings for WPS between WPS compatible devices. WPS devices feature a WPS function which can activate WPS... on the wireless extender by pushing a WPS button on the screen. 32 III-4. WPS Setting WPS (Wi-Fi Protected Setup) is activated in the correct manner and at the correct time for wireless clients: PBC (Push Button Configuration) and PIN code. For PBC...
User Manual
Page 33
... to and the wireless client(s) will remain active for the extender have been configured or not, either manually or using the WPS button. PIN code setup varies slightly in order to activate WPS -
... to and the wireless client(s) will remain active for the extender have been configured or not, either manually or using the WPS button. PIN code setup varies slightly in order to activate WPS -

User Manual
Page 40
... Address. Please refer to save the changes. Resetting The Wireless Extender. If you are unable to connect to the browser based configuration interface using http://edimax.setup, it is disabled. Input the start address of your network, in the field "DHCP Server". For static IP users, the wireless extender needs to its...
... Address. Please refer to save the changes. Resetting The Wireless Extender. If you are unable to connect to the browser based configuration interface using http://edimax.setup, it is disabled. Input the start address of your network, in the field "DHCP Server". For static IP users, the wireless extender needs to its...

User Manual
Page 42
... times. Scheduling Setting The wireless extender includes a scheduling function, where power saving functions and an automatic reboot can be automated for automatic time and date setup. Time Zone Time Server Address Daylight Savings Select the time zone of the IP server manually. Click "APPLY" to save the changes and continue configuring...
... times. Scheduling Setting The wireless extender includes a scheduling function, where power saving functions and an automatic reboot can be automated for automatic time and date setup. Time Zone Time Server Address Daylight Savings Select the time zone of the IP server manually. Click "APPLY" to save the changes and continue configuring...

User Manual
Page 50
... install the utility software, insert the CD into your CD-ROM drive. When the following EZmax Wizard appears, select your CD-ROM drive and the setup wizard should begin automatically. If not, please manually locate and open the "AutoRun.exe" file in more detail. IV-1.1 Win 8 Step 1 Before installing the utility...
... install the utility software, insert the CD into your CD-ROM drive. When the following EZmax Wizard appears, select your CD-ROM drive and the setup wizard should begin automatically. If not, please manually locate and open the "AutoRun.exe" file in more detail. IV-1.1 Win 8 Step 1 Before installing the utility...

User Manual
Page 51
Step 3 Then click "Setup Utility". 51
Step 3 Then click "Setup Utility". 51

User Manual
Page 53
The wizard will guide you through the setup process. 53 Step 6 Then click "WinPcap_4_1_2".
The wizard will guide you through the setup process. 53 Step 6 Then click "WinPcap_4_1_2".

User Manual
Page 59
Step 3 Then click "Setup Utility". 59 When the following EZmax Wizard appears, select your computer. IV-1.2 Win XP/Vista / 7 Step 1 Before installing the utility software, make sure that no other utility software is installed on your model. Step 2 Insert the CD into your CD-ROM drive. If any other powerline utility is installed, uninstall it and reboot the computer.
Step 3 Then click "Setup Utility". 59 When the following EZmax Wizard appears, select your computer. IV-1.2 Win XP/Vista / 7 Step 1 Before installing the utility software, make sure that no other utility software is installed on your model. Step 2 Insert the CD into your CD-ROM drive. If any other powerline utility is installed, uninstall it and reboot the computer.