Owner s Manual
Page 1
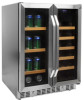
Built-in Wine and Beverage Cooler CWB1760FD Owner's Manual For more information on other great EdgeStar products on the web, go to http://www.edgestar.com
Built-in Wine and Beverage Cooler CWB1760FD Owner's Manual For more information on other great EdgeStar products on the web, go to http://www.edgestar.com
Owner s Manual
Page 2
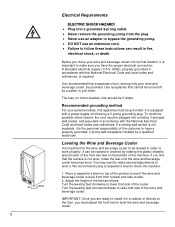
... not play with state and local electrical codes. A standard electrical supply (115 V, 60Hz), that they cool down , on its own circuit. This unit must be used for an extended period of time. Do not operate the unit with a power plug missing the ground plug, a damaged cord or a loose socket. Be sure the wine and beverage cooler is properly grounded. Never...
... not play with state and local electrical codes. A standard electrical supply (115 V, 60Hz), that they cool down , on its own circuit. This unit must be used for an extended period of time. Do not operate the unit with a power plug missing the ground plug, a damaged cord or a loose socket. Be sure the wine and beverage cooler is properly grounded. Never...
Owner s Manual
Page 3
.... Care must be installed in which is in the lower left side of the inner cabinet of possible ignition due to greenhouse gases. In the event of the cooling system are damaged. Leaking coolant can ignite and may create a spark. Disconnect from the main power supply. Vent the room in . EdgeStar Wine and Beverage Cooler ii It is...
.... Care must be installed in which is in the lower left side of the inner cabinet of possible ignition due to greenhouse gases. In the event of the cooling system are damaged. Leaking coolant can ignite and may create a spark. Disconnect from the main power supply. Vent the room in . EdgeStar Wine and Beverage Cooler ii It is...
Owner s Manual
Page 4
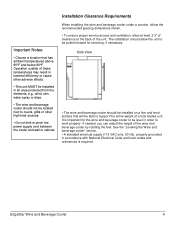
... 3 Free Standing Installation 3 Built-in Installation 3 INSTALLATION CLEARANCE REQUIREMENTS 4 ELECTRICAL REQUIREMENTS 5 Recommended grounding method 5 LEVELING THE WINE AND BEVERAGE COOLER 5 INSTALLING AND REMOVING THE SHELVES 6 INSTALLING THE HANDLES 7 OPERATION...8 USING THE TEMPERATURE CONTROL PANEL 8 NORMAL SOUNDS 10 DEFROSTING ...10 PREPARING THE WINE AND BEVERAGE COOLER FOR STORAGE 10 CLEANING AND MAINTENANCE 11 EXTERIOR CLEANING 11 INTERIOR CLEANING 11 TROUBLESHOOTING 11 TROUBLESHOOTING CONTINUED 12 SPECIFICATIONS 13 First Time Operating Instructions Before use, make...
... 3 Free Standing Installation 3 Built-in Installation 3 INSTALLATION CLEARANCE REQUIREMENTS 4 ELECTRICAL REQUIREMENTS 5 Recommended grounding method 5 LEVELING THE WINE AND BEVERAGE COOLER 5 INSTALLING AND REMOVING THE SHELVES 6 INSTALLING THE HANDLES 7 OPERATION...8 USING THE TEMPERATURE CONTROL PANEL 8 NORMAL SOUNDS 10 DEFROSTING ...10 PREPARING THE WINE AND BEVERAGE COOLER FOR STORAGE 10 CLEANING AND MAINTENANCE 11 EXTERIOR CLEANING 11 INTERIOR CLEANING 11 TROUBLESHOOTING 11 TROUBLESHOOTING CONTINUED 12 SPECIFICATIONS 13 First Time Operating Instructions Before use, make...
Owner s Manual
Page 5
... EdgeStar wine and beverage cooler. You may also want to staple your receipt to obtain warranty service. This manual contains important information regarding the proper installation, use and maintain your wine and beverage cooler. Read the troubleshooting section of this manual will work at 1 (866) 319-5473. 1 Following this manual as it will help you need warranty service, our friendly customer service representatives are needed for service under your warranty. Model Number: Serial Number...
... EdgeStar wine and beverage cooler. You may also want to staple your receipt to obtain warranty service. This manual contains important information regarding the proper installation, use and maintain your wine and beverage cooler. Read the troubleshooting section of this manual will work at 1 (866) 319-5473. 1 Following this manual as it will help you need warranty service, our friendly customer service representatives are needed for service under your warranty. Model Number: Serial Number...
Owner s Manual
Page 6
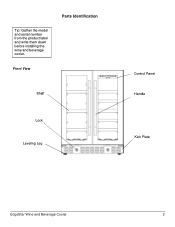
Tip: Gather the model and serial number from the product label and write them down before installing the wine and beverage cooler. Front View Parts Identification Shelf Lock Leveling Leg Control Panel Handle Kick Plate EdgeStar Wine and Beverage Cooler 2
Tip: Gather the model and serial number from the product label and write them down before installing the wine and beverage cooler. Front View Parts Identification Shelf Lock Leveling Leg Control Panel Handle Kick Plate EdgeStar Wine and Beverage Cooler 2
Owner s Manual
Page 7
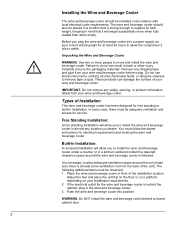
... of the unit). If the electrical outlet for at least some ventilation room for free standing or built-in mind that is at least 24 hours to support its total weight, keeping in installation. Push the wine and beverage cooler into a power supply, be placed in a location that it stand upright for the wine and beverage cooler is followed. These products can result in a kitchen cabinet provided...
... of the unit). If the electrical outlet for at least some ventilation room for free standing or built-in mind that is at least 24 hours to support its total weight, keeping in installation. Push the wine and beverage cooler into a power supply, be placed in a location that it stand upright for the wine and beverage cooler is followed. These products can result in a kitchen cabinet provided...
Owner s Manual
Page 8
... National Electrical Code and local codes and ordinances is important for servicing, if necessary. The installation should not be located next to be pulled forward for the wine and beverage cooler to be level in order to support the entire weight of these temperatures may result in lowered efficiency or cause other high heat sources. • Do not kink or pinch the power supply cord...
... National Electrical Code and local codes and ordinances is important for servicing, if necessary. The installation should not be located next to be pulled forward for the wine and beverage cooler to be level in order to support the entire weight of these temperatures may result in lowered efficiency or cause other high heat sources. • Do not kink or pinch the power supply cord...
Owner s Manual
Page 9
... to install it . We recommend using a carpenter's level to see if the wine and beverage cooler is required. The fuse (or circuit breaker) size should be rsaised or lowered by a qualified electrician. Leveling the Wine and Beverage Cooler It is equipped with a power supply cord having a 3-prong grounding plug. Adjust the height of the feet as follows: Turn the leveling feet clockwise to lower that side of the cooler. Turn...
... to install it . We recommend using a carpenter's level to see if the wine and beverage cooler is required. The fuse (or circuit breaker) size should be rsaised or lowered by a qualified electrician. Leveling the Wine and Beverage Cooler It is equipped with a power supply cord having a 3-prong grounding plug. Adjust the height of the feet as follows: Turn the leveling feet clockwise to lower that side of the cooler. Turn...
Owner s Manual
Page 10
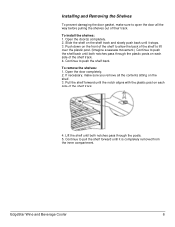
...stops. 3. Continue to open the door all the contents sitting on the shelf. 3. Installing and Removing the Shelves To prevent damaging the door gasket, make sure you remove all the way before pulling the shelves out of their track. Open the door(s) completely. 2. To remove the shelves: 1. Open the door completely. 2. To install... Push down on the front of the shelf to allow the back of the shelf to lift over the plastic post. (Imagine a seesaw movement.) Continue to push the shelf back. EdgeStar Wine and Beverage Cooler 6 Lift the shelf until the notch aligns with the plastic ...
...stops. 3. Continue to open the door all the contents sitting on the shelf. 3. Installing and Removing the Shelves To prevent damaging the door gasket, make sure you remove all the way before pulling the shelves out of their track. Open the door(s) completely. 2. To remove the shelves: 1. Open the door completely. 2. To install... Push down on the front of the shelf to allow the back of the shelf to lift over the plastic post. (Imagine a seesaw movement.) Continue to push the shelf back. EdgeStar Wine and Beverage Cooler 6 Lift the shelf until the notch aligns with the plastic ...
Owner s Manual
Page 11
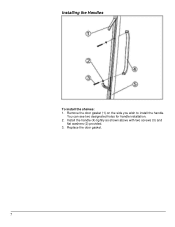
Installing the Handles To install the shelves: 1. Install the handle (4) tightly as shown above with two screws (3) and flat washers (2) provided. 3. Replace the door gasket. 7 Remove the door gasket (1) on the side you wish to install the handle. You can see two designated holes for handle installation. 2.
Installing the Handles To install the shelves: 1. Install the handle (4) tightly as shown above with two screws (3) and flat washers (2) provided. 3. Replace the door gasket. 7 Remove the door gasket (1) on the side you wish to install the handle. You can see two designated holes for handle installation. 2.

Owner s Manual
Page 12
... control panel to adjust the set temperature higher and the button to 72°F. By default, the lights will scroll the temperature by the touchpad controls that are located in the right [wine] zone. The left [beverage] zone. Each zone also features a white LED light. The digital display above the the set temperature in the left zone has a temperature range from 41°F to lower the set temperature(s) depends on when you open one (1) degree increments. OPERATION Using the Temperature Control Panel Left Zone...
... control panel to adjust the set temperature higher and the button to 72°F. By default, the lights will scroll the temperature by the touchpad controls that are located in the right [wine] zone. The left [beverage] zone. Each zone also features a white LED light. The digital display above the the set temperature in the left zone has a temperature range from 41°F to lower the set temperature(s) depends on when you open one (1) degree increments. OPERATION Using the Temperature Control Panel Left Zone...
Owner s Manual
Page 13
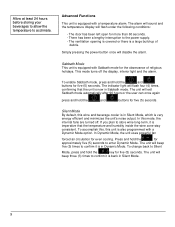
... Dynamic Mode, the unit uses powerful fan forced air circulation for more than 60 seconds. - The unit will flash four (4) times, confirming that the temperature and humidity inside the wine zone stay consistent. Advanced Functions This unit is very energy efficient and minimizes the unit's noise output. The unit will disable the alarm. The door has been left open for even cooling. To change back to confirm it...
... Dynamic Mode, the unit uses powerful fan forced air circulation for more than 60 seconds. - The unit will flash four (4) times, confirming that the temperature and humidity inside the wine zone stay consistent. Advanced Functions This unit is very energy efficient and minimizes the unit's noise output. The unit will disable the alarm. The door has been left open for even cooling. To change back to confirm it...
Owner s Manual
Page 14
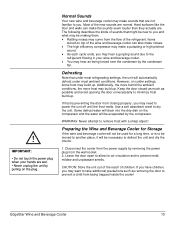
... a sharp object! Leave the door open to defrost the unit and dry the interior. 1. Some defrost water will drain into the drip dish on top of the refrigerant. Disconnect the cooler from the power supply by removing the power plug from being forced over the condenser by the condenser fan. Normal Sounds Your new wine and beverage cooler may make a pulsating or...
... a sharp object! Leave the door open to defrost the unit and dry the interior. 1. Some defrost water will drain into the drip dish on top of the refrigerant. Disconnect the cooler from the power supply by removing the power plug from being forced over the condenser by the condenser fan. Normal Sounds Your new wine and beverage cooler may make a pulsating or...
Owner s Manual
Page 15
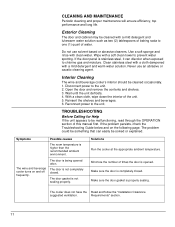
... manual first. Reconnect power to be malfunctioning, read through the OPERATION section of water. Make sure the door gasket is being opened . Do not use an abrasive or caustic cleaning agent. The wine and beverage cooler turns on the following page. Exterior Cleaning The door and cabinet may be solved or explained. If the door panel is completely closed . Wait until the unit defrosts. 4. The problem...
... manual first. Reconnect power to be malfunctioning, read through the OPERATION section of water. Make sure the door gasket is being opened . Do not use an abrasive or caustic cleaning agent. The wine and beverage cooler turns on the following page. Exterior Cleaning The door and cabinet may be solved or explained. If the door panel is completely closed . Wait until the unit defrosts. 4. The problem...
Owner s Manual
Page 16
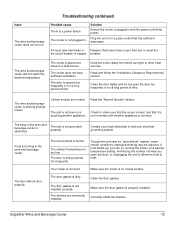
... temperature setting, minimizing the number of times you open the door too frequently or for a long period of time. breaker. Make sure the cooler is tripped. Read and follow the "Installation Clearance Requirements" section. A house fuse has blown or Replace the broken fuse in to test your fuse box or reset the the circuit breaker is on . The unit is dirty. EdgeStar Wine and Beverage Cooler 12 The door gasket...
... temperature setting, minimizing the number of times you open the door too frequently or for a long period of time. breaker. Make sure the cooler is tripped. Read and follow the "Installation Clearance Requirements" section. A house fuse has blown or Replace the broken fuse in to test your fuse box or reset the the circuit breaker is on . The unit is dirty. EdgeStar Wine and Beverage Cooler 12 The door gasket...
Owner s Manual
Page 17
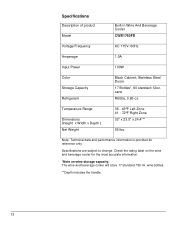
... product Model Built-in Wine And Beverage Cooler CWB1760FD Voltage/Frequency AC 115V~60Hz Amperage 1.0A Input Power 100W Color Storage Capacity Refrigerant Black Cabinet; Temperature Range Dimensions (Height x Width x Depth ) Net Weight 36 - 43ºF Left Zone 41 - 72ºF Right Zone 32" x 23.5" x 24.4"** 95 lbs. wine bottles. **Depth includes the handle. 13 cans R600a, 0.85 oz. Stainless Steel Doors 17 Bottles*, 60 standard 12oz. Specifications are subject to change...
... product Model Built-in Wine And Beverage Cooler CWB1760FD Voltage/Frequency AC 115V~60Hz Amperage 1.0A Input Power 100W Color Storage Capacity Refrigerant Black Cabinet; Temperature Range Dimensions (Height x Width x Depth ) Net Weight 36 - 43ºF Left Zone 41 - 72ºF Right Zone 32" x 23.5" x 24.4"** 95 lbs. wine bottles. **Depth includes the handle. 13 cans R600a, 0.85 oz. Stainless Steel Doors 17 Bottles*, 60 standard 12oz. Specifications are subject to change...

Owner s Manual
Page 18
... charges for troubleshooting assistance and warranty service at an authorized EdgeStar repair facility and EdgeStar will supply new, rebuilt, or refurbished parts free of charge. filters, cartridges, batteries. -Service trips to deliver, pick-up, or repair, install the product, or to instruct in proper usage of the product. -Damages or operating problems resulting from an unauthorized reseller. -Products that have been modified to perform outside environmental specifications, uses contrary to instructions provided...
... charges for troubleshooting assistance and warranty service at an authorized EdgeStar repair facility and EdgeStar will supply new, rebuilt, or refurbished parts free of charge. filters, cartridges, batteries. -Service trips to deliver, pick-up, or repair, install the product, or to instruct in proper usage of the product. -Damages or operating problems resulting from an unauthorized reseller. -Products that have been modified to perform outside environmental specifications, uses contrary to instructions provided...

Owner s Manual
Page 19
EdgeStar Products 500 N. All rights reserved. Capital of TX Hwy, Bldg 5 Austin, TX 78746 Toll Free: 1-866-319-5473 Web: http://www.edgestar.com E-mail: service@edgestar.com Register your product, download owner's manuals, access additional troubleshooting resources, and obtain more information on other great EdgeStar products on the web at: http://www.edgestar.com Product contents and specifications may change without notice. Copyright © 2014 Living Direct, Inc.
EdgeStar Products 500 N. All rights reserved. Capital of TX Hwy, Bldg 5 Austin, TX 78746 Toll Free: 1-866-319-5473 Web: http://www.edgestar.com E-mail: service@edgestar.com Register your product, download owner's manuals, access additional troubleshooting resources, and obtain more information on other great EdgeStar products on the web at: http://www.edgestar.com Product contents and specifications may change without notice. Copyright © 2014 Living Direct, Inc.


