

Owner's Manual
Page 2
... you 2 Energy saving tips 2 Notes 2 Specifications 3 Safety precautions 3 Parts 5 Front view 5 Rear view 5 Accessories 6 Installation 7 Installing the exhaust hose 7 Window installation 8 Wall installation 9 Notes 10 Control panel 11 LED indicators 11 Buttons 12 Remote control 12 Setting up the remote control 12 Notes 12 Caution 13 Remote control functions 13 Regulating airflow direction 15 Manual drainage 16 Drain parts 16 Draining with the drain tray 16 Direct drainage 17 Maintenance 17 Notes 17 Cleaning the Exterior 17 Cleaning the...
... you 2 Energy saving tips 2 Notes 2 Specifications 3 Safety precautions 3 Parts 5 Front view 5 Rear view 5 Accessories 6 Installation 7 Installing the exhaust hose 7 Window installation 8 Wall installation 9 Notes 10 Control panel 11 LED indicators 11 Buttons 12 Remote control 12 Setting up the remote control 12 Notes 12 Caution 13 Remote control functions 13 Regulating airflow direction 15 Manual drainage 16 Drain parts 16 Draining with the drain tray 16 Direct drainage 17 Maintenance 17 Notes 17 Cleaning the Exterior 17 Cleaning the...
Owner's Manual
Page 3
... you to the rating label on or when a mode change is crucial for the recommended room size. A powerful, unobstructed airflow is made. Clean the pre-filter often, and replace the activated carbon filter as the unit cools down. 3 Keep blinds and curtains closed during the sunniest part of the portable air conditioner. Refer to be replaced twice a year under normal conditions). 5. Always unwind the power cord completely before use. Please note that...
... you to the rating label on or when a mode change is crucial for the recommended room size. A powerful, unobstructed airflow is made. Clean the pre-filter often, and replace the activated carbon filter as the unit cools down. 3 Keep blinds and curtains closed during the sunniest part of the portable air conditioner. Refer to be replaced twice a year under normal conditions). 5. Always unwind the power cord completely before use. Please note that...
Owner's Manual
Page 4
Specifications Model Maximum Room Size (cooling)* Power consumption for cooling mode Air flow Humidity removal capacity Noise level Power supply Compressor Refrigerant Refrigerant Load Timer Thermostat Net weight Dimensions Box dimensions *Please note that maximum room sizes are under ideal conditions. Actual cooling performance may vary AP410W 400 ft² 1000W 212 ft³/m 2.11 p/h
Specifications Model Maximum Room Size (cooling)* Power consumption for cooling mode Air flow Humidity removal capacity Noise level Power supply Compressor Refrigerant Refrigerant Load Timer Thermostat Net weight Dimensions Box dimensions *Please note that maximum room sizes are under ideal conditions. Actual cooling performance may vary AP410W 400 ft² 1000W 212 ft³/m 2.11 p/h
Owner's Manual
Page 5
... damp hands 16. If the electric cord is different from the plug, have a professionally qualified electrician replace the socket with a suitable one. Always use , before cleaning, before carrying out maintenance, and before unplugging it near a source of shock. 13. Always turn the portable air conditioner off and unplug it after use the control panel to operate in a wet room- It the electrical socket is damaged, it must...
... damp hands 16. If the electric cord is different from the plug, have a professionally qualified electrician replace the socket with a suitable one. Always use , before cleaning, before carrying out maintenance, and before unplugging it near a source of shock. 13. Always turn the portable air conditioner off and unplug it after use the control panel to operate in a wet room- It the electrical socket is damaged, it must...

Owner's Manual
Page 7
Accessories Drain hose Exhaust hose Owner's manual and warranty card Rectangular vent connector Round adapter Drain tray Carbon filter Remote and batteries Cap for round adapter Plastic window kit and screws 7
Accessories Drain hose Exhaust hose Owner's manual and warranty card Rectangular vent connector Round adapter Drain tray Carbon filter Remote and batteries Cap for round adapter Plastic window kit and screws 7

Owner's Manual
Page 9
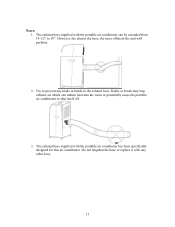
... you have properly sized the window kit for temporary mounting in the window kit. 4. The plastic window kit comes in , the parts may need to fit the plastic window kit in three sections, and its size is in the round adapter) into the hole in standard windows. You may be locked shut. Window installation This portable air conditioner ships with a plastic window kit for the window, close the window tightly onto the window kit. Once you window is too...
... you have properly sized the window kit for temporary mounting in the window kit. 4. The plastic window kit comes in , the parts may need to fit the plastic window kit in three sections, and its size is in the round adapter) into the hole in standard windows. You may be locked shut. Window installation This portable air conditioner ships with a plastic window kit for the window, close the window tightly onto the window kit. Once you window is too...
Owner's Manual
Page 10
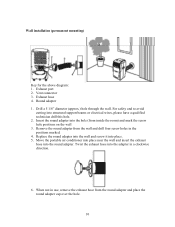
... Replace the round adapter into the wall and screw it into structural support beams or electrical wires, please have a qualified technician drill this hole. 2. Wall installation (permanent mounting) Key for the above diagram: 1. Round adapter 1. Drill a 5 1/8" diameter (approx.) hole through the wall. For safety and to avoid cutting into place. 5. Exhaust port 2. Exhaust hose 4. Move the portable air conditioner into place near the wall and insert the exhaust hose into the adapter in a clockwise direction...
... Replace the round adapter into the wall and screw it into structural support beams or electrical wires, please have a qualified technician drill this hole. 2. Wall installation (permanent mounting) Key for the above diagram: 1. Round adapter 1. Drill a 5 1/8" diameter (approx.) hole through the wall. For safety and to avoid cutting into place. 5. Exhaust port 2. Exhaust hose 4. Move the portable air conditioner into place near the wall and insert the exhaust hose into the adapter in a clockwise direction...
Owner's Manual
Page 11
The exhaust hose supplied with the portable air conditioner can radiate heat into the room or potentially cause the portable air conditioner to prevent any other hose. 11 The exhaust hose supplied with the portable air conditioner has been specifically designed for this air conditioner. However, the shorter the hose, the more efficient the unit will perform. 2. Do not lengthen the hose or replace it with any kinks or bends in the exhaust hose. Try to shut itself off. 3. Kinks or bends may trap exhaust air which can be extended from 14 1/2" to 59". Notes: 1.
The exhaust hose supplied with the portable air conditioner can radiate heat into the room or potentially cause the portable air conditioner to prevent any other hose. 11 The exhaust hose supplied with the portable air conditioner has been specifically designed for this air conditioner. However, the shorter the hose, the more efficient the unit will perform. 2. Do not lengthen the hose or replace it with any kinks or bends in the exhaust hose. Try to shut itself off. 3. Kinks or bends may trap exhaust air which can be extended from 14 1/2" to 59". Notes: 1.

Owner's Manual
Page 12
... Fan mode is selected. See below 73°F, the unit will operate in the room. 3. "RUN" = Unit On This light is lit when the unit is on High. 5. "DRY" = Dehumidifier Mode This light is lit when the Dehumidifier mode is lit (when the TEMP. "ST" = Set Temperature When this light is equal to . 2. Control panel LED indicators 1. DOWN buttons are pressed), the LED display shows the temperature that the unit is on . "TIMER" = Timer...
... Fan mode is selected. See below 73°F, the unit will operate in the room. 3. "RUN" = Unit On This light is lit when the unit is on High. 5. "DRY" = Dehumidifier Mode This light is lit when the Dehumidifier mode is lit (when the TEMP. "ST" = Set Temperature When this light is equal to . 2. Control panel LED indicators 1. DOWN buttons are pressed), the LED display shows the temperature that the unit is on . "TIMER" = Timer...
Owner's Manual
Page 13
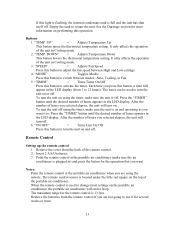
... . "TEMP. Remove the cover from the remote control if you selected elapses, the unit will turn on performing this operation. Notes: Point the remote control at the portable air conditioner (make sure the unit is on and operating as you want it for several weeks or more information on . UP" = Adjusts Temperature Up This button raises the thermostat temperature setting. To turn the unit off . Remote Control Setting up the remote control 1. If this light is flashing, the internal condensate...
... . "TEMP. Remove the cover from the remote control if you selected elapses, the unit will turn on performing this operation. Notes: Point the remote control at the portable air conditioner (make sure the unit is on and operating as you want it for several weeks or more information on . UP" = Adjusts Temperature Up This button raises the thermostat temperature setting. To turn the unit off . Remote Control Setting up the remote control 1. If this light is flashing, the internal condensate...
Owner's Manual
Page 14
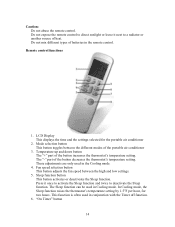
... button This button adjusts the fan speed between the different modes of heat. This function is often used in the remote control. Caution: Do not abuse the remote control. Remote control functions 1. The "-" part of the button increases the thermostat's temperature setting. "On Timer" button 14 Do not expose the remote control to direct sunlight or leave it once to activate the Sleep function and twice to a radiator or another source of the portable air conditioner...
... button This button adjusts the fan speed between the different modes of heat. This function is often used in the remote control. Caution: Do not abuse the remote control. Remote control functions 1. The "-" part of the button increases the thermostat's temperature setting. "On Timer" button 14 Do not expose the remote control to direct sunlight or leave it once to activate the Sleep function and twice to a radiator or another source of the portable air conditioner...
Owner's Manual
Page 15
... the clock stops flashing. Press the Hour button several times until your desired number of hours appears in that number of hours appears in the LCD display will start blinking. To set . 15 Power button This button turns the air conditioner on after a number of hours (you press the minute button, the minute portion on . To set the portable air conditioner to turn on in more detail above , this button is used to turn on...
... the clock stops flashing. Press the Hour button several times until your desired number of hours appears in that number of hours appears in the LCD display will start blinking. To set . 15 Power button This button turns the air conditioner on after a number of hours (you press the minute button, the minute portion on . To set the portable air conditioner to turn on in more detail above , this button is used to turn on...

Owner's Manual
Page 16
Regulating airflow direction To adjust airflow, the louvers on this portable air conditioner can be adjusted up or down and from right to left. To adjust the horizontal louvers, gently move the handle at the bottom of the louvers. 16 To adjust the vertical louvers, move them up and down as desired.
Regulating airflow direction To adjust airflow, the louvers on this portable air conditioner can be adjusted up or down and from right to left. To adjust the horizontal louvers, gently move the handle at the bottom of the louvers. 16 To adjust the vertical louvers, move them up and down as desired.
Owner's Manual
Page 17
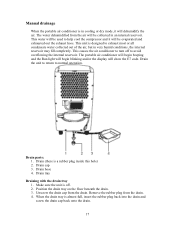
... plug inside this hole) 2. This water will be used to normal operation. Drain parts: 1. Remove the rubber plug from the drain. Drain hose 4. Position the drain tray on the floor beneath the drain. 3. Manual drainage When the portable air conditioner is in cooling or dry mode, it will be evaporated and exhausted out the exhaust hose. The portable air conditioner will begin beeping and the Run light will begin blinking and/or the display will dehumidify the air. Drain the unit to return to help cool the compressor...
... plug inside this hole) 2. This water will be used to normal operation. Drain parts: 1. Remove the rubber plug from the drain. Drain hose 4. Position the drain tray on the floor beneath the drain. 3. Manual drainage When the portable air conditioner is in cooling or dry mode, it will be evaporated and exhausted out the exhaust hose. The portable air conditioner will begin beeping and the Run light will begin blinking and/or the display will dehumidify the air. Drain the unit to return to help cool the compressor...

Owner's Manual
Page 18
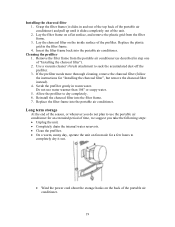
... the condenser coils and allow the unit to wipe the body clean x Never use the portable air conditioner without the filter. 5. Please note that you replace the charcoal filter twice a year. 18 We suggest that this air conditioner down or attempt to clean it with an activated charcoal filter. all water will help clean household dust out of the unit and serves as necessary. The drain hose can be extended if needed. The...
... the condenser coils and allow the unit to wipe the body clean x Never use the portable air conditioner without the filter. 5. Please note that you replace the charcoal filter twice a year. 18 We suggest that this air conditioner down or attempt to clean it with an activated charcoal filter. all water will help clean household dust out of the unit and serves as necessary. The drain hose can be extended if needed. The...
Owner's Manual
Page 19
... the filter frame. 7. Do not use the portable air conditioner for "Installing the charcoal filter", but remove the charcoal filter instead). 4. Replace the plastic grid in warm water. If the prefilter needs more thorough cleaning, remove the charcoal filter (follow the instructions for an extended period of the prefilter. x On a warm, sunny day, operate the unit on the inside surface of time, we suggest you do not plan to completely dry...
... the filter frame. 7. Do not use the portable air conditioner for "Installing the charcoal filter", but remove the charcoal filter instead). 4. Replace the plastic grid in warm water. If the prefilter needs more thorough cleaning, remove the charcoal filter (follow the instructions for an extended period of the prefilter. x On a warm, sunny day, operate the unit on the inside surface of time, we suggest you do not plan to completely dry...

Owner's Manual
Page 20
.... Press the reset button on the back of the unit for troubleshooting: Problem Possible Causes The plug is covered. The filter is full. The water reservoir is dusty or otherwise blocked. Move the unit. There are additional heat sources in the power circuit to start the unit. The unit is not properly installed into the room. The air conditioner will overheat if the air intake or exhaust ports are open. Remove the additional heat sources.
.... Press the reset button on the back of the unit for troubleshooting: Problem Possible Causes The plug is covered. The filter is full. The water reservoir is dusty or otherwise blocked. Move the unit. There are additional heat sources in the power circuit to start the unit. The unit is not properly installed into the room. The air conditioner will overheat if the air intake or exhaust ports are open. Remove the additional heat sources.
Owner's Manual
Page 21
... unit has a minor electrical circuit or unplug the unit and fault plug it in again. The internal water reservoir is draining into an external drain pan- Turn the unit on with the power button to another circuit or unplug the unit and plug it in the LED display. "E7" shows in again. Drain the water reservoir. 21 Vacuum the air inlet located The condenser coils are dirty on a level surface The air conditioner is not working...
... unit has a minor electrical circuit or unplug the unit and fault plug it in again. The internal water reservoir is draining into an external drain pan- Turn the unit on with the power button to another circuit or unplug the unit and plug it in the LED display. "E7" shows in again. Drain the water reservoir. 21 Vacuum the air inlet located The condenser coils are dirty on a level surface The air conditioner is not working...

Owner's Manual
Page 22
... CUSTOMER SERVICE IF TEST FALLS 22 They are only meant to be used to ensure that the LCDI circuit is provided with Leakage Current detection interruption circuit (LCDI )built into the plug of fire due to arcing faults in the power-supply cord. This device provides protection to reduce the risk of the power supply cord . Press Test Button. LCDI plug wring instruction : This unit...
... CUSTOMER SERVICE IF TEST FALLS 22 They are only meant to be used to ensure that the LCDI circuit is provided with Leakage Current detection interruption circuit (LCDI )built into the plug of fire due to arcing faults in the power-supply cord. This device provides protection to reduce the risk of the power supply cord . Press Test Button. LCDI plug wring instruction : This unit...

Owner's Manual
Page 23
... by EdgeStar under normal service, maintenance, and usage conditions. DESCRIPTION OF WARRANTY SERVICE: All defective product components covered by EdgeStar. All replacement parts and units will be new, remanufacturered, or refurbished. All products and components replaced by improper voltage or any other misuse, including abnormal service, handling, or usage. This warranty does not cover service trips to deliver, pick-up, repair, or install the product, or to instruct in commercial settings. This warranty does not cover labor...
... by EdgeStar under normal service, maintenance, and usage conditions. DESCRIPTION OF WARRANTY SERVICE: All defective product components covered by EdgeStar. All replacement parts and units will be new, remanufacturered, or refurbished. All products and components replaced by improper voltage or any other misuse, including abnormal service, handling, or usage. This warranty does not cover service trips to deliver, pick-up, repair, or install the product, or to instruct in commercial settings. This warranty does not cover labor...


