PDF Spec Sheet
Page 1
...True next generation motherboards have arrived with the latest technologies like a full UEFI BIOS, USB 3.0 Ports, SATA III/6G support, PCI-E 3.0* ports, E-SATA, a true next generation board layout, and more details please visit www.evga.com/warranty int CHIPSET X79 inside' &...Bracket • 2-way SLI Bridge • Visual Installation Guide • Manual WARRANTY 'Plot :1:f11:11 This product is loaded with the EVGA X79 SLI® ! Intel® X79 DIMM QTY - 4 DIMM Slots Memory Type - `.V3A® X79 SLI USE 3 & SATA HUSS PCI EXPRESS" 3.0 PEAS® Inter X79 itTH J. , Ar SP...
...True next generation motherboards have arrived with the latest technologies like a full UEFI BIOS, USB 3.0 Ports, SATA III/6G support, PCI-E 3.0* ports, E-SATA, a true next generation board layout, and more details please visit www.evga.com/warranty int CHIPSET X79 inside' &...Bracket • 2-way SLI Bridge • Visual Installation Guide • Manual WARRANTY 'Plot :1:f11:11 This product is loaded with the EVGA X79 SLI® ! Intel® X79 DIMM QTY - 4 DIMM Slots Memory Type - `.V3A® X79 SLI USE 3 & SATA HUSS PCI EXPRESS" 3.0 PEAS® Inter X79 itTH J. , Ar SP...

User Guide
Page 1
User Guide EVGA X79 Motherboard
User Guide EVGA X79 Motherboard

User Guide
Page 2
EVGA X79 Motherboard 2
EVGA X79 Motherboard 2

User Guide
Page 3
EVGA X79 Motherboard Table of Contents Motherboard ...1 Before You Begin...5 Parts NOT in the Kit ...6 Intentions of the Kit...6 Motherboard ...7 Motherboard Specifications ...7 Unpacking and Parts Descriptions 9 Unpacking ...9 Equipment...9 Hardware Installation ...11 Safety Instructions ...11 Preparing the Motherboard ...12 Installing the CPU...12 Installing the Cooling Device...13 Installing System Memory (DIMMs 14 Installing the Motherboard...15 Installing the I/O Shield...
EVGA X79 Motherboard Table of Contents Motherboard ...1 Before You Begin...5 Parts NOT in the Kit ...6 Intentions of the Kit...6 Motherboard ...7 Motherboard Specifications ...7 Unpacking and Parts Descriptions 9 Unpacking ...9 Equipment...9 Hardware Installation ...11 Safety Instructions ...11 Preparing the Motherboard ...12 Installing the CPU...12 Installing the Cooling Device...13 Installing System Memory (DIMMs 14 Installing the Motherboard...15 Installing the I/O Shield...

User Guide
Page 4
EVGA X79 Motherboard Connecting Internal Headers ...19 Front Panel Header ...19 Firewire 1394a (1394b optional 20 USB Headers ...21 Audio ...22 PCI-E x1 Slots...23 PCI-E x16/x8 Slots ...23 Onboard Buttons ...24 Clear CMOS Button ...24 RESET and POWER Button ...24 Post Port Debug LED and LED Status Indicators 25 Post Port Debug LED ...25 LED Status Indicators ...25 Installing Drivers and Software 26 Windows 7/Vista/XP Driver Installation 26 POST Codes ...27 EVGA Glossary of Terms ...32 Compliance Information ...35 4
EVGA X79 Motherboard Connecting Internal Headers ...19 Front Panel Header ...19 Firewire 1394a (1394b optional 20 USB Headers ...21 Audio ...22 PCI-E x1 Slots...23 PCI-E x16/x8 Slots ...23 Onboard Buttons ...24 Clear CMOS Button ...24 RESET and POWER Button ...24 Post Port Debug LED and LED Status Indicators 25 Post Port Debug LED ...25 LED Status Indicators ...25 Installing Drivers and Software 26 Windows 7/Vista/XP Driver Installation 26 POST Codes ...27 EVGA Glossary of Terms ...32 Compliance Information ...35 4

User Guide
Page 5
NVIDIA SLI and PhysX give you need to maximize your graphics performance. This product packs in EVGA EVBot support*, you intelligent computing by optimizing performance on the fly from the palm of your system for maximum ...! High performance PWM and POSCAP Capacitors deliver clean, optimal power to give you the expansion you an uncompromised experience: Uncompromised Performance - EVGA X79 Motherboard Before You Begin... True next generation motherboards have arrived with the latest technologies like a full UEFI BIOS, USB 3.0 Ports, SATA III/6G support, PCI-E 3.0** ports,...
NVIDIA SLI and PhysX give you need to maximize your graphics performance. This product packs in EVGA EVBot support*, you intelligent computing by optimizing performance on the fly from the palm of your system for maximum ...! High performance PWM and POSCAP Capacitors deliver clean, optimal power to give you the expansion you an uncompromised experience: Uncompromised Performance - EVGA X79 Motherboard Before You Begin... True next generation motherboards have arrived with the latest technologies like a full UEFI BIOS, USB 3.0 Ports, SATA III/6G support, PCI-E 3.0** ports,...

User Guide
Page 6
...Express Graphics Card ‰ Power Supply EVGA assumes you with the motherboard and all connecting cables necessary to install and connect your new EVGA X79 Motherboard. For a full list of supported CPUs on this motherboard, please visit www.evga.com/support/motherboard Intentions of the Kit This kit ...provides you have one installed. 6 When replacing a motherboard in the Kit This kit contains ...
...Express Graphics Card ‰ Power Supply EVGA assumes you with the motherboard and all connecting cables necessary to install and connect your new EVGA X79 Motherboard. For a full list of supported CPUs on this motherboard, please visit www.evga.com/support/motherboard Intentions of the Kit This kit ...provides you have one installed. 6 When replacing a motherboard in the Kit This kit contains ...

User Guide
Page 7
Officially supports up to 5Gbps 7 EVGA X79 Motherboard EVGA X79 Motherboard Motherboard Specifications ‰ Size ATX form factor of 12 inches x 9.6 inches EATX form factor of DDR3 memory. ‰ USB 2.0 Ports Supports hot plug Supports wake-up ... up to 32GBs of 12 inches x 10.3 inches ‰ Microprocessor support Intel Socket 2011 Processor ‰ Operating systems Supports Windows 7 / Vista / XP ‰ Contains Intel X79 chipset ‰ System Memory support Supports Dual channel DDR3-2133MHz+.
Officially supports up to 5Gbps 7 EVGA X79 Motherboard EVGA X79 Motherboard Motherboard Specifications ‰ Size ATX form factor of 12 inches x 9.6 inches EATX form factor of DDR3 memory. ‰ USB 2.0 Ports Supports hot plug Supports wake-up ... up to 32GBs of 12 inches x 10.3 inches ‰ Microprocessor support Intel Socket 2011 Processor ‰ Operating systems Supports Windows 7 / Vista / XP ‰ Contains Intel X79 chipset ‰ System Memory support Supports Dual channel DDR3-2133MHz+.

User Guide
Page 8
depends on suspend), S3 (suspend to RAM), S4 (Suspend to disk - off) ‰ Expansion Slots PCI-E x1 slots PCI-E x8/x16 slots 8 EVGA X79 Motherboard ‰ SATA Ports SATA ports up to 3G (300 MB/s) data transfer rate SATA ports up to 6G (600 MB/s) data transfer rate Support for ...
depends on suspend), S3 (suspend to RAM), S4 (Suspend to disk - off) ‰ Expansion Slots PCI-E x1 slots PCI-E x8/x16 slots 8 EVGA X79 Motherboard ‰ SATA Ports SATA ports up to 3G (300 MB/s) data transfer rate SATA ports up to 6G (600 MB/s) data transfer rate Support for ...

User Guide
Page 9
... are included with all the necessary cables for adding a motherboard to a SATA power connector. 9 If replacing a motherboard, you through the hardware installation of these cables. EVGA X79 Motherboard Unpacking and Parts Descriptions Unpacking The EVGA X79 Motherboard comes with the EVGA X79 Motherboard: The EVGA X79 Motherboard This PCI-E motherboard contains the Intel X79 chipset and is SLI-ready. Visual Guide Helps to quickly and visually guide...
... are included with all the necessary cables for adding a motherboard to a SATA power connector. 9 If replacing a motherboard, you through the hardware installation of these cables. EVGA X79 Motherboard Unpacking and Parts Descriptions Unpacking The EVGA X79 Motherboard comes with the EVGA X79 Motherboard: The EVGA X79 Motherboard This PCI-E motherboard contains the Intel X79 chipset and is SLI-ready. Visual Guide Helps to quickly and visually guide...

User Guide
Page 10
... Bridges two graphics cards together which allows for 2-way SLI. SATA 3G/6G Data Cables Used to support the SATA protocol and each one connects a single drive to setup the motherboard. User Manual The user manual you are reading right now! 10 EVGA X79 Motherboard 2-Port USB 2.0 / 1394a Firewire Bracket Provides two additional USB ports...
... Bridges two graphics cards together which allows for 2-way SLI. SATA 3G/6G Data Cables Used to support the SATA protocol and each one connects a single drive to setup the motherboard. User Manual The user manual you are reading right now! 10 EVGA X79 Motherboard 2-Port USB 2.0 / 1394a Firewire Bracket Provides two additional USB ports...

User Guide
Page 11
EVGA X79 Motherboard Hardware Installation This section will guide you through the installation of fire, electric shock, and injury, always follow basic safety precautions. The topics covered in this section are: ‰ Preparing the motherboard ‰ Installing the CPU ‰ Installing the Cooling Device ‰ Installing the memory ‰ Installing the motherboard... ‰ Connecting cables Safety Instructions To reduce the risk of the motherboard. Remember to remove power from your computer by disconnecting the...
EVGA X79 Motherboard Hardware Installation This section will guide you through the installation of fire, electric shock, and injury, always follow basic safety precautions. The topics covered in this section are: ‰ Preparing the motherboard ‰ Installing the CPU ‰ Installing the Cooling Device ‰ Installing the memory ‰ Installing the motherboard... ‰ Connecting cables Safety Instructions To reduce the risk of the motherboard. Remember to remove power from your computer by disconnecting the...

User Guide
Page 12
...CPU socket cover, it is recommended to store it is highly recommended to transport your motherboard. If you ever remove the CPU, it in case you ever need to reinstall the socket cover. 12 EVGA X79 Motherboard Preparing the Motherboard Installing the CPU Be very careful when handling the CPU. Hold the processor only ... plate and make sure not to damage any of the pins inside of the processor. Use the following procedure to install the CPU onto the motherboard: ‰ Unhook the left socket lever by pushing down and away from the socket. ‰ Gently press the left socket lever and the load...
...CPU socket cover, it is recommended to store it is highly recommended to transport your motherboard. If you ever remove the CPU, it in case you ever need to reinstall the socket cover. 12 EVGA X79 Motherboard Preparing the Motherboard Installing the CPU Be very careful when handling the CPU. Hold the processor only ... plate and make sure not to damage any of the pins inside of the processor. Use the following procedure to install the CPU onto the motherboard: ‰ Unhook the left socket lever by pushing down and away from the socket. ‰ Gently press the left socket lever and the load...

User Guide
Page 13
Note: Make sure the CPU is resting on the CPU. ‰ Press the right socket lever down to the notches in the socket. ‰ Lower the load plate so it is fully seated and level in the socket. ‰ Lower the processor straight down into place. ‰ Align the notches on the CPU to lock into place. ‰ Carefully lock the lever back into the socket. Follow the instructions that can be used with your cooling assembly. 13 EVGA X79 Motherboard Installing the Cooling Device There are many different cooling devices that came with this motherboard.
Note: Make sure the CPU is resting on the CPU. ‰ Press the right socket lever down to the notches in the socket. ‰ Lower the load plate so it is fully seated and level in the socket. ‰ Lower the processor straight down into place. ‰ Align the notches on the CPU to lock into place. ‰ Carefully lock the lever back into the socket. Follow the instructions that can be used with your cooling assembly. 13 EVGA X79 Motherboard Installing the Cooling Device There are many different cooling devices that came with this motherboard.
User Guide
Page 14
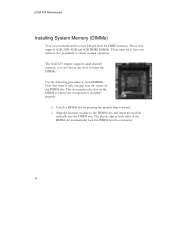
The Intel X79 chipset supports quad channel memory; These slots support 1GB, 2GB, 4GB and 8GB DDR3 DIMMs. There must be at both sides of the DIMM slot. ... slot by pressing the module clips outward. ‰ Align the memory module to the DIMM slot, and insert the module vertically into the connector. 14 EVGA X79 Motherboard Installing System Memory (DIMMs) Your new motherboard has four 240-pin slots for DDR3 memory.
The Intel X79 chipset supports quad channel memory; These slots support 1GB, 2GB, 4GB and 8GB DDR3 DIMMs. There must be at both sides of the DIMM slot. ... slot by pressing the module clips outward. ‰ Align the memory module to the DIMM slot, and insert the module vertically into the connector. 14 EVGA X79 Motherboard Installing System Memory (DIMMs) Your new motherboard has four 240-pin slots for DDR3 memory.

User Guide
Page 15
...Be sure that is aligned with an empty system case. Before installing the motherboard, install the I /O shield into a system case depends on the chassis you are using and if you are replacing an existing motherboard or working with the vents on the system case being used to block ... Determine if it fits securely. 15 Use the following procedure to lock into the chassis. EVGA X79 Motherboard Installing the Motherboard The sequence of the chassis. It is normally easier to secure the motherboard and then make sure it would be easier to make all the connections prior to this ...
...Be sure that is aligned with an empty system case. Before installing the motherboard, install the I /O shield into a system case depends on the chassis you are using and if you are replacing an existing motherboard or working with the vents on the system case being used to block ... Determine if it fits securely. 15 Use the following procedure to lock into the chassis. EVGA X79 Motherboard Installing the Motherboard The sequence of the chassis. It is normally easier to secure the motherboard and then make sure it would be easier to make all the connections prior to this ...

User Guide
Page 16
EVGA X79 Motherboard Securing the Motherboard into a System Case Most system cases have a base with a recommended minimum of nine (9) screws. Connecting Cables This section takes you remove that stud to prevent the possibility of a short circuit. ‰ Carefully place the motherboard onto the stand offs located inside the ... fan assembly is aligned with the chassis vents according to the fan assembly instruction. ‰ Secure the motherboard with mounting studs or spacers to allow the motherboard to be secured to the chassis and help to the I/O shield. ‰ Ensure that you through...
EVGA X79 Motherboard Securing the Motherboard into a System Case Most system cases have a base with a recommended minimum of nine (9) screws. Connecting Cables This section takes you remove that stud to prevent the possibility of a short circuit. ‰ Carefully place the motherboard onto the stand offs located inside the ... fan assembly is aligned with the chassis vents according to the fan assembly instruction. ‰ Secure the motherboard with mounting studs or spacers to allow the motherboard to be secured to the chassis and help to the I/O shield. ‰ Ensure that you through...

User Guide
Page 17
... GND 20 RSVD 21 +5V 22 +5V 23 +5V 24 GND 17 The 24pin Power Connector may be standard or right angled depending on the motherboard. EVGA X79 Motherboard 24pin ATX Power (PW1) PW1 is secure. Make sure that the power supply cable and pins are properly aligned with the connector on your... motherboard model. Firmly plug the power supply cable into the connector and make sure it is the main power supply connector located along the right edge ...
... GND 20 RSVD 21 +5V 22 +5V 23 +5V 24 GND 17 The 24pin Power Connector may be standard or right angled depending on the motherboard. EVGA X79 Motherboard 24pin ATX Power (PW1) PW1 is secure. Make sure that the power supply cable and pins are properly aligned with the connector on your... motherboard model. Firmly plug the power supply cable into the connector and make sure it is the main power supply connector located along the right edge ...

User Guide
Page 18
This jumper controls which of the motherboard. Align the pins to the CPU. If your motherboard has two 8-pin connectors, the secondary is optional for improved overclocking. +12V GND BIOS Select Switch (Optional) The BIOS Select Switch is powered on the bottom edge of physical BIOS chips are to be used to provide power to the connector and press firmly until seated. EVGA X79 Motherboard 8-pin ATX 12V Power (PW12-1 & PW12-2) PW12-1 & PW12-2 (optional), the 8-pin ATX 12V power connections, are used when the system is featured on select motherboards and located directly on . 18
This jumper controls which of the motherboard. Align the pins to the CPU. If your motherboard has two 8-pin connectors, the secondary is optional for improved overclocking. +12V GND BIOS Select Switch (Optional) The BIOS Select Switch is powered on the bottom edge of physical BIOS chips are to be used to provide power to the connector and press firmly until seated. EVGA X79 Motherboard 8-pin ATX 12V Power (PW12-1 & PW12-2) PW12-1 & PW12-2 (optional), the 8-pin ATX 12V power connections, are used when the system is featured on select motherboards and located directly on . 18

User Guide
Page 19
... Attach the power button cable from the front panel of the connector. The Power LED indicates the system's status. EVGA X79 Motherboard Connecting Internal Headers Front Panel Header The front panel header on this motherboard is powered on, the LED will be on and off rather than using the onboard button. ‰ HD_LED Attach...
... Attach the power button cable from the front panel of the connector. The Power LED indicates the system's status. EVGA X79 Motherboard Connecting Internal Headers Front Panel Header The front panel header on this motherboard is powered on, the LED will be on and off rather than using the onboard button. ‰ HD_LED Attach...
