PDF Spec Sheet
Page 1
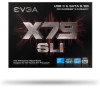
... Slots - 2 BIOS Type - Supported CPUs - RAID 0, 1, 5, 10, JBOD USB 2.0 Ports/Controller - 10 / Intel® X79 PCH USB 3.0 Ports/Controller - 4 / VLI VL800-Q8 . 66611ip..A.132$E770 INTR2 True next generation motherboards have arrived with the latest technologies like a full UEFI BIOS, USB 3.0 Ports, SATA III/6G support, PCI-E 3.0* ports, E-SATA, a true next generation board layout, and more details please visit www.evga.com/warranty int CHIPSET X79 inside' &inside IL E. Uncompromised Performance - EVGA E-LEET Tuning Utility Fan Headers - 7 • 10 USB 2.0 Ports (two rear panel...
... Slots - 2 BIOS Type - Supported CPUs - RAID 0, 1, 5, 10, JBOD USB 2.0 Ports/Controller - 10 / Intel® X79 PCH USB 3.0 Ports/Controller - 4 / VLI VL800-Q8 . 66611ip..A.132$E770 INTR2 True next generation motherboards have arrived with the latest technologies like a full UEFI BIOS, USB 3.0 Ports, SATA III/6G support, PCI-E 3.0* ports, E-SATA, a true next generation board layout, and more details please visit www.evga.com/warranty int CHIPSET X79 inside' &inside IL E. Uncompromised Performance - EVGA E-LEET Tuning Utility Fan Headers - 7 • 10 USB 2.0 Ports (two rear panel...
PDF Spec Sheet
Page 2
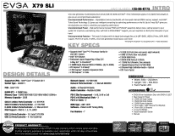
... PWM Clean variable power switching 5eeSe eft) kr) EZ VOLTAGE READ POINTS Easy read dedicated read points D IMM4 9 VCOREI • PU vrn • "zo• 9 PU VPLLI • CPU_VSAI DIMM3 VEIPlI _PBG1' [tIGNDI E-LEET TUNING UTILITY Adjust your overclocking in O.S. CORE i7 inside ,T4- ess DUAL BIOS SUPPORT Use 2 separate profiles! . 4•_ co s ONBOARD CPU TEMP MONITOR Monitor CPU temps quickly & easily CLEAR CMOS, POWER & RESET System essentials at...
... PWM Clean variable power switching 5eeSe eft) kr) EZ VOLTAGE READ POINTS Easy read dedicated read points D IMM4 9 VCOREI • PU vrn • "zo• 9 PU VPLLI • CPU_VSAI DIMM3 VEIPlI _PBG1' [tIGNDI E-LEET TUNING UTILITY Adjust your overclocking in O.S. CORE i7 inside ,T4- ess DUAL BIOS SUPPORT Use 2 separate profiles! . 4•_ co s ONBOARD CPU TEMP MONITOR Monitor CPU temps quickly & easily CLEAR CMOS, POWER & RESET System essentials at...

User Guide
Page 3
EVGA X79 Motherboard Table of Contents Motherboard ...1 Before You Begin...5 Parts NOT in the Kit ...6 Intentions of the Kit...6 Motherboard ...7 Motherboard Specifications ...7 Unpacking and Parts Descriptions 9 Unpacking ...9 Equipment...9 Hardware Installation ...11 Safety Instructions ...11 Preparing the Motherboard ...12 Installing the CPU...12 Installing the Cooling Device...13 Installing System Memory (DIMMs 14 Installing the Motherboard...15 Installing the I/O Shield...15 Securing the Motherboard into a System Case 16 Connecting Cables ...16 24pin ATX Power (PW1) ...17 8pin ATX 12V ...
EVGA X79 Motherboard Table of Contents Motherboard ...1 Before You Begin...5 Parts NOT in the Kit ...6 Intentions of the Kit...6 Motherboard ...7 Motherboard Specifications ...7 Unpacking and Parts Descriptions 9 Unpacking ...9 Equipment...9 Hardware Installation ...11 Safety Instructions ...11 Preparing the Motherboard ...12 Installing the CPU...12 Installing the Cooling Device...13 Installing System Memory (DIMMs 14 Installing the Motherboard...15 Installing the I/O Shield...15 Securing the Motherboard into a System Case 16 Connecting Cables ...16 24pin ATX Power (PW1) ...17 8pin ATX 12V ...

User Guide
Page 4
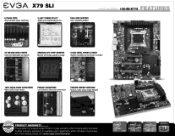
EVGA X79 Motherboard Connecting Internal Headers ...19 Front Panel Header ...19 Firewire 1394a (1394b optional 20 USB Headers ...21 Audio ...22 PCI-E x1 Slots...23 PCI-E x16/x8 Slots ...23 Onboard Buttons ...24 Clear CMOS Button ...24 RESET and POWER Button ...24 Post Port Debug LED and LED Status Indicators 25 Post Port Debug LED ...25 LED Status Indicators ...25 Installing Drivers and Software 26 Windows 7/Vista/XP Driver Installation 26 POST Codes ...27 EVGA Glossary of Terms ...32 Compliance Information ...35 4
EVGA X79 Motherboard Connecting Internal Headers ...19 Front Panel Header ...19 Firewire 1394a (1394b optional 20 USB Headers ...21 Audio ...22 PCI-E x1 Slots...23 PCI-E x16/x8 Slots ...23 Onboard Buttons ...24 Clear CMOS Button ...24 RESET and POWER Button ...24 Post Port Debug LED and LED Status Indicators 25 Post Port Debug LED ...25 LED Status Indicators ...25 Installing Drivers and Software 26 Windows 7/Vista/XP Driver Installation 26 POST Codes ...27 EVGA Glossary of Terms ...32 Compliance Information ...35 4

User Guide
Page 5
... with built in the latest technologies to maximize your system for maximum overclocking. Also, with true quad channel DDR3 memory support, and Intel Turbo Boost Technology 2.0 gives you can overclock on the fly! Uncompromised Power - EVGA X79 Motherboard Before You Begin... True next generation motherboards have arrived with the latest technologies like a full UEFI BIOS, USB 3.0 Ports, SATA III/6G support, PCI-E 3.0** ports, E-SATA, a true next generation board layout, and more! *sold separately **pending PCI Express 3.0 supported CPU 5
... with built in the latest technologies to maximize your system for maximum overclocking. Also, with true quad channel DDR3 memory support, and Intel Turbo Boost Technology 2.0 gives you can overclock on the fly! Uncompromised Power - EVGA X79 Motherboard Before You Begin... True next generation motherboards have arrived with the latest technologies like a full UEFI BIOS, USB 3.0 Ports, SATA III/6G support, PCI-E 3.0** ports, E-SATA, a true next generation board layout, and more! *sold separately **pending PCI Express 3.0 supported CPU 5

User Guide
Page 6
... even though the current storage drive may already have purchased all the necessary parts needed to allow for proper system functionality. However, it does not contain the following items that must be purchased separately to make the motherboard functional. ‰ Intel Socket 2011 Processor ‰ DDR3 System Memory ‰ Socket 2011 CPU Cooling Device ‰ PCI Express Graphics Card ‰ Power Supply EVGA assumes you have one installed. 6
... even though the current storage drive may already have purchased all the necessary parts needed to allow for proper system functionality. However, it does not contain the following items that must be purchased separately to make the motherboard functional. ‰ Intel Socket 2011 Processor ‰ DDR3 System Memory ‰ Socket 2011 CPU Cooling Device ‰ PCI Express Graphics Card ‰ Power Supply EVGA assumes you have one installed. 6

User Guide
Page 7
... support Intel Socket 2011 Processor ‰ Operating systems Supports Windows 7 / Vista / XP ‰ Contains Intel X79 chipset ‰ System Memory support Supports Dual channel DDR3-2133MHz+. EVGA X79 Motherboard EVGA X79 Motherboard Motherboard Specifications ‰ Size ATX form factor of 12 inches x 9.6 inches EATX form factor of DDR3 memory. ‰ USB 2.0 Ports Supports hot plug Supports wake-up from S1 and S3 mode Supports USB 2.0 protocol up to a 480 Mbps transmission rate ‰ USB 3.0 Ports Backwards compatible USB 2.0 and USB 1.1 support Supports transfer speeds up...
... support Intel Socket 2011 Processor ‰ Operating systems Supports Windows 7 / Vista / XP ‰ Contains Intel X79 chipset ‰ System Memory support Supports Dual channel DDR3-2133MHz+. EVGA X79 Motherboard EVGA X79 Motherboard Motherboard Specifications ‰ Size ATX form factor of 12 inches x 9.6 inches EATX form factor of DDR3 memory. ‰ USB 2.0 Ports Supports hot plug Supports wake-up from S1 and S3 mode Supports USB 2.0 protocol up to a 480 Mbps transmission rate ‰ USB 3.0 Ports Backwards compatible USB 2.0 and USB 1.1 support Supports transfer speeds up...

User Guide
Page 8
... Slots PCI-E x1 slots PCI-E x8/x16 slots 8 EVGA X79 Motherboard ‰ SATA Ports SATA ports up to 3G (300 MB/s) data transfer rate SATA ports up to disk - depends on suspend), S3 (suspend to RAM), S4 (Suspend to 6G (600 MB/s) data transfer rate Support for RAID 0, RAID 1, RAID 0+1, RAID5 and RAID 10 ESATA ‰ Onboard LAN Supports 10/100/1000 Mb/sec Ethernet ‰ Onboard Firewire 1394a (1394b optional) Supports hot plug ‰ Onboard Audio Realtek ALC898 High-Definition audio Supports 8-channel audio Supports...
... Slots PCI-E x1 slots PCI-E x8/x16 slots 8 EVGA X79 Motherboard ‰ SATA Ports SATA ports up to 3G (300 MB/s) data transfer rate SATA ports up to disk - depends on suspend), S3 (suspend to RAM), S4 (Suspend to 6G (600 MB/s) data transfer rate Support for RAID 0, RAID 1, RAID 0+1, RAID5 and RAID 10 ESATA ‰ Onboard LAN Supports 10/100/1000 Mb/sec Ethernet ‰ Onboard Firewire 1394a (1394b optional) Supports hot plug ‰ Onboard Audio Realtek ALC898 High-Definition audio Supports 8-channel audio Supports...

User Guide
Page 10
... Cables Used to support the SATA protocol and each one connects a single drive to setup the motherboard. Installation CD Contains drivers and software needed to the motherboard. 2-way SLI Bridge Bridges two graphics cards together which allows for 2-way SLI. User Manual The user manual you are reading right now! 10 EVGA X79 Motherboard 2-Port USB 2.0 / 1394a Firewire Bracket Provides two additional USB ports and 1 additional 1394a Firewire port to the back panel of the chassis. 2-Port USB 3.0 Bracket (Optional) Allows addition of 2 USB 3.0 ports...
... Cables Used to support the SATA protocol and each one connects a single drive to setup the motherboard. Installation CD Contains drivers and software needed to the motherboard. 2-way SLI Bridge Bridges two graphics cards together which allows for 2-way SLI. User Manual The user manual you are reading right now! 10 EVGA X79 Motherboard 2-Port USB 2.0 / 1394a Firewire Bracket Provides two additional USB ports and 1 additional 1394a Firewire port to the back panel of the chassis. 2-Port USB 3.0 Bracket (Optional) Allows addition of 2 USB 3.0 ports...

User Guide
Page 11
... follow basic safety precautions. Remember to remove power from your computer by disconnecting the AC main source before removing or installing any equipment from/to the computer chassis. 11 The topics covered in this section are: ‰ Preparing the motherboard ‰ Installing the CPU ‰ Installing the Cooling Device ‰ Installing the memory ‰ Installing the motherboard ‰ Connecting cables Safety Instructions To reduce the risk of the...
... follow basic safety precautions. Remember to remove power from your computer by disconnecting the AC main source before removing or installing any equipment from/to the computer chassis. 11 The topics covered in this section are: ‰ Preparing the motherboard ‰ Installing the CPU ‰ Installing the Cooling Device ‰ Installing the memory ‰ Installing the motherboard ‰ Connecting cables Safety Instructions To reduce the risk of the...

User Guide
Page 13
EVGA X79 Motherboard Installing the Cooling Device There are many different cooling devices that came with this motherboard. Follow the instructions that can be used with your cooling assembly. 13 Note: Make sure the CPU is fully seated and level in the socket. ‰ Lower the load plate so it is resting on the CPU to the notches in the socket. ‰ Lower the processor straight down to lock into place. ‰ Carefully lock the lever back into the socket. ‰ Align the notches on the CPU. ‰ Press the right socket lever down into place.
EVGA X79 Motherboard Installing the Cooling Device There are many different cooling devices that came with this motherboard. Follow the instructions that can be used with your cooling assembly. 13 Note: Make sure the CPU is fully seated and level in the socket. ‰ Lower the load plate so it is resting on the CPU to the notches in the socket. ‰ Lower the processor straight down to lock into place. ‰ Carefully lock the lever back into the socket. ‰ Align the notches on the CPU. ‰ Press the right socket lever down into place.

User Guide
Page 16
... on the motherboard. This will include: ‰ Power Connections 24pin ATX power (PW1) 8pin ATX 12V power ‰ Internal Headers Front Panel Header IEEE 1394a Header (IEEE 1394b Optional) USB Headers Audio Header ‰ SATA II ‰ SATA III ‰ USB 3.0/2.0 ‰ Expansion slots ‰ CMOS Clear Button 16 Connecting Cables This section takes you through all the necessary connections on the motherboard, it is aligned with the chassis vents according to the fan assembly instruction. ‰ Secure the motherboard with mounting...
... on the motherboard. This will include: ‰ Power Connections 24pin ATX power (PW1) 8pin ATX 12V power ‰ Internal Headers Front Panel Header IEEE 1394a Header (IEEE 1394b Optional) USB Headers Audio Header ‰ SATA II ‰ SATA III ‰ USB 3.0/2.0 ‰ Expansion slots ‰ CMOS Clear Button 16 Connecting Cables This section takes you through all the necessary connections on the motherboard, it is aligned with the chassis vents according to the fan assembly instruction. ‰ Secure the motherboard with mounting...

User Guide
Page 19
... 8 Ground 9 +5V 10 Empty 19 EVGA X79 Motherboard Connecting Internal Headers Front Panel Header The front panel header on this motherboard is powered on, the LED will be on. The Power LED indicates the system's status. Pressing the power button on the front panel turns the system on and off rather than using the onboard button. ‰ HD_LED Attach the hard disk drive indicator LED cable to these two pins. Note: Some system cases may not have all four...
... 8 Ground 9 +5V 10 Empty 19 EVGA X79 Motherboard Connecting Internal Headers Front Panel Header The front panel header on this motherboard is powered on, the LED will be on. The Power LED indicates the system's status. Pressing the power button on the front panel turns the system on and off rather than using the onboard button. ‰ HD_LED Attach the hard disk drive indicator LED cable to these two pins. Note: Some system cases may not have all four...

User Guide
Page 23
... this motherboard supports multiple Graphics Card technologies such as a sound or network card. PCI-E x16/x8 Slots These PCI-E slots are designed to hold the blank cover. 23 When installing a PCI-E Graphics Card, be sure the retention clip snaps and locks the card into place. Secure the card's metal bracket to the chassis back panel with the screw used to accommodate less bandwidthintensive cards, such as SLI or CrossFireX. EVGA X79 Motherboard PCI-E x1 Slots There are PCI-E x1 slots...
... this motherboard supports multiple Graphics Card technologies such as a sound or network card. PCI-E x16/x8 Slots These PCI-E slots are designed to hold the blank cover. 23 When installing a PCI-E Graphics Card, be sure the retention clip snaps and locks the card into place. Secure the card's metal bracket to the chassis back panel with the screw used to accommodate less bandwidthintensive cards, such as SLI or CrossFireX. EVGA X79 Motherboard PCI-E x1 Slots There are PCI-E x1 slots...

User Guide
Page 25
.... ‰ POWER LED: When the System is powered on: This LED is on. ‰ DIMM LED: When the Memory slot is functional: This LED is on. ‰ STANDBY LED: When the System is in Standby Mode: This LED is on as long as the motherboard is useful during troubleshooting situations. It is receiving constant power. 25 This LED will also display current CPU socket temperatures after the system has fully booted into...
.... ‰ POWER LED: When the System is powered on: This LED is on. ‰ DIMM LED: When the Memory slot is functional: This LED is on. ‰ STANDBY LED: When the System is in Standby Mode: This LED is on as long as the motherboard is useful during troubleshooting situations. It is receiving constant power. 25 This LED will also display current CPU socket temperatures after the system has fully booted into...

User Guide
Page 26
... following software and drivers: ‰ Chipset Drivers ‰ Audio Drivers ‰ RAID Drivers ‰ LAN Drivers ‰ USB 3.0 Drivers ‰ EVGA E-LEET ‰ User's Manual Windows 7/Vista/XP Driver Installation 1. If the CD does not run, go to My Computer and click on the install screen. Insert the EVGA X79 installation CD for the motherboard included in the kit, you need to open. 26 Install the drivers and utilities listed on the CD to load your operating system. EVGA X79 Motherboard Installing Drivers and Software...
... following software and drivers: ‰ Chipset Drivers ‰ Audio Drivers ‰ RAID Drivers ‰ LAN Drivers ‰ USB 3.0 Drivers ‰ EVGA E-LEET ‰ User's Manual Windows 7/Vista/XP Driver Installation 1. If the CD does not run, go to My Computer and click on the install screen. Insert the EVGA X79 installation CD for the motherboard included in the kit, you need to open. 26 Install the drivers and utilities listed on the CD to load your operating system. EVGA X79 Motherboard Installing Drivers and Software...

User Guide
Page 27
... LED with CPU Temperature Monitor AMI POST Codes 01 Power on the Debug LED readout located directly onboard the motherboard. Pre-memory North Bridge initialization is started 18 19- POST Codes EVGA X79 Motherboard This section provides the AMI POST Codes for future AMI SEC error codes 0D 0E Microcode not found 0F Microcode not loaded 10 PEI Core is started 11- Pre-memory CPU initialization is started 14 15- The POST Codes are displayed on . Pre-memory South Bridge initialization is started...
... LED with CPU Temperature Monitor AMI POST Codes 01 Power on the Debug LED readout located directly onboard the motherboard. Pre-memory North Bridge initialization is started 18 19- POST Codes EVGA X79 Motherboard This section provides the AMI POST Codes for future AMI SEC error codes 0D 0E Microcode not found 0F Microcode not loaded 10 PEI Core is started 11- Pre-memory CPU initialization is started 14 15- The POST Codes are displayed on . Pre-memory South Bridge initialization is started...

User Guide
Page 28
... 34 CPU post-memory initialization. Post-Memory North Bridge initialization is started 33 CPU post-memory initialization. EVGA X79 Motherboard 1C 1D- System Management Mode (SMM) initialization 37- Post-Memory South Bridge initialization is started 50 Memory initialization error. Invalid memory size or memory modules do not match. 53 Memory initialization error. OEM pre-memory initialization codes 2A 2B Memory initialization. No usable memory detected 54 Unspecified memory initialization error. 55 Memory not installed 56 Invalid CPU type or Speed 57 CPU mismatch 58 CPU...
... 34 CPU post-memory initialization. Post-Memory North Bridge initialization is started 33 CPU post-memory initialization. EVGA X79 Motherboard 1C 1D- System Management Mode (SMM) initialization 37- Post-Memory South Bridge initialization is started 50 Memory initialization error. Invalid memory size or memory modules do not match. 53 Memory initialization error. OEM pre-memory initialization codes 2A 2B Memory initialization. No usable memory detected 54 Unspecified memory initialization error. 55 Memory not installed 56 Invalid CPU type or Speed 57 CPU mismatch 58 CPU...

User Guide
Page 30
... Reset A6 SCSI Detect A7 SCSI Enable A8 Setup Verifying Password A9 Start of Setup AA Reserved for ASL (see ASL Status Codes section below ) AB Setup Input Wait AC Reserved for future AMI DXE codes 7F 80- EVGA X79 Motherboard 71 South Bridge DXE SMM initialization is started 9B USB Reset 9C USB Detect 9D USB Enable 9E- South Bridge DXE Initialization (South Bridge 77 module specific) 78 ACPI...
... Reset A6 SCSI Detect A7 SCSI Enable A8 Setup Verifying Password A9 Start of Setup AA Reserved for ASL (see ASL Status Codes section below ) AB Setup Input Wait AC Reserved for future AMI DXE codes 7F 80- EVGA X79 Motherboard 71 South Bridge DXE SMM initialization is started 9B USB Reset 9C USB Detect 9D USB Enable 9E- South Bridge DXE Initialization (South Bridge 77 module specific) 78 ACPI...

User Guide
Page 34
... Inexpensive Disks RAM - Split Frame Rendering SLI - System Platform Processors SSD - Transmission Control Protocol/Internet Protocol USB - Southbridge SCSI - Solid State Drive TCP/IP - VCore Voltage Drop VGA - Quad Data Rate QPI - Random Access Memory ROM - Serial Advanced Technology Attachment SAS - Serial Presence Detect SPDIF - Sony/Philips Digital Interconnect Format SPP - Video Graphics Array VREG - Read Only Memory RGB - Peripheral Component Interconnect PCI-E - Phase Locked Loop POST - Power on Self Test PWM - EVGA X79 Motherboard...
... Inexpensive Disks RAM - Split Frame Rendering SLI - System Platform Processors SSD - Transmission Control Protocol/Internet Protocol USB - Southbridge SCSI - Solid State Drive TCP/IP - VCore Voltage Drop VGA - Quad Data Rate QPI - Random Access Memory ROM - Serial Advanced Technology Attachment SAS - Serial Presence Detect SPDIF - Sony/Philips Digital Interconnect Format SPP - Video Graphics Array VREG - Read Only Memory RGB - Peripheral Component Interconnect PCI-E - Phase Locked Loop POST - Power on Self Test PWM - EVGA X79 Motherboard...


