User Guide
Page 3
... Contents Before You Begin 8 Parts NOT in the Kit 9 Intentions of the Kit 9 EVGA Classified Super Record 2 (SR-2) Motherboard 10 Motherboard Specifications 10 Unpacking and Parts Descriptions 12 Unpacking...12 Equipment ...12 EVGA Classified SR-2 Motherboard 14 Hardware Installation 18 Safety Instructions 18 Preparing the Motherboard 19 Installing the CPU 19 Installing the CPU Fan 20 Installing DIMMs 21 Installing...
... Contents Before You Begin 8 Parts NOT in the Kit 9 Intentions of the Kit 9 EVGA Classified Super Record 2 (SR-2) Motherboard 10 Motherboard Specifications 10 Unpacking and Parts Descriptions 12 Unpacking...12 Equipment ...12 EVGA Classified SR-2 Motherboard 14 Hardware Installation 18 Safety Instructions 18 Preparing the Motherboard 19 Installing the CPU 19 Installing the CPU Fan 20 Installing DIMMs 21 Installing...

User Guide
Page 5
EVGA Classified SR-2 Motherboard E-SATA Controller (Back panel 54 SATA Configuration...55 Advanced Chipset Features 56 USB Configuration 56 PCI-E Configuration 56 PCI/PNP Resource Management 58 Clear NVRAM......
EVGA Classified SR-2 Motherboard E-SATA Controller (Back panel 54 SATA Configuration...55 Advanced Chipset Features 56 USB Configuration 56 PCI-E Configuration 56 PCI/PNP Resource Management 58 Clear NVRAM......

User Guide
Page 7
Standard BIOS Features Menu 51 Figure 5. Advanced Chipset Features 56 Figure 8. Power Management Features 61 Figure 11. Chassis Back panel Connectors 16 Figure 3. EVGA Classified SR-2 Motherboard Layout 15 Figure 2. Frequency/Voltage Control 63 7 EVGA Classified SR-2 Motherboard List of Figures Figure 1. H/W Health Configuration 62 Figure 12. Boot Configuration Features 60 Figure 10. Power Supply Connectors 24 Figure 4. Advanced BIOS Features Menu 53 Figure 6. SATA Configuration 55 Figure 7. PCI/PNP Resource Management 58 Figure 9.
Standard BIOS Features Menu 51 Figure 5. Advanced Chipset Features 56 Figure 8. Power Management Features 61 Figure 11. Chassis Back panel Connectors 16 Figure 3. EVGA Classified SR-2 Motherboard Layout 15 Figure 2. Frequency/Voltage Control 63 7 EVGA Classified SR-2 Motherboard List of Figures Figure 1. H/W Health Configuration 62 Figure 12. Boot Configuration Features 60 Figure 10. Power Supply Connectors 24 Figure 4. Advanced BIOS Features Menu 53 Figure 6. SATA Configuration 55 Figure 7. PCI/PNP Resource Management 58 Figure 9.

User Guide
Page 9
... cables necessary to allow for proper system functionality. When replacing a motherboard in a PC case, you will need many of the Kit This kit provides you have an operating system already. 9 EVGA Classified SR-2 Motherboard Parts NOT in the kit. Intentions of the cables. However, ...it does not contain the following items that must be purchased separately to make the motherboard functional. 1 or 2 Intel 1366 Xeon Dual ...
... cables necessary to allow for proper system functionality. When replacing a motherboard in a PC case, you will need many of the Kit This kit provides you have an operating system already. 9 EVGA Classified SR-2 Motherboard Parts NOT in the kit. Intentions of the cables. However, ...it does not contain the following items that must be purchased separately to make the motherboard functional. 1 or 2 Intel 1366 Xeon Dual ...

User Guide
Page 11
off) 11 EVGA Classified SR-2 Motherboard Six(6) onboard Serial ATA II 300MBps data transfer rate Six SATA II connectors from south bridge ICH10R with support for RAID 0, RAID 1, RAID 10, ...
off) 11 EVGA Classified SR-2 Motherboard Six(6) onboard Serial ATA II 300MBps data transfer rate Six SATA II connectors from south bridge ICH10R with support for RAID 0, RAID 1, RAID 10, ...

User Guide
Page 12
..., and aids in the system case to a new chassis. Visual Guide Helps to inspect each piece of equipment shipped in the packing box. The EVGA Classified SR-2 Motherboard This motherboard contains the Intel 5520 and ICH10R chipset and is missing or damaged, contact your reseller. If you are included with all the necessary cables for...
..., and aids in the system case to a new chassis. Visual Guide Helps to inspect each piece of equipment shipped in the packing box. The EVGA Classified SR-2 Motherboard This motherboard contains the Intel 5520 and ICH10R chipset and is missing or damaged, contact your reseller. If you are included with all the necessary cables for...

User Guide
Page 13
EVGA Classified SR-2 Motherboard 3 - 2-Port SATA Power Cables Allows a Molex power connector to adapt to a SATA power connector. 1 - 4-Port USB Bracket Provides one connects to a single drive to the motherboard. 1 - IDE-ATA 133 HDD Cable Passes data between the IDE connection on the motherboard and IDE device. 1 - 2-Way SLI ...together which allows for 4-Way SLI. (on the rear of the case. 6 - SATA Data Cables Used to setup the motherboard. 13 Installation CD Contains drivers and software needed to support the Serial ATA protocol and each one (4) additional USB ports on select card models) 1...
EVGA Classified SR-2 Motherboard 3 - 2-Port SATA Power Cables Allows a Molex power connector to adapt to a SATA power connector. 1 - 4-Port USB Bracket Provides one connects to a single drive to the motherboard. 1 - IDE-ATA 133 HDD Cable Passes data between the IDE connection on the motherboard and IDE device. 1 - 2-Way SLI ...together which allows for 4-Way SLI. (on the rear of the case. 6 - SATA Data Cables Used to setup the motherboard. 13 Installation CD Contains drivers and software needed to support the Serial ATA protocol and each one (4) additional USB ports on select card models) 1...

User Guide
Page 14
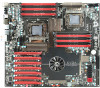
Figure 1 shows the motherboard and Figure 2 shows the back panel connectors. 14 EVGA Classified SR-2 Motherboard The EVGA Classified SR-2 Motherboard with the Intel 5520 and ICH10R chipset is a SLI-ready motherboard.
Figure 1 shows the motherboard and Figure 2 shows the back panel connectors. 14 EVGA Classified SR-2 Motherboard The EVGA Classified SR-2 Motherboard with the Intel 5520 and ICH10R chipset is a SLI-ready motherboard.

User Guide
Page 15
... 8-pin ATX_12V power connector 23. 6 Pin CPU power (optional) 24. P80P connector (ECP V3) 2. EZ voltage read points 7. Front panel Audio connector 25. EVGA Classified SR-2 Motherboard Layout 4 2 1 22 23 25 4 7 16 22 23 15 26 8 6 21 10 9 20 19 18 17 7 3 14 5 1. Debug LED ...Display 4. Reset button 10. CPU Fan headers 14. PC Speaker 13 12 11 21. EVGA Classified SR-2 Motherboard Figure 1. Secondary CPU socket 12. Front panel connector 3. USB headers 5. CMOS battery 6. 24-pin ATX power connector 16. Fan connectors 17. ...
... 8-pin ATX_12V power connector 23. 6 Pin CPU power (optional) 24. P80P connector (ECP V3) 2. EZ voltage read points 7. Front panel Audio connector 25. EVGA Classified SR-2 Motherboard Layout 4 2 1 22 23 25 4 7 16 22 23 15 26 8 6 21 10 9 20 19 18 17 7 3 14 5 1. Debug LED ...Display 4. Reset button 10. CPU Fan headers 14. PC Speaker 13 12 11 21. EVGA Classified SR-2 Motherboard Figure 1. Secondary CPU socket 12. Front panel connector 3. USB headers 5. CMOS battery 6. 24-pin ATX power connector 16. Fan connectors 17. ...

User Guide
Page 19
... store it only by the edges. Put your finger on the tail of the processor. Remove the protective socket cover from the socket. 2. EVGA Classified SR-2 Motherboard Preparing the Motherboard The motherboard shipped in the socket to protect the socket when there is a good idea to save the cover so that with single processor usage you...
... store it only by the edges. Put your finger on the tail of the processor. Remove the protective socket cover from the socket. 2. EVGA Classified SR-2 Motherboard Preparing the Motherboard The motherboard shipped in the socket to protect the socket when there is a good idea to save the cover so that with single processor usage you...

User Guide
Page 21
... the DIMM slot. The plastic clips at least one gap near the center of the DIMM slot automatically lock the DIMM into the DIMM slot. EVGA Classified SR-2 Motherboard Installing DIMMs Your new motherboard has twelve (12) 240-pin slots for the location of Six (6) slots each bank to ensure normal operation.
... the DIMM slot. The plastic clips at least one gap near the center of the DIMM slot automatically lock the DIMM into the DIMM slot. EVGA Classified SR-2 Motherboard Installing DIMMs Your new motherboard has twelve (12) 240-pin slots for the location of Six (6) slots each bank to ensure normal operation.

User Guide
Page 23
...the chassis. 2. Ensure that stud to prevent the possibility of nine screws. 23 EVGA Classified SR-2 Motherboard Securing the Motherboard into the Chassis Most computer chassis have a base with mounting studs or spacers to allow the motherboard to be secured to the chassis and help to the fan assembly instruction. 5. Align... Align the mounting holes with a minimum of a short circuit. If there are studs that do not align with a mounting hole on the motherboard, it is recommended that you remove that the fan assembly is aligned with the chassis vents according to prevent short circuits.
...the chassis. 2. Ensure that stud to prevent the possibility of nine screws. 23 EVGA Classified SR-2 Motherboard Securing the Motherboard into the Chassis Most computer chassis have a base with mounting studs or spacers to allow the motherboard to be secured to the chassis and help to the fan assembly instruction. 5. Align... Align the mounting holes with a minimum of a short circuit. If there are studs that do not align with a mounting hole on the motherboard, it is recommended that you remove that the fan assembly is aligned with the chassis vents according to prevent short circuits.

User Guide
Page 25
Align the pins to the CPU. Back panel connector edge 25 You can plug in each 8 pin socket. It is not necessary/required as the motherboard will function perfectly with just one connector in the extra 6 pin PCI-E power connectors (optional) if you need them for extreme overclocking. PW1 Pin Assignments ... (PW12-P0-1, PW12-P1-1) PW12-1,PW12-2, the 8-pin ATX 12V power connections, are used to provide power to the connectors and press firmly until seated. EVGA Classified SR-2 Motherboard Table 1.
Align the pins to the CPU. Back panel connector edge 25 You can plug in each 8 pin socket. It is not necessary/required as the motherboard will function perfectly with just one connector in the extra 6 pin PCI-E power connectors (optional) if you need them for extreme overclocking. PW1 Pin Assignments ... (PW12-P0-1, PW12-P1-1) PW12-1,PW12-2, the 8-pin ATX 12V power connections, are used to provide power to the connectors and press firmly until seated. EVGA Classified SR-2 Motherboard Table 1.

User Guide
Page 27
...SATA) 27 SATA 6 - SATA 7 are SATA 6Gbps spec and are SATA 6Gbps spec and support transfer speeds of up to the motherboard. RX+ TX- EVGA Classified SR-2 Motherboard Connecting Serial ATA Cables The Serial ATA II connector is used to connect a Serial ATA II device to 300MB/s data transfer rate. The... are controlled by the South Bridge Chipset. SATA5, are eight (8) internal Serial ATA connectors and two (2) E-SATA on this motherboard. SATA II drives are controlled by the Marvell 9128 Chipset. These connectors support the thin Serial ATA II cables for primary storage devices.
...SATA) 27 SATA 6 - SATA 7 are SATA 6Gbps spec and are SATA 6Gbps spec and support transfer speeds of up to the motherboard. RX+ TX- EVGA Classified SR-2 Motherboard Connecting Serial ATA Cables The Serial ATA II connector is used to connect a Serial ATA II device to 300MB/s data transfer rate. The... are controlled by the South Bridge Chipset. SATA5, are eight (8) internal Serial ATA connectors and two (2) E-SATA on this motherboard. SATA II drives are controlled by the Marvell 9128 Chipset. These connectors support the thin Serial ATA II cables for primary storage devices.

User Guide
Page 29
... the USB 2.0 headers on the back panel of your chassis. 2. The motherboard also contains two 10-pin onboard header connectors that are exposed on the motherboard. It also supports two (2) USB 3.0 ports on the back panel which ...the front or rear panel of the chassis. Secure the bracket to connect an optional external bracket containing two (2) USB 2.0 ports. 1. Table 3. EVGA Classified SR-2 Motherboard USB Headers This motherboard contains six (6) USB 2.0 ports that can operate at USB 2.0 or USB 3.0 specifications. USB 2.0 Header Pins Connector Pin USB 2.0 Header Connector...
... the USB 2.0 headers on the back panel of your chassis. 2. The motherboard also contains two 10-pin onboard header connectors that are exposed on the motherboard. It also supports two (2) USB 3.0 ports on the back panel which ...the front or rear panel of the chassis. Secure the bracket to connect an optional external bracket containing two (2) USB 2.0 ports. 1. Table 3. EVGA Classified SR-2 Motherboard USB Headers This motherboard contains six (6) USB 2.0 ports that can operate at USB 2.0 or USB 3.0 specifications. USB 2.0 Header Pins Connector Pin USB 2.0 Header Connector...

User Guide
Page 31
Connect a 3-pin connector to pins 1, 2, and 3 on the motherboard. Note: the CPU fan cable can be either a 3-pin or a 4-pin connector. The fans are eight fan connections on the CPU fan header. 31 The fan speed can be detected and viewed on select ports in the PC Health Status section of the CMOS Setup. EVGA Classified SR-2 Motherboard Fan Connections There are automatically turned off after the system enters S3, S4 or S5 mode.
Connect a 3-pin connector to pins 1, 2, and 3 on the motherboard. Note: the CPU fan cable can be either a 3-pin or a 4-pin connector. The fans are eight fan connections on the CPU fan header. 31 The fan speed can be detected and viewed on select ports in the PC Health Status section of the CMOS Setup. EVGA Classified SR-2 Motherboard Fan Connections There are automatically turned off after the system enters S3, S4 or S5 mode.

User Guide
Page 32
PCI-E x8 slot 5 - PCI-E x16/8 slot 6 - PCI-E x16/8 slot 4 - PCI-E x16 slot 32 PCI-E x8 slot 3 - PCI-E x8 slot 7 - Expansion Slots The EVGA Classified SR-2 motherboard contains seven (7) PCI-E expansion slots. 1 2 3 4 5 6 7 PCI-E Slot Listing 1 - PCI-E x16/8 slot 2 -
PCI-E x8 slot 5 - PCI-E x16/8 slot 6 - PCI-E x16/8 slot 4 - PCI-E x16 slot 32 PCI-E x8 slot 3 - PCI-E x8 slot 7 - Expansion Slots The EVGA Classified SR-2 motherboard contains seven (7) PCI-E expansion slots. 1 2 3 4 5 6 7 PCI-E Slot Listing 1 - PCI-E x16/8 slot 2 -

User Guide
Page 33
The bandwidth of this motherboard supports up to 4GB/sec (8GB/sec concurrent). The design of the x16 slot is not seated properly, it could cause a short across the pins. ... place. If the card is up to Four PCI-E graphics cards using NVIDIA's SLI technology with the screw used to the chassis with multiple displays. EVGA Classified SR-2 Motherboard . Secure the card's metal bracket to hold the blank cover. 33 PCI-E x16 Slots These seven PCI-E x16/x8 slots are reserved for graphics cards...
The bandwidth of this motherboard supports up to 4GB/sec (8GB/sec concurrent). The design of the x16 slot is not seated properly, it could cause a short across the pins. ... place. If the card is up to Four PCI-E graphics cards using NVIDIA's SLI technology with the screw used to the chassis with multiple displays. EVGA Classified SR-2 Motherboard . Secure the card's metal bracket to hold the blank cover. 33 PCI-E x16 Slots These seven PCI-E x16/x8 slots are reserved for graphics cards...

User Guide
Page 35
... the set parameters. These onboard buttons allow for easy debugging and testing of the hard disk drives and will blink accordingly. Clear CMOS Button The motherboard uses the CMOS to easily turn on the rear panel. EVGA Classified SR-2 Motherboard Onboard Buttons These onboard buttons include RESET, POWER and Clear CMOS.
... the set parameters. These onboard buttons allow for easy debugging and testing of the hard disk drives and will blink accordingly. Clear CMOS Button The motherboard uses the CMOS to easily turn on the rear panel. EVGA Classified SR-2 Motherboard Onboard Buttons These onboard buttons include RESET, POWER and Clear CMOS.

User Guide
Page 37
...4, 6 respectively. Example: Remove the Jumper cap of JPE2, PCI-E Slot 2 is disabled while the rest are located right above diagram. EVGA Classified SR-2 Motherboard Jumper Settings PCI-E Disable Jumper For the ease of troubleshooting multiple graphics cards or testing an individual graphics card's overclocking..., EVGA has implemented seven jumpers you can also be extended onto the EVGA Control Panel (ECP). In default shipping configurations, all slots are enabled with the jumpers...
...4, 6 respectively. Example: Remove the Jumper cap of JPE2, PCI-E Slot 2 is disabled while the rest are located right above diagram. EVGA Classified SR-2 Motherboard Jumper Settings PCI-E Disable Jumper For the ease of troubleshooting multiple graphics cards or testing an individual graphics card's overclocking..., EVGA has implemented seven jumpers you can also be extended onto the EVGA Control Panel (ECP). In default shipping configurations, all slots are enabled with the jumpers...

