Installation Guide
Page 1
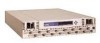
RKH/RKL 5 • Installing the DS-16B2 Rails 10 • Installing the DS-16B2 Switch 21 EMC Departmental Switch DS-16B Installation Guide 1 EMC Departmental Switch DS-16B2 Installation Guide P/N 014003075-A01 This document explains the power, cooling, weight, and rack placement requirements for mounting them in Figure 1. Device 16-port departmental switch Device Model DS-16B2-0D Mounting Kit Model DS16B2-RKH DS16B2...
RKH/RKL 5 • Installing the DS-16B2 Rails 10 • Installing the DS-16B2 Switch 21 EMC Departmental Switch DS-16B Installation Guide 1 EMC Departmental Switch DS-16B2 Installation Guide P/N 014003075-A01 This document explains the power, cooling, weight, and rack placement requirements for mounting them in Figure 1. Device 16-port departmental switch Device Model DS-16B2-0D Mounting Kit Model DS16B2-RKH DS16B2...
Installation Guide
Page 3
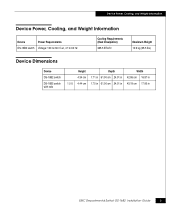
Device Power, Cooling, and Weight Information Device Power, Cooling, and Weight Information Device Power Requirements DS-16B2 switch Voltage: 100 to 240 V ac, 47 to 63 Hz Cooling Requirements (Heat Dissipation) 368.5 BTU/hr Maximum Weight 12.9 kg (28.5 lbs) Device Dimensions Device DS-16B2 switch DS-16B2 switch with rails Height 4.34 cm 1.0 U 4.44 cm Depth 1.71 in 61.00 cm 24.01 in 1.75 in 61.00 cm 24.01 in Width 42.86 cm 16.87 in 43.18 cm 17.00 in EMC Departmental Switch DS-16B2 Installation Guide 3
Device Power, Cooling, and Weight Information Device Power, Cooling, and Weight Information Device Power Requirements DS-16B2 switch Voltage: 100 to 240 V ac, 47 to 63 Hz Cooling Requirements (Heat Dissipation) 368.5 BTU/hr Maximum Weight 12.9 kg (28.5 lbs) Device Dimensions Device DS-16B2 switch DS-16B2 switch with rails Height 4.34 cm 1.0 U 4.44 cm Depth 1.71 in 61.00 cm 24.01 in 1.75 in 61.00 cm 24.01 in Width 42.86 cm 16.87 in 43.18 cm 17.00 in EMC Departmental Switch DS-16B2 Installation Guide 3
Installation Guide
Page 8
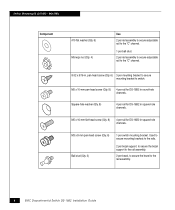
...to secure the bezel to the rail assembly. 8 EMC Departmental Switch DS-16B2 Installation Guide Used to secure mounting brackets to the rails. 2 per bezel support, to secure the bezel support to the "C" channel. 1 per ball stud. 2 per rail for DS-16B2 in . RKH/RKL) Component #10 flat ... rail assembly to secure adjustable rail to switch. pan-head screw (Qty. 6) 3 per rail for DS-16B2 in square-hole channels. Square-hole washer (Qty. 8) 4 per mounting bracket to secure mounting bracket to the "C" channel. 8-32 x 5/16-in round-hole channels. M5 x 16-mm flat-head screw (Qty. 8) ...
...to secure the bezel to the rail assembly. 8 EMC Departmental Switch DS-16B2 Installation Guide Used to secure mounting brackets to the rails. 2 per bezel support, to secure the bezel support to the "C" channel. 1 per ball stud. 2 per rail for DS-16B2 in . RKH/RKL) Component #10 flat ... rail assembly to secure adjustable rail to switch. pan-head screw (Qty. 6) 3 per rail for DS-16B2 in square-hole channels. Square-hole washer (Qty. 8) 4 per mounting bracket to secure mounting bracket to the "C" channel. 8-32 x 5/16-in round-hole channels. M5 x 16-mm flat-head screw (Qty. 8) ...
Installation Guide
Page 9
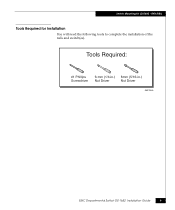
Switch Mounting Kit (DS16B2 - RKH/RKL) Tools Required for Installation You will need the following tools to complete the installation of the rails and switch(es). Tools Required: #1 Phillips Screwdriver 6-mm (1/4-in.) 8mm (5/16-in.) Nut Driver Nut Driver EMC2065 EMC Departmental Switch DS-16B2 Installation Guide 9
Switch Mounting Kit (DS16B2 - RKH/RKL) Tools Required for Installation You will need the following tools to complete the installation of the rails and switch(es). Tools Required: #1 Phillips Screwdriver 6-mm (1/4-in.) 8mm (5/16-in.) Nut Driver Nut Driver EMC2065 EMC Departmental Switch DS-16B2 Installation Guide 9

Installation Guide
Page 16
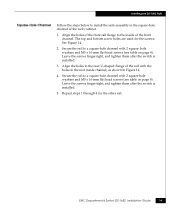
Installing the DS-16B2 Rails 5. Keps Nut Keps Nut Figure 12 Securing the Keps Nuts EMC2045 If the side skins are adjusted to fit between the channels in the rack/cabinet you will locate the switch. 6. See Figure 12. Once the rails are removed on the rail assembly. Adjust the length of the rail to the correct length, tighten the keps nuts on the rack/cabinet, the keps nuts can be tightened after the rails have been installed. 16 EMC Departmental Switch DS-16B2 Installation Guide Determine where in the rack/cabinet. 7.
Installing the DS-16B2 Rails 5. Keps Nut Keps Nut Figure 12 Securing the Keps Nuts EMC2045 If the side skins are adjusted to fit between the channels in the rack/cabinet you will locate the switch. 6. See Figure 12. Once the rails are removed on the rail assembly. Adjust the length of the rail to the correct length, tighten the keps nuts on the rack/cabinet, the keps nuts can be tightened after the rails have been installed. 16 EMC Departmental Switch DS-16B2 Installation Guide Determine where in the rack/cabinet. 7.
Installation Guide
Page 19
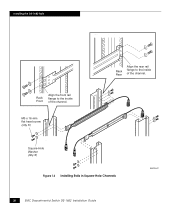
... flange to the inside channel, as shown in the square-hole channel of the front channel. Secure the rail to a square-hole channel with 2 square-hole washers and M5 x 16-mm flat head screws (see table on page 8). Leave the screws finger-tight, and tighten them after the switch is installed. 5. EMC Departmental Switch DS-16B2 Installation Guide 19...
... flange to the inside channel, as shown in the square-hole channel of the front channel. Secure the rail to a square-hole channel with 2 square-hole washers and M5 x 16-mm flat head screws (see table on page 8). Leave the screws finger-tight, and tighten them after the switch is installed. 5. EMC Departmental Switch DS-16B2 Installation Guide 19...
Installation Guide
Page 20
Installing the DS-16B2 Rails Rack Front Align the front rail flange to the inside of the channel. M5 x 16-mm flat head screw (Qty. 8) Rack Rear Align the rear rail flange to the inside of the channel. Square-Hole Washer (Qty. 8) Figure 14 Installing Rails in Square-Hole Channels EMC2047 20 EMC Departmental Switch DS-16B2 Installation Guide
Installing the DS-16B2 Rails Rack Front Align the front rail flange to the inside of the channel. M5 x 16-mm flat head screw (Qty. 8) Rack Rear Align the rear rail flange to the inside of the channel. Square-Hole Washer (Qty. 8) Figure 14 Installing Rails in Square-Hole Channels EMC2047 20 EMC Departmental Switch DS-16B2 Installation Guide
Installation Guide
Page 21
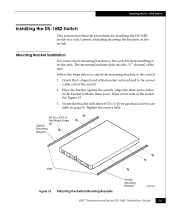
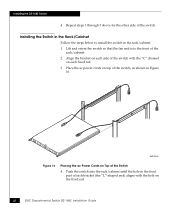
... Figure 15 Attaching the Switch Mounting Brackets Switch Mounting Bracket EMC2048 EMC Departmental Switch DS-16B2 Installation Guide 21 Follow the steps below to attach the mounting brackets to the switch. 1. Place the bracket against the switch. The mounting brackets slide into the "C" channel of the switch. See Figure 15. 3. Installing the DS-16B2 Switch Installing the DS-16B2 Switch This section describes...
... Figure 15 Attaching the Switch Mounting Brackets Switch Mounting Bracket EMC2048 EMC Departmental Switch DS-16B2 Installation Guide 21 Follow the steps below to attach the mounting brackets to the switch. 1. Place the bracket against the switch. The mounting brackets slide into the "C" channel of the switch. See Figure 15. 3. Installing the DS-16B2 Switch Installing the DS-16B2 Switch This section describes...
Installation Guide
Page 22
... rail. 3. Align the bracket on top of the switch. EMC2049 Figure 16 Placing the ac Power Cords on Top of the switch with the hole on each bracket (the "L"-shaped end) aligns with the "C" channel on the fixed rail. 22 EMC Departmental Switch DS-16B2 Installation Guide Push the switch into the rack/cabinet until the hole in...
... rail. 3. Align the bracket on top of the switch. EMC2049 Figure 16 Placing the ac Power Cords on Top of the switch with the hole on each bracket (the "L"-shaped end) aligns with the "C" channel on the fixed rail. 22 EMC Departmental Switch DS-16B2 Installation Guide Push the switch into the rack/cabinet until the hole in...
