User Manual (English)
Page 2
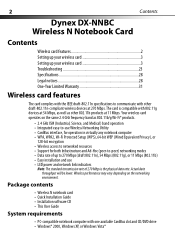
2 Contents Dynex DX-NNBC Wireless N Notebook Card Contents Wireless card features 2 Setting up your wireless card 3 Setting up to 270 Mbps (draft 802.11n), 54 Mbps (802.11g), or 11 Mbps (802.11b) • Easy installation and use Wireless Networking Utility • CardBus interface, for operation in virtually any notebook computer • WPA, ... 270 Mbps is compatible with 802.11g devices at 270 Mbps. Package contents • Wireless N notebook card • Quick Installation Guide • Installation software CD • This User Guide System requirements • PC-compatible...
2 Contents Dynex DX-NNBC Wireless N Notebook Card Contents Wireless card features 2 Setting up your wireless card 3 Setting up to 270 Mbps (draft 802.11n), 54 Mbps (802.11g), or 11 Mbps (802.11b) • Easy installation and use Wireless Networking Utility • CardBus interface, for operation in virtually any notebook computer • WPA, ... 270 Mbps is compatible with 802.11g devices at 270 Mbps. Package contents • Wireless N notebook card • Quick Installation Guide • Installation software CD • This User Guide System requirements • PC-compatible...

User Manual (English)
Page 3
To install the software and the card with Windows Vista: 1 Insert the Installation Software CD into your CD/DVD drive. The AutoPlay box opens. Setting up your wireless card Components Link LED Power LED 3 Card connector Component Description Link LED Lights up when the card links to a wireless network Power LED Lights up your wireless card Windows Vista® Important note: Install the software before inserting the card. DX-NNBC Card connector Fits securely into your computer's CardBus slot Setting up when the card is turned on.
To install the software and the card with Windows Vista: 1 Insert the Installation Software CD into your CD/DVD drive. The AutoPlay box opens. Setting up your wireless card Components Link LED Power LED 3 Card connector Component Description Link LED Lights up when the card links to a wireless network Power LED Lights up your wireless card Windows Vista® Important note: Install the software before inserting the card. DX-NNBC Card connector Fits securely into your computer's CardBus slot Setting up when the card is turned on.

User Manual (English)
Page 4
If you see a window titled, "Windows can't verify the publisher of this operating system. You may see a window titled, "An unidentified program wants access to begin the installation process. This is compatible with this driver software." 4 Setting up your computer," click Allow. The InstallShield Wizard screen opens. 3 Click Next to your wireless card 2 Double-click Run Installer.exe. Our software has been fully tested and is normal and does not indicate a problem.
If you see a window titled, "Windows can't verify the publisher of this operating system. You may see a window titled, "An unidentified program wants access to begin the installation process. This is compatible with this driver software." 4 Setting up your computer," click Allow. The InstallShield Wizard screen opens. 3 Click Next to your wireless card 2 Double-click Run Installer.exe. Our software has been fully tested and is normal and does not indicate a problem.

User Manual (English)
Page 5
Your installation is now complete. 6 To connect to a network. The Network and Sharing Center opens. 7 Click Connect to the Internet, open the Network and Sharing Center by clicking Start, Control Panel, Network and Internet - The Connect to a network screen opens. When the installation completes, the InstallShield Wizard Complete screen opens. 5 Click Finish. View network status and tasks. Setting up your wireless card 5 4 Click Install this driver software anyway, then, when prompted, plug in your card.
Your installation is now complete. 6 To connect to a network. The Network and Sharing Center opens. 7 Click Connect to the Internet, open the Network and Sharing Center by clicking Start, Control Panel, Network and Internet - The Connect to a network screen opens. When the installation completes, the InstallShield Wizard Complete screen opens. 5 Click Finish. View network status and tasks. Setting up your wireless card 5 4 Click Install this driver software anyway, then, when prompted, plug in your card.

User Manual (English)
Page 6
The successful connection screen opens. After connecting to the network, you can choose to save this network and connect automatically when your wireless network, you may be prompted to the selected network. Your card attempts to connect to enter in range. Depending on the security settings of your card is in a network security key or a passphrase. 9 Enter the network security key or passphrase, then click Connect. 6 Setting up your wireless card 8 Select an available wireless network, then click Connect.
The successful connection screen opens. After connecting to the network, you can choose to save this network and connect automatically when your wireless network, you may be prompted to the selected network. Your card attempts to connect to enter in range. Depending on the security settings of your card is in a network security key or a passphrase. 9 Enter the network security key or passphrase, then click Connect. 6 Setting up your wireless card 8 Select an available wireless network, then click Connect.

User Manual (English)
Page 7
...: 1 Insert the Installation Software CD into your network connections. All other Windows versions Important note: Install the software before inserting the card. Note: If the InstallShield Wizard Welcome screen does not open, double-click My Computer, then double-click the CD/DVD drive where...folder, then double-click setup.exe. The InstallShield Wizard Welcome screen opens. Setting up your wireless card 7 The Network and Sharing Center should now show the network connection that you configure your notebook's CD/DVD drive. The links on the left of the window let you have just ...
...: 1 Insert the Installation Software CD into your network connections. All other Windows versions Important note: Install the software before inserting the card. Note: If the InstallShield Wizard Welcome screen does not open, double-click My Computer, then double-click the CD/DVD drive where...folder, then double-click setup.exe. The InstallShield Wizard Welcome screen opens. Setting up your wireless card 7 The Network and Sharing Center should now show the network connection that you configure your notebook's CD/DVD drive. The links on the left of the window let you have just ...
User Manual (English)
Page 8
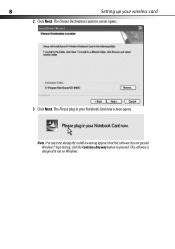
This software is designed to proceed. 8 Setting up your Notebook Card now screen opens. The Please plug in your wireless card 2 Click Next. The Choose Destination Location screen opens. 3 Click Next. Note: If at any time during the install a warning appears that the software has not passed Windows® logo testing, click the Continue Anyway button to run on Windows.
This software is designed to proceed. 8 Setting up your Notebook Card now screen opens. The Please plug in your wireless card 2 Click Next. The Choose Destination Location screen opens. 3 Click Next. Note: If at any time during the install a warning appears that the software has not passed Windows® logo testing, click the Continue Anyway button to run on Windows.

User Manual (English)
Page 9
Setting up your wireless card 9 4 Firmly insert the card, label side UP, into your Card, do so now. Note: If your system did not prompt you to insert your computer's CardBus slot until it stops. The Found New Hardware Wizard Welcome screen opens.
Setting up your wireless card 9 4 Firmly insert the card, label side UP, into your Card, do so now. Note: If your system did not prompt you to insert your computer's CardBus slot until it stops. The Found New Hardware Wizard Welcome screen opens.

User Manual (English)
Page 10
10 Setting up your wireless card 5 Click No, not this time, then click Next. The Completing the Found New Hardware Wizard opens. The Welcome to the Found New Hardware Wizard Install screen opens. 6 Click Install the software automatically (Recommended), then click Next.
10 Setting up your wireless card 5 Click No, not this time, then click Next. The Completing the Found New Hardware Wizard opens. The Welcome to the Found New Hardware Wizard Install screen opens. 6 Click Install the software automatically (Recommended), then click Next.
User Manual (English)
Page 11
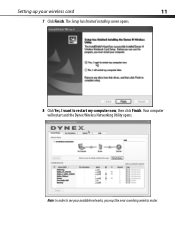
Note: In order to restart my computer now, then click Finish. Setting up your available networks, you must be near a working wireless router. Your computer will restart and the Dynex Wireless Networking Utility opens. The Setup has finished installing screen opens. 8 Click Yes, I want to see your wireless card 11 7 Click Finish.
Note: In order to restart my computer now, then click Finish. Setting up your available networks, you must be near a working wireless router. Your computer will restart and the Dynex Wireless Networking Utility opens. The Setup has finished installing screen opens. 8 Click Yes, I want to see your wireless card 11 7 Click Finish.

User Manual (English)
Page 12
Note: If the Dynex Wireless Networking Utility did not open automatically, double-click the Wireless Utility icon in the system tray near a working wireless router. 3 The WNU icon can also be found on the system tray will bring up your computer, double-click the Wireless Networking Utility (...WNU) icon located on the screen. Note: In order to your network To use the wireless networking utility: 1 After restarting your wireless card 9 Select a network to connect to from the Available Networks...
Note: If the Dynex Wireless Networking Utility did not open automatically, double-click the Wireless Utility icon in the system tray near a working wireless router. 3 The WNU icon can also be found on the system tray will bring up your computer, double-click the Wireless Networking Utility (...WNU) icon located on the screen. Note: In order to your network To use the wireless networking utility: 1 After restarting your wireless card 9 Select a network to connect to from the Available Networks...

User Manual (English)
Page 13
... the SSID, Signal Strength, Security Type, Channel, and Network Type. Setting up your wireless card 13 Accessing the wireless networking utility (WNU) To access the WNU from the Windows system tray: • Right-click the WNU icon on Start, Programs, Dynex, Wireless Networking Utility. Network Status This area displays the connectivity status of the current...
... the SSID, Signal Strength, Security Type, Channel, and Network Type. Setting up your wireless card 13 Accessing the wireless networking utility (WNU) To access the WNU from the Windows system tray: • Right-click the WNU icon on Start, Programs, Dynex, Wireless Networking Utility. Network Status This area displays the connectivity status of the current...

User Manual (English)
Page 14
14 Setting up your wireless card Connection Failure Other options will appear during attempts to connect, click Stop. Network Status and Solution Tips To further understand the current network status, click Open Wireless Utility. To re-try connecting, click Retry. The default screen is the Current Status tab and the Network Status section determines which connections are good or faulty. To stop trying to reconnect.
14 Setting up your wireless card Connection Failure Other options will appear during attempts to connect, click Stop. Network Status and Solution Tips To further understand the current network status, click Open Wireless Utility. To re-try connecting, click Retry. The default screen is the Current Status tab and the Network Status section determines which connections are good or faulty. To stop trying to reconnect.

User Manual (English)
Page 15
Setting up your wireless card 15 Setting Wireless Network Profiles The My Connections tab on your router has security (WEP or WPA) set on the WNU lets you try to connect. It also displays signal strength, security, and network type. Securing your Wi-Fi® Network If your router, then click Connect. The next few pages are advanced options of setting the security through the card instead of the router. When this box opens, type the encryption key you set , you will see this box when you add, edit, and delete connection profiles.
Setting up your wireless card 15 Setting Wireless Network Profiles The My Connections tab on your router has security (WEP or WPA) set on the WNU lets you try to connect. It also displays signal strength, security, and network type. Securing your Wi-Fi® Network If your router, then click Connect. The next few pages are advanced options of setting the security through the card instead of the router. When this box opens, type the encryption key you set , you will see this box when you add, edit, and delete connection profiles.

User Manual (English)
Page 16
... rotated and throughput loss of system generated encryption is data strengthened Click the Advanced button to see the simple security screen. 16 Setting up your wireless card Note: When you will first see other security options (below).
... rotated and throughput loss of system generated encryption is data strengthened Click the Advanced button to see the simple security screen. 16 Setting up your wireless card Note: When you will first see other security options (below).

User Manual (English)
Page 17
... of WEP. WPA uses both Temporal Key Integrity Protocol (TKIP) and AES for encryption of your wireless equipment must now set all wireless network cards/adapters to activate WEP or WPA and make sure all Wi-Fi-compliant wireless products. To use the hex WEP key from A-F and 0-9. It can be found in a... this is the mode that will be unable to enter 26 hex characters. WPA (with one another. Setting up your wireless card 17 WEP WEP is a common protocol that adds security to the clients automatically. WEP Encryption Keys-After selecting either the 64-bit or 128-bit...
... of WEP. WPA uses both Temporal Key Integrity Protocol (TKIP) and AES for encryption of your wireless equipment must now set all wireless network cards/adapters to activate WEP or WPA and make sure all Wi-Fi-compliant wireless products. To use the hex WEP key from A-F and 0-9. It can be found in a... this is the mode that will be unable to enter 26 hex characters. WPA (with one another. Setting up your wireless card 17 WEP WEP is a common protocol that adds security to the clients automatically. WEP Encryption Keys-After selecting either the 64-bit or 128-bit...

User Manual (English)
Page 18
...Dynex wireless card is disabled. Your client automatically exchanges security information and is added to let a device access your wireless network. Your client is used by the router. (See your wireless router's guide for encryption. You can also initiate the PBS method from the client side. 18 Setting up your wireless card Configuring your wireless N notebook card... to use security You should already have your wireless router set if you are indicated by a key icon. It...
...Dynex wireless card is disabled. Your client automatically exchanges security information and is added to let a device access your wireless network. Your client is used by the router. (See your wireless router's guide for encryption. You can also initiate the PBS method from the client side. 18 Setting up your wireless card Configuring your wireless N notebook card... to use security You should already have your wireless router set if you are indicated by a key icon. It...

User Manual (English)
Page 19
Setting up WEP To set up your wireless card 19 To access the security settings on the Edit information for a network page. 2 Select WEP from A-F and 0-9. For 64-bit WEP, you want to change. 3 ... in the Passphrase field, then click Generate to create a key. Setting up 64-Bit WEP encryption: 1 Select OPEN from the Network Authentication menu on the Wireless Network Properties tab on your card: 1 Open the WNU. 2 Click the My Connections tab, then click the connection you need to enter 10 hex characters.
Setting up WEP To set up your wireless card 19 To access the security settings on the Edit information for a network page. 2 Select WEP from A-F and 0-9. For 64-bit WEP, you want to change. 3 ... in the Passphrase field, then click Generate to create a key. Setting up 64-Bit WEP encryption: 1 Select OPEN from the Network Authentication menu on the Wireless Network Properties tab on your card: 1 Open the WNU. 2 Click the My Connections tab, then click the connection you need to enter 10 hex characters.

User Manual (English)
Page 20
... can type in a passphrase in your wireless router, you will temporarily lose your wireless connection until you are using a wireless client (such as your wireless client. For 128-bit WEP, you don't remember the hex key, your wireless network will be configured with a wireless notebook card) to applying changes in the wireless router. If you need to be locked...
... can type in a passphrase in your wireless router, you will temporarily lose your wireless connection until you are using a wireless client (such as your wireless client. For 128-bit WEP, you don't remember the hex key, your wireless network will be configured with a wireless notebook card) to applying changes in the wireless router. If you need to be locked...

User Manual (English)
Page 21
...If you activate security on your wireless network will now need to turn on the security settings in home and small office networking. 1 Select WPA-PSK or WPA2-PSK (no server): Note: Choose this setting if your notebook equipped with a wireless notebook card) to be locked out of ...your computers on your wireless client. Caution: If you are using a wireless client (such as your network does not use a radius server. WPA2-PSK (no ...
...If you activate security on your wireless network will now need to turn on the security settings in home and small office networking. 1 Select WPA-PSK or WPA2-PSK (no server): Note: Choose this setting if your notebook equipped with a wireless notebook card) to be locked out of ...your computers on your wireless client. Caution: If you are using a wireless client (such as your network does not use a radius server. WPA2-PSK (no ...