
User Manual (English)
Page 2
2 Dynex DX-LCD22-09 22" LCD TV Contents Important safety instructions...4 TV components ...6 Front ...6 Left side...6 Back...7 Remote control ...7 Setting up your TV...8 Installing remote control batteries...8 Using the remote control ...8 Connecting to AC power...8 Connecting an antenna or basic cable...9 Connecting a cable or satellite box...9 Making audio and video connections...9 Using your TV ...11 ...
2 Dynex DX-LCD22-09 22" LCD TV Contents Important safety instructions...4 TV components ...6 Front ...6 Left side...6 Back...7 Remote control ...7 Setting up your TV...8 Installing remote control batteries...8 Using the remote control ...8 Connecting to AC power...8 Connecting an antenna or basic cable...9 Connecting a cable or satellite box...9 Making audio and video connections...9 Using your TV ...11 ...
User Manual (English)
Page 6
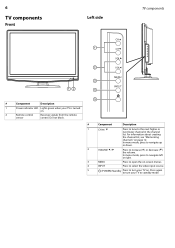
... select the video input source. 5 (POWER)/Standby Press to standby mode. For information about creating the channel list, see "Memorizing channels" on . 2 Remote control Receives signals from the remote sensor control. Press again to turn your TV to turn your TV on. In menu mode, press to navigate up or down. 2 VOLUME...
... select the video input source. 5 (POWER)/Standby Press to standby mode. For information about creating the channel list, see "Memorizing channels" on . 2 Remote control Receives signals from the remote sensor control. Press again to turn your TV to turn your TV on. In menu mode, press to navigate up or down. 2 VOLUME...
User Manual (English)
Page 7
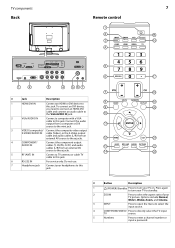
TV components Back Remote control 1 2 3 4 7 15 16 5 6 17 1 2 3 4 5 67 7 18 # Jack Description 8 19 1 HDMI/DVI IN Connect an HDMI or DVI device to enter a channel number or input a password. ...
TV components Back Remote control 1 2 3 4 7 15 16 5 6 17 1 2 3 4 5 67 7 18 # Jack Description 8 19 1 HDMI/DVI IN Connect an HDMI or DVI device to enter a channel number or input a password. ...
User Manual (English)
Page 8
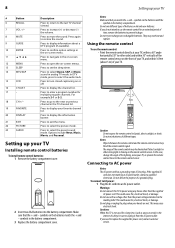
...cord has a grounding-type AC line plug. Notes: Make sure that the + and - If you do not intend to use the remote control: • Point the remote control directly at your TV, within a 60° angle horizontally (30° to display your hands are wet. Caution Do not expose...fire, electrical shock, or damage. Do not plug or unplug the plug when your favorite channel list. 8 Setting up your TV Installing remote control batteries To install remote control batteries: 1 Remove the battery compartment cover. 2 Insert two AAA batteries into an AC power outlet. Press to navigate in the ...
...cord has a grounding-type AC line plug. Notes: Make sure that the + and - If you do not intend to use the remote control: • Point the remote control directly at your TV, within a 60° angle horizontally (30° to display your hands are wet. Caution Do not expose...fire, electrical shock, or damage. Do not plug or unplug the plug when your favorite channel list. 8 Setting up your TV Installing remote control batteries To install remote control batteries: 1 Remove the battery compartment cover. 2 Insert two AAA batteries into an AC power outlet. Press to navigate in the ...
User Manual (English)
Page 11
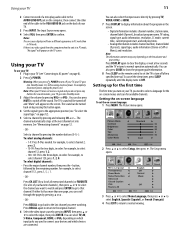
... 15.1, press 1, 5, •, 1. - OR - Select a channel by the remaining number. You can also press GUIDE to show the program guide information. 8 Press SLEEP on the remote control to set the on -screen displays will appear on the TV screen.
... 15.1, press 1, 5, •, 1. - OR - Select a channel by the remaining number. You can also press GUIDE to show the program guide information. 8 Press SLEEP on the remote control to set the on -screen displays will appear on the TV screen.
User Manual (English)
Page 17
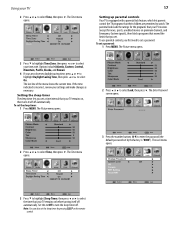
...: 1 Press MENU. If the time indicated is equipped with a parental lock feature, which lets parents control the TV programs that your TV remains on the remote control. To set a password: 1 Press MENU. Setting the sleep timer The sleep timer lets you set a time interval that your TV remains on premium channels...
...: 1 Press MENU. If the time indicated is equipped with a parental lock feature, which lets parents control the TV programs that your TV remains on the remote control. To set a password: 1 Press MENU. Setting the sleep timer The sleep timer lets you set a time interval that your TV remains on premium channels...
User Manual (English)
Page 21
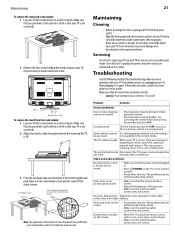
... TV is in these illustrations may differ from your actual product, and is 90°. 3 Press the two black tabs on the TV or the remote control. • Try another channel. Pull off the stand column. Lost password Use the master password (1397) to repair a defective TV yourself. The TV cabinet...
... TV is in these illustrations may differ from your actual product, and is 90°. 3 Press the two black tabs on the TV or the remote control. • Try another channel. Pull off the stand column. Lost password Use the master password (1397) to repair a defective TV yourself. The TV cabinet...
User Manual (English)
Page 22
...harmful interference, and (2) this device must accept any interference received, including interference that the sound is no sound Audio noise Remote control The remote control does not work Use a highly directional antenna or cable TV. • Make sure that may cause undesired operation....1-125, CADTV 1-135, DTV 2-69 Audio multiplex BTSC system Power requirement AC 120 V, 60 Hz Power consumption 48 W Dimensions 20.24 × 16.14 × 7.09 inches (W × H × D) (514 × 410 × 180 mm) Weight 11.5 lbs (5.2 kg) Input terminals Composite video/audio L/R (1) S-Video (1)...
...harmful interference, and (2) this device must accept any interference received, including interference that the sound is no sound Audio noise Remote control The remote control does not work Use a highly directional antenna or cable TV. • Make sure that may cause undesired operation....1-125, CADTV 1-135, DTV 2-69 Audio multiplex BTSC system Power requirement AC 120 V, 60 Hz Power consumption 48 W Dimensions 20.24 × 16.14 × 7.09 inches (W × H × D) (514 × 410 × 180 mm) Weight 11.5 lbs (5.2 kg) Input terminals Composite video/audio L/R (1) S-Video (1)...


