Warranty (English)
Page 2
... as fuses or batteries • Products where the factory applied serial number has been altered or removed REPAIR REPLACEMENT AS PROVIDED UNDER THIS WARRANTY IS YOUR EXCLUSIVE REMEDY. DYNEX PRODUCTS MAKES NO OTHER EXPRESS WARRANTIES WITH RESPECT TO THE PRODUCT, ALL EXPRESS AND IMPLIED WARRANTIES FOR THE PRODUCT,... IN DURATION TO THE WARRANTY PERIOD SET FORTH ABOVE AND NO WARRANTIES, WHETHER EXPRESS OR IMPLIED, WILL APPLY AFTER THE WARRANTY PERIOD. This warranty also does not cover: • Damage due to incorrect operation or maintenance • Connection to service the product • ...
... as fuses or batteries • Products where the factory applied serial number has been altered or removed REPAIR REPLACEMENT AS PROVIDED UNDER THIS WARRANTY IS YOUR EXCLUSIVE REMEDY. DYNEX PRODUCTS MAKES NO OTHER EXPRESS WARRANTIES WITH RESPECT TO THE PRODUCT, ALL EXPRESS AND IMPLIED WARRANTIES FOR THE PRODUCT,... IN DURATION TO THE WARRANTY PERIOD SET FORTH ABOVE AND NO WARRANTIES, WHETHER EXPRESS OR IMPLIED, WILL APPLY AFTER THE WARRANTY PERIOD. This warranty also does not cover: • Damage due to incorrect operation or maintenance • Connection to service the product • ...
User Manual (English)
Page 2
... 8 Connecting to a 12V car power outlet 9 Connecting headphones 10 Connecting a TV or monitor 10 Using your player 11 Playing a DVD or audio CD 11 Controlling DVD or audio CD playback 11 Adjusting the volume 11 Viewing DVD information 12 Viewing audio CD information 13 Opening the DVD main menu 13 Selecting a viewing angle 13 Selecting an audio language 14 Enlarging the display image 14 Repeating a chapter, title, or DVD 15 Repeating a track or CD 15 Selecting a subtitle language 16 Viewing photos 16 Using the Setup menu 17 Troubleshooting 18...
... 8 Connecting to a 12V car power outlet 9 Connecting headphones 10 Connecting a TV or monitor 10 Using your player 11 Playing a DVD or audio CD 11 Controlling DVD or audio CD playback 11 Adjusting the volume 11 Viewing DVD information 12 Viewing audio CD information 13 Opening the DVD main menu 13 Selecting a viewing angle 13 Selecting an audio language 14 Enlarging the display image 14 Repeating a chapter, title, or DVD 15 Repeating a track or CD 15 Selecting a subtitle language 16 Viewing photos 16 Using the Setup menu 17 Troubleshooting 18...

User Manual (English)
Page 3
... grounding-type plug. 7" and 9" Dual-Screen Portable DVD Players 3 Important safety instructions 1 Read these instructions. 2 Keep these instructions. 3 Heed all warnings. 4 Follow all servicing to qualified service personnel. The wide blade is damaged, liquid has been spilled or objects have fallen into your safety. Install in any way, such as power-supply cord or plug is provided for your outlet, consult an electrician for replacement...
... grounding-type plug. 7" and 9" Dual-Screen Portable DVD Players 3 Important safety instructions 1 Read these instructions. 2 Keep these instructions. 3 Heed all warnings. 4 Follow all servicing to qualified service personnel. The wide blade is damaged, liquid has been spilled or objects have fallen into your safety. Install in any way, such as power-supply cord or plug is provided for your outlet, consult an electrician for replacement...
User Manual (English)
Page 4
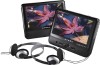
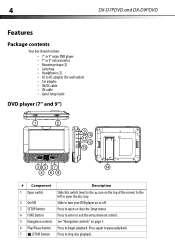
... to pause playback. 4 DX-D7PDVD and DX-D9PDVD Features Package contents Your box should contain: • 7" or 9" main DVD player • 7" or 9" extra monitor • Mounting straps (2) • Carry bag • Headphones (2) • AC to DC adapter (for wall outlet) • Car adapter • AV/DC cable • AV cable • Quick Setup Guide DVD player (7" and 9") SETUP FUNC. # Component 1 Open switch 2 On/Off 3 SETUP button 4 FUNC button 5 Navigation controls 6 Play/Pause button 7 (STOP) button Description Slide...
... to pause playback. 4 DX-D7PDVD and DX-D9PDVD Features Package contents Your box should contain: • 7" or 9" main DVD player • 7" or 9" extra monitor • Mounting straps (2) • Carry bag • Headphones (2) • AC to DC adapter (for wall outlet) • Car adapter • AV/DC cable • AV cable • Quick Setup Guide DVD player (7" and 9") SETUP FUNC. # Component 1 Open switch 2 On/Off 3 SETUP button 4 FUNC button 5 Navigation controls 6 Play/Pause button 7 (STOP) button Description Slide...

User Manual (English)
Page 5
... cable (not supplied). In playback mode, press to fast reverse the playback. / In Menu mode, press to move up your player is powered and turned on a desktop or table. In playback mode, press to confirm a selection. OK In menu mode, press to fast forward the playback. 7" and 9" Dual-Screen Portable DVD Players 5 # Component 8 Power indicator 9 DC IN jack 10 DC OUT jack 11 AV OUT jack 12 Headphone jack 13 VOL control 14 Stand Description Lights...
... cable (not supplied). In playback mode, press to fast reverse the playback. / In Menu mode, press to move up your player is powered and turned on a desktop or table. In playback mode, press to confirm a selection. OK In menu mode, press to fast forward the playback. 7" and 9" Dual-Screen Portable DVD Players 5 # Component 8 Power indicator 9 DC IN jack 10 DC OUT jack 11 AV OUT jack 12 Headphone jack 13 VOL control 14 Stand Description Lights...
User Manual (English)
Page 6
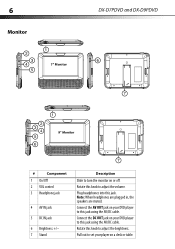
..., the speakers are muted. Rotate this jack. Connect the AV OUT jack on your DVD player to this knob to adjust the volume. Pull out to set your DVD player to turn the monitor on a desk or table. Rotate this jack using the AV/DC cable. 6 Monitor 7" Monitor DX-D7PDVD and DX-D9PDVD 9" Monitor # Component 1 On/Off 2 VOL control 3 Headphone jack 4 AV IN jack 5 DC IN...
..., the speakers are muted. Rotate this jack. Connect the AV OUT jack on your DVD player to this knob to adjust the volume. Pull out to set your DVD player to turn the monitor on a desk or table. Rotate this jack using the AV/DC cable. 6 Monitor 7" Monitor DX-D7PDVD and DX-D9PDVD 9" Monitor # Component 1 On/Off 2 VOL control 3 Headphone jack 4 AV IN jack 5 DC IN...
User Manual (English)
Page 7
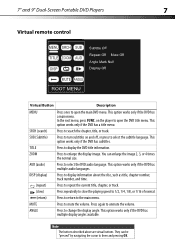
... to open the DVD title menu. This option works only if the DVD has subtitles. AUD (audio) Press to open the main DVD menu. 7" and 9" Dual-Screen Portable DVD Players 7 Virtual remote control MENU SRCH SUB TITLE ZOOM AUD DISP Subtitle Off Repeat Off Mute Off Angle Mark Null Display Off MUTE ANGLE ROOT MENU Virtual Button Description MENU Press once to select the subtitle language. SUB (Subtitle) Press to turn subtitles on the player to select the DVD audio language. This option works only...
... to open the DVD title menu. This option works only if the DVD has subtitles. AUD (audio) Press to open the main DVD menu. 7" and 9" Dual-Screen Portable DVD Players 7 Virtual remote control MENU SRCH SUB TITLE ZOOM AUD DISP Subtitle Off Repeat Off Mute Off Angle Mark Null Display Off MUTE ANGLE ROOT MENU Virtual Button Description MENU Press once to select the subtitle language. SUB (Subtitle) Press to turn subtitles on the player to select the DVD audio language. This option works only...
User Manual (English)
Page 9
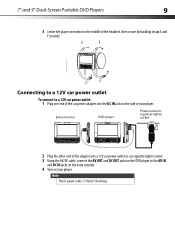
... of the car power adapter into a 12V car power outlet or car cigarette lighter socket. 3 Using the AV/DC cable, connect the AV OUT and DC OUT jacks on the DVD player to the AV IN and DC IN jacks on the extra monitor. 4 Turn on the side of your player. Extra monitor DVD player Power outlet or cigarette lighter socket SETUP FUNC. 2 Plug...
... of the car power adapter into a 12V car power outlet or car cigarette lighter socket. 3 Using the AV/DC cable, connect the AV OUT and DC OUT jacks on the DVD player to the AV IN and DC IN jacks on the extra monitor. 4 Turn on the side of your player. Extra monitor DVD player Power outlet or cigarette lighter socket SETUP FUNC. 2 Plug...
User Manual (English)
Page 10
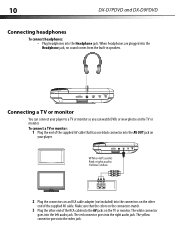
.... 10 DX-D7PDVD and DX-D9PDVD Connecting headphones To connect headphones: • Plug headphones into the left audio Red=right audio Yellow=video 2 Plug the connectors on an RCA cable adapter (not included) into the connectors on the other end of the RCA cable into the AV jacks on the TV or monitor. Connecting a TV or monitor You can watch DVDs or view photos...
.... 10 DX-D7PDVD and DX-D9PDVD Connecting headphones To connect headphones: • Plug headphones into the left audio Red=right audio Yellow=video 2 Plug the connectors on an RCA cable adapter (not included) into the connectors on the other end of the RCA cable into the AV jacks on the TV or monitor. Connecting a TV or monitor You can watch DVDs or view photos...
User Manual (English)
Page 11
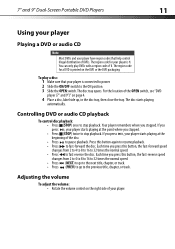
... press this button again to resume playback. • Press to fast-forward the disc. Each time you stopped. 7" and 9" Dual-Screen Portable DVD Players 11 Using your player Playing a DVD or audio CD Note Most DVDs and your player have region codes that your player is connected to power. 2 Slide the ON/OFF switch to the ON position. 3 Slide the OPEN switch. The region code for a DVD is printed on page 4. 4 Place a disc, label side up, in the disc tray, then close the tray.
... press this button again to resume playback. • Press to fast-forward the disc. Each time you stopped. 7" and 9" Dual-Screen Portable DVD Players 11 Using your player Playing a DVD or audio CD Note Most DVDs and your player have region codes that your player is connected to power. 2 Slide the ON/OFF switch to the ON position. 3 Slide the OPEN switch. The region code for a DVD is printed on page 4. 4 Place a disc, label side up, in the disc tray, then close the tray.
User Manual (English)
Page 13
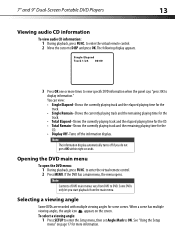
... "Using the Setup menu" on the screen. Single Elapsed Track 1/24 00:00 3 Press OK one or more information. Note The information display automatically turns off the information display. Opening the DVD main menu To open the DVD menu: 1 During playback, press FUNC. to ON. To select a viewing angle: 1 Press SETUP to enter the Setup menu, then set Angle Mark to enter the virtual remote control. 2 Press MENU. If the DVD has a main menu, the menu opens. Selecting a viewing...
... "Using the Setup menu" on the screen. Single Elapsed Track 1/24 00:00 3 Press OK one or more information. Note The information display automatically turns off the information display. Opening the DVD main menu To open the DVD menu: 1 During playback, press FUNC. to ON. To select a viewing angle: 1 Press SETUP to enter the Setup menu, then set Angle Mark to enter the virtual remote control. 2 Press MENU. If the DVD has a main menu, the menu opens. Selecting a viewing...

User Manual (English)
Page 15
... To repeat a track or CD: 1 During playback, press FUNC. 7" and 9" Dual-Screen Portable DVD Players 15 3 Press OK one or more times to enlarge the image two, three, or four times when the panel says "press OK to enlarge image." 4 Press OK a fourth time to return to select: • Track-Repeats the currently playing track. • All-Repeats the entire CD. • Off-Turns off the repeat function.
... To repeat a track or CD: 1 During playback, press FUNC. 7" and 9" Dual-Screen Portable DVD Players 15 3 Press OK one or more times to enlarge the image two, three, or four times when the panel says "press OK to enlarge image." 4 Press OK a fourth time to return to select: • Track-Repeats the currently playing track. • All-Repeats the entire CD. • Off-Turns off the repeat function.
User Manual (English)
Page 16
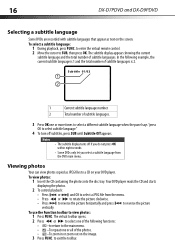
... select a subtitle language: 1 During playback, press FUNC. To view photos: 1 Insert the CD containing the photos into the disc tray. 16 DX-D7PDVD and DX-D9PDVD Selecting a subtitle language Some DVDs are recorded with subtitle languages that appear as JPEG files to a CD on your DVD player. In the following functions: • -to return to the main menu. • -To repeat one or more times to select a different subtitle language when the panel says "press OK to select subtitle language." 4 To turn off...
... select a subtitle language: 1 During playback, press FUNC. To view photos: 1 Insert the CD containing the photos into the disc tray. 16 DX-D7PDVD and DX-D9PDVD Selecting a subtitle language Some DVDs are recorded with subtitle languages that appear as JPEG files to a CD on your DVD player. In the following functions: • -to return to the main menu. • -To repeat one or more times to select a different subtitle language when the panel says "press OK to select subtitle language." 4 To turn off...
User Manual (English)
Page 17
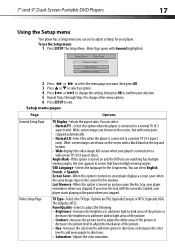
... option is connected to a normal TV (4:3 aspect ratio). If you close the tray with some parts cropped automatically. • Normal/LB-Select this when the player is turned on, your player. Options are watching has multiple viewing angles, the icon appears in scenes that have multiple viewing angles. 7" and 9" Dual-Screen Portable DVD Players 17 Using the Setup menu Your player has a Setup menu you can use the Setup menu: 1 Press SETUP. Setup Menu -- You can select: • Normal...
... option is connected to a normal TV (4:3 aspect ratio). If you close the tray with some parts cropped automatically. • Normal/LB-Select this when the player is turned on, your player. Options are watching has multiple viewing angles, the icon appears in scenes that have multiple viewing angles. 7" and 9" Dual-Screen Portable DVD Players 17 Using the Setup menu Your player has a Setup menu you can use the Setup menu: 1 Press SETUP. Setup Menu -- You can select: • Normal...
User Manual (English)
Page 18
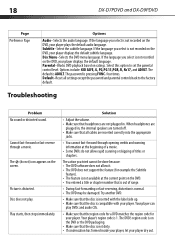
... DVD does not support the feature (for your player plays the default audio language. Play starts, then stops immediately. Your player can play . The default is distorted. Troubleshooting Problem No sound or distorted sound. Picture is ADULT. The DVD's region code is out of titles or chapters. Subtitle-Select the subtitle language. The password is 1. Disc does not play DVDs and audio CDs. • Make sure that is on the DVD, your player. Your player's region code is pressing FUNC. Cannot fast-forward or fast-reverse through opening credits...
... DVD does not support the feature (for your player plays the default audio language. Play starts, then stops immediately. Your player can play . The default is distorted. Troubleshooting Problem No sound or distorted sound. Picture is ADULT. The DVD's region code is out of titles or chapters. Subtitle-Select the subtitle language. The password is 1. Disc does not play DVDs and audio CDs. • Make sure that is on the DVD, your player. Your player's region code is pressing FUNC. Cannot fast-forward or fast-reverse through opening credits...
User Manual (English)
Page 19
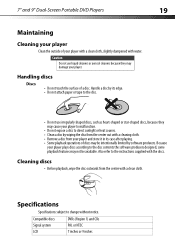
... Do not use irregularly shaped discs, such as heart-shaped or star-shaped discs, because they may damage your player. Compatible discs Signal system LCD DVDs (Region 1) and CDs PAL or NTSC 7 inches or 9 inches Because your player plays discs according to change without notice. Cleaning discs • Before playback, wipe the disc outwards from the center with the discs. 7" and 9" Dual-Screen Portable DVD Players 19 Maintaining Cleaning your player Clean the...
... Do not use irregularly shaped discs, such as heart-shaped or star-shaped discs, because they may damage your player. Compatible discs Signal system LCD DVDs (Region 1) and CDs PAL or NTSC 7 inches or 9 inches Because your player plays discs according to change without notice. Cleaning discs • Before playback, wipe the disc outwards from the center with the discs. 7" and 9" Dual-Screen Portable DVD Players 19 Maintaining Cleaning your player Clean the...
User Manual (English)
Page 20
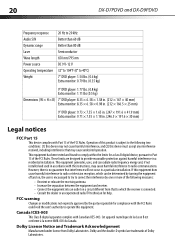
... Canada. Canada ICES-003 This Class B digital apparatus complies with the instructions, may cause harmful interference to operate this equipment. Dolby License Notice and Trademark Acknowledgement Manufactured under license from that interference will not occur in a particular installation. 20 DX-D7PDVD and DX-D9PDVD Frequency response Audio S/N Dynamic range Laser Wave length Power source Operating temperature Weight 20 Hz to 20...
... Canada. Canada ICES-003 This Class B digital apparatus complies with the instructions, may cause harmful interference to operate this equipment. Dolby License Notice and Trademark Acknowledgement Manufactured under license from that interference will not occur in a particular installation. 20 DX-D7PDVD and DX-D9PDVD Frequency response Audio S/N Dynamic range Laser Wave length Power source Operating temperature Weight 20 Hz to 20...

User Manual (English)
Page 21
... Warranty Period lasts for a period of Dynex and are required after the Warranty Period expires, you notify Dynex during the Warranty Period. or (2) replace the Product at no charge with the Product. This warranty lasts as long as fuses or batteries • Products where the factory applied serial number has been altered or removed If you received with new or rebuilt comparable products or parts...
... Warranty Period lasts for a period of Dynex and are required after the Warranty Period expires, you notify Dynex during the Warranty Period. or (2) replace the Product at no charge with the Product. This warranty lasts as long as fuses or batteries • Products where the factory applied serial number has been altered or removed If you received with new or rebuilt comparable products or parts...

Quick Setup Guide (English)
Page 1
... when installing player in a list or menu. In playback mode, press to adjust the volume. SETUP FUNC. # COMPONENT 1 OPEN 2 On/Off 3 SETUP button 4 FUNC. 5 Navigation controls 6 button 7 button 8 Power indicator 9 DC IN jack 10 DC OUT jack 11 AV OUT jack 12 Headphone jack 13 VOL control 14 Stand 15 Strap slots DESCRIPTION Slide to turn your player on or off . Press to an AC/DC adapter or cigarette lighter adapter. Connect to...
... when installing player in a list or menu. In playback mode, press to adjust the volume. SETUP FUNC. # COMPONENT 1 OPEN 2 On/Off 3 SETUP button 4 FUNC. 5 Navigation controls 6 button 7 button 8 Power indicator 9 DC IN jack 10 DC OUT jack 11 AV OUT jack 12 Headphone jack 13 VOL control 14 Stand 15 Strap slots DESCRIPTION Slide to turn your player on or off . Press to an AC/DC adapter or cigarette lighter adapter. Connect to...
Quick Setup Guide (English)
Page 2
... = video Using your DVD player Playing a DVD or audio CD Note: Most DVDs and your player. 2 Plug the other end of your DVD player have fallen into a 12V car power outlet or car cigarette lighter socket. 3 Using the AV/DC cable, connect AV OUT and DC OUT on , the user is damaged, liquid has been spilled or objects have region codes that may cause harmful interference to qualified service...
... = video Using your DVD player Playing a DVD or audio CD Note: Most DVDs and your player. 2 Plug the other end of your DVD player have fallen into a 12V car power outlet or car cigarette lighter socket. 3 Using the AV/DC cable, connect AV OUT and DC OUT on , the user is damaged, liquid has been spilled or objects have region codes that may cause harmful interference to qualified service...


