
Quick Setup Guide (English)
Page 1
... To program your existing remote control to work with the + and - DX-32L151A11_DX-37L130A11_10-0569_QSG_V1_EN.eps 1 6/1/2010 6:16:53 PM Front and side features 32"and 37" LCD TV QUICK SETUP GUIDE DX-32L151A11/DX-37L130A11 Remote control Power sensor indicator Installing the stand 1 Remove the stand from... cord Back of the remote, lift the cover off the remote. Make sure that the + and - Universal remote control TV codes(for all Dynex TVs manufactured after Jan. 1, 2007) Universal remote control makers and models Philips PHDVD5, PH5DSS, PMDVR8, PDVR8 RCA RCU807 One for common...
... To program your existing remote control to work with the + and - DX-32L151A11_DX-37L130A11_10-0569_QSG_V1_EN.eps 1 6/1/2010 6:16:53 PM Front and side features 32"and 37" LCD TV QUICK SETUP GUIDE DX-32L151A11/DX-37L130A11 Remote control Power sensor indicator Installing the stand 1 Remove the stand from... cord Back of the remote, lift the cover off the remote. Make sure that the + and - Universal remote control TV codes(for all Dynex TVs manufactured after Jan. 1, 2007) Universal remote control makers and models Philips PHDVD5, PH5DSS, PMDVR8, PDVR8 RCA RCU807 One for common...

Quick Setup Guide (English)
Page 2
... ENGLISH 10-0569 09-0xxx 32" and 37" LCD TV I QUICK SETUP GUIDE I DX-32L151A11/DX-37L130A11 The Time screen opens. This comprehensive guide includes everything from basic how-to steps to highlight Home Mode (recommended) or Retail Mode. DYNEX is also available at www.dynexproducts.com. MY CY 5...(U.S./Canada markets) 01 800-926-3020 (Mexico market) Distributed by the broadcaster. DX-32L151A11_DX-37L130A11_10-0569_QSG_V1_EN.eps 2 6/1/2010 6:17:17 PM Turning on your TV for the first time 1 Plug in your TV and turn off the sound. Press to return to view an information banner. de...
... ENGLISH 10-0569 09-0xxx 32" and 37" LCD TV I QUICK SETUP GUIDE I DX-32L151A11/DX-37L130A11 The Time screen opens. This comprehensive guide includes everything from basic how-to steps to highlight Home Mode (recommended) or Retail Mode. DYNEX is also available at www.dynexproducts.com. MY CY 5...(U.S./Canada markets) 01 800-926-3020 (Mexico market) Distributed by the broadcaster. DX-32L151A11_DX-37L130A11_10-0569_QSG_V1_EN.eps 2 6/1/2010 6:17:17 PM Turning on your TV for the first time 1 Plug in your TV and turn off the sound. Press to return to view an information banner. de...
Firmware Installation Guide (English)
Page 1
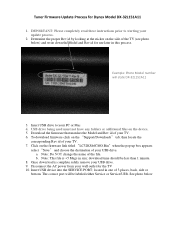
... photo below) and write down the Model and Rev id for Dynex Model DX‐32L151A11 1. Note: This file is Example: Photo Model number will state DX‐32L151A11 3. then locate the corresponding Rev id of your TV. 6. Note: Do NOT change the name of your USB drive. b. Download the firmware that matches the Model and... "Save" and choose the destination of your update process. 2. Tuner Firmware Update Process for use later in this process. Insert USB drive to starting your TV. 7.
... photo below) and write down the Model and Rev id for Dynex Model DX‐32L151A11 1. Note: This file is Example: Photo Model number will state DX‐32L151A11 3. then locate the corresponding Rev id of your TV. 6. Note: Do NOT change the name of your USB drive. b. Download the firmware that matches the Model and... "Save" and choose the destination of your update process. 2. Tuner Firmware Update Process for use later in this process. Insert USB drive to starting your TV. 7.

Firmware Installation Guide (English)
Page 2
... and repeat the process. a. If the upgrade fails again contact Dynex at 1-800-305-2204. 14. While the TV is still turned on; While the TV is still turned on the remote or TV once the unit has been plugged in) TV will flicker red and blue 13. the flickering of the power ... reconnect the power cord to the wall outlet for a few seconds) a. The upgrade is now complete. Note: this message only appears for the TV; After completion, the TV will auto power on . b. Note: If the process takes more than 5 minutes, that means the upgrade failed. The process is complete when the...
... and repeat the process. a. If the upgrade fails again contact Dynex at 1-800-305-2204. 14. While the TV is still turned on; While the TV is still turned on the remote or TV once the unit has been plugged in) TV will flicker red and blue 13. the flickering of the power ... reconnect the power cord to the wall outlet for a few seconds) a. The upgrade is now complete. Note: this message only appears for the TV; After completion, the TV will auto power on . b. Note: If the process takes more than 5 minutes, that means the upgrade failed. The process is complete when the...

User Manual (English)
Page 1
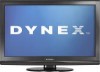
32" and 37" LCD TVs DX-32L151A11/DX-37L130A11 USER GUIDE
32" and 37" LCD TVs DX-32L151A11/DX-37L130A11 USER GUIDE

User Manual (English)
Page 2
ii Dynex DX-32L151A11/DX-37L130A11 32" and 37" LCD TVs Contents CHILD SAFETY 1 Important safety instructions 2 Warnings 2 Cautions 2 Installing the stand or removing the stand column 4 Installing the stand 4 Removing the stand column 4 Installing a wall-mount bracket 4 TV components 4 Accessories 4 Front 5 Side 5 Back 6 Remote control ...a computer 10 Connecting a home theater system 10 Connecting headphones 11 Turning on your TV for the first time 11 Understanding the basics 12 Turning your TV on or off 12 Selecting the video input source 12 Selecting a channel 12 Adjusting...
ii Dynex DX-32L151A11/DX-37L130A11 32" and 37" LCD TVs Contents CHILD SAFETY 1 Important safety instructions 2 Warnings 2 Cautions 2 Installing the stand or removing the stand column 4 Installing the stand 4 Removing the stand column 4 Installing a wall-mount bracket 4 TV components 4 Accessories 4 Front 5 Side 5 Back 6 Remote control ...a computer 10 Connecting a home theater system 10 Connecting headphones 11 Turning on your TV for the first time 11 Understanding the basics 12 Turning your TV on or off 12 Selecting the video input source 12 Selecting a channel 12 Adjusting...
User Manual (English)
Page 3
...Selecting the signal source 17 Hiding channels 17 Setting up a favorite channel list 18 Adding or changing a channel label 18 Checking digital TV signal strength 19 Setting parental controls 19 Turning parental controls on or off 19 Setting or changing the password 20 Turning the button ...parental control levels 21 Using closed captioning 23 Turning closed captioning on or off 23 Selecting the closed captioning mode 24 Customizing digital TV closed captioning styles 24 Adjusting time settings 25 Setting the date and time 25 Setting the sleep timer 26 Adjusting menu settings 26...
...Selecting the signal source 17 Hiding channels 17 Setting up a favorite channel list 18 Adding or changing a channel label 18 Checking digital TV signal strength 19 Setting parental controls 19 Turning parental controls on or off 19 Setting or changing the password 20 Turning the button ...parental control levels 21 Using closed captioning 23 Turning closed captioning on or off 23 Selecting the closed captioning mode 24 Customizing digital TV closed captioning styles 24 Adjusting time settings 25 Setting the date and time 25 Setting the sleep timer 26 Adjusting menu settings 26...
User Manual (English)
Page 5
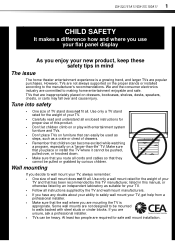
... of wall mount does not fit all enclosed instructions for proper use your flat panel display As you are mounting the TV is a growing trend, and larger TVs are popular purchases. DX-32L151A11/DX-37L130A11 1 f CHILD SAFETY It makes a difference how and where you use of this manual, or otherwise listed by an independent laboratory...
... of wall mount does not fit all enclosed instructions for proper use your flat panel display As you are mounting the TV is a growing trend, and larger TVs are popular purchases. DX-32L151A11/DX-37L130A11 1 f CHILD SAFETY It makes a difference how and where you use of this manual, or otherwise listed by an independent laboratory...

User Manual (English)
Page 6
... from lightning and power line surges. The wide blade or the third prong are important operating and maintenance instructions in the literature accompanying your TV. 1 Read these instructions. 2 Keep these instructions. 3 Heed all warnings. 4 Follow all servicing to rain or moisture. When a ... your doctor after rinsing for long periods of fire or electric shock, do not touch the liquid in clean water. 2 DX-32L151A11/DX-37L130A11 Important safety instructions Important safety instructions CAUTION RISK OF ELECTRIC SHOCK DO NOT OPEN This symbol indicates that have the same ...
... from lightning and power line surges. The wide blade or the third prong are important operating and maintenance instructions in the literature accompanying your TV. 1 Read these instructions. 2 Keep these instructions. 3 Heed all warnings. 4 Follow all servicing to rain or moisture. When a ... your doctor after rinsing for long periods of fire or electric shock, do not touch the liquid in clean water. 2 DX-32L151A11/DX-37L130A11 Important safety instructions Important safety instructions CAUTION RISK OF ELECTRIC SHOCK DO NOT OPEN This symbol indicates that have the same ...

User Manual (English)
Page 7
... and cellular telephones away from cool surroundings into a warm room or if the temperature of mercury. End of life directives Your TV contains tin-lead solder and a fluorescent lamp containing a small amount of the room rises suddenly. For disposal or recycling information,...reused. These non-active pixels do not adversely affect the performance of your TV, and are covered by following the operating instructions. Important safety instructions DX-32L151A11/DX-37L130A11 3 • If your TV does not operate normally by the operating instructions because incorrect adjustment of the ...
... and cellular telephones away from cool surroundings into a warm room or if the temperature of mercury. End of life directives Your TV contains tin-lead solder and a fluorescent lamp containing a small amount of the room rises suddenly. For disposal or recycling information,...reused. These non-active pixels do not adversely affect the performance of your TV, and are covered by following the operating instructions. Important safety instructions DX-32L151A11/DX-37L130A11 3 • If your TV does not operate normally by the operating instructions because incorrect adjustment of the ...

User Manual (English)
Page 8
... If you want to attach the TV to a wall-mount bracket (not provided), you handle the TV carefully when attempting to the column with the four M5 screws (provided). TV components Accessories Make sure the following accessories are not sure of the table or bench. 4 DX-32L151A11/DX-37L130A11 Installing the stand or removing ...that your warranty. • Before assembly or removal of the table or bench. See "Removing the stand column" on a wall or other flat surface. Dynex is not intended to stand upright on the edge of the stand, unplug the power cord. Do not move or handle the...
... If you want to attach the TV to a wall-mount bracket (not provided), you handle the TV carefully when attempting to the column with the four M5 screws (provided). TV components Accessories Make sure the following accessories are not sure of the table or bench. 4 DX-32L151A11/DX-37L130A11 Installing the stand or removing ...that your warranty. • Before assembly or removal of the table or bench. See "Removing the stand column" on a wall or other flat surface. Dynex is not intended to stand upright on the edge of the stand, unplug the power cord. Do not move or handle the...

User Manual (English)
Page 9
TV components Front DX-32L151A11/DX-37L130A11 5 Side Item Name 1 Remote control sensor 2 Power indicator Description Receives signals from the remote control. Flashes red when your TV is turned on the TV or put the TV in standby mode. Item Name 1 CH / CH 2 VOL+ / VOL3 MENU 4 INPUT 5 (power) Description In TV...more information, see "Selecting the video input source" on -screen menu. Press to receive power even in standby mode. Caution: The TV continues to open the INPUT SOURCE menu. For more information, see "Aiming the remote control" on page 8. Press to turn on...
TV components Front DX-32L151A11/DX-37L130A11 5 Side Item Name 1 Remote control sensor 2 Power indicator Description Receives signals from the remote control. Flashes red when your TV is turned on the TV or put the TV in standby mode. Item Name 1 CH / CH 2 VOL+ / VOL3 MENU 4 INPUT 5 (power) Description In TV...more information, see "Selecting the video input source" on -screen menu. Press to receive power even in standby mode. Caution: The TV continues to open the INPUT SOURCE menu. For more information, see "Aiming the remote control" on page 8. Press to turn on...

User Manual (English)
Page 10
...on page 11. 3 HDMI 2 jack Connect an HDMI device to this jack. For more information, see "Connecting an antenna, cable TV, or satellite TV box" on page 9. Connect a digital optical cable to this 6 DIGITAL OUTPUT connector, then to the COMPONENT IN jacks Press to select... jack. Do not use. For more information, see "Connecting a computer" on the TV or put the TV in standby mode. 6 DX-32L151A11/DX-37L130A11 Back AV IN VIDEO L AUDIO R HDMI 2 SERVICE PORT TV components Item Name Description 9 COMPONENT IN jacks Connect component video devices to these jacks. ...
...on page 11. 3 HDMI 2 jack Connect an HDMI device to this jack. For more information, see "Connecting an antenna, cable TV, or satellite TV box" on page 9. Connect a digital optical cable to this 6 DIGITAL OUTPUT connector, then to the COMPONENT IN jacks Press to select... jack. Do not use. For more information, see "Connecting a computer" on the TV or put the TV in standby mode. 6 DX-32L151A11/DX-37L130A11 Back AV IN VIDEO L AUDIO R HDMI 2 SERVICE PORT TV components Item Name Description 9 COMPONENT IN jacks Connect component video devices to these jacks. ...

User Manual (English)
Page 11
... language), or MONO. For more information, see "Turning closed captioning on or off " on page 18. For more information, see "Adjusting the TV picture" on page 13. Press to go to turn closed captioning on -screen menus. For more information, see "Displaying program information" on page ...on page 13. Mixing old and new batteries can shorten the life of new batteries and can cause a rash. Using the remote control DX-32L151A11/DX-37L130A11 7 Item Name Description 3 HDMI Press once to select a device connected to select the picture mode. Press the dot button to enter...
... language), or MONO. For more information, see "Turning closed captioning on or off " on page 18. For more information, see "Adjusting the TV picture" on page 13. Press to go to turn closed captioning on -screen menus. For more information, see "Displaying program information" on page ...on page 13. Mixing old and new batteries can shorten the life of new batteries and can cause a rash. Using the remote control DX-32L151A11/DX-37L130A11 7 Item Name Description 3 HDMI Press once to select a device connected to select the picture mode. Press the dot button to enter...

User Manual (English)
Page 12
... set-top box and your universal remote control or set-top box manufacturer, or call the Dynex Customer Care Center. See your universal remote control's instructions for your TV. 8 DX-32L151A11/DX-37L130A11 Making connections Aiming the remote control To aim the remote control: • Point the ...remote control towards the remote sensor on the front of cables to make sure that the TV and the device are turned off...
... set-top box and your universal remote control or set-top box manufacturer, or call the Dynex Customer Care Center. See your universal remote control's instructions for your TV. 8 DX-32L151A11/DX-37L130A11 Making connections Aiming the remote control To aim the remote control: • Point the ...remote control towards the remote sensor on the front of cables to make sure that the TV and the device are turned off...
User Manual (English)
Page 13
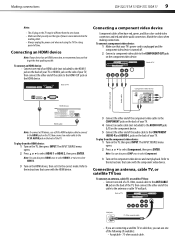
... correct mode. Back of the audio cable to select Component. 3 Turn on the component video device and start playback. Making connections DX-32L151A11/DX-37L130A11 9 Notes: • The AC plug on the TV may be different from the one shown. • Make sure that to get the best quality possible. The INPUT SOURCE menu...
... correct mode. Back of the audio cable to select Component. 3 Turn on the component video device and start playback. Making connections DX-32L151A11/DX-37L130A11 9 Notes: • The AC plug on the TV may be different from the one shown. • Make sure that to get the best quality possible. The INPUT SOURCE menu...
User Manual (English)
Page 14
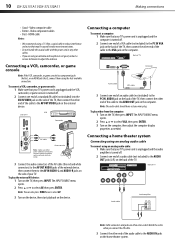
...the AUDIO IN jacks on the computer. Video composite cable • Better - Back of the TV. 10 DX-32L151A11/DX-37L130A11 Making connections AV IN VIDEO L AUDIO R HDMI 2 SERVICE PORT • Good - Back of TV Computer Audio cable VGA cable 3 Connect one end of the cable to connectors. Note: The audio...jack on the home theater system. Video component cables • Best - To connect a VCR, camcorder, or game console: 1 Make sure that your TV's power cord is unplugged and the audio amplifier is turned off . 2 Connect one end of a VGA cable (not included) to the PC IN ...
...the AUDIO IN jacks on the computer. Video composite cable • Better - Back of the TV. 10 DX-32L151A11/DX-37L130A11 Making connections AV IN VIDEO L AUDIO R HDMI 2 SERVICE PORT • Good - Back of TV Computer Audio cable VGA cable 3 Connect one end of the cable to connectors. Note: The audio...jack on the home theater system. Video component cables • Best - To connect a VCR, camcorder, or game console: 1 Make sure that your TV's power cord is unplugged and the audio amplifier is turned off . 2 Connect one end of a VGA cable (not included) to the PC IN ...

User Manual (English)
Page 15
... To connect headphones: • Plug the headphones (not included) into the (headphone) jack on the side of TV Digital sound system Turning on your TV for the first time DX-32L151A11/DX-37L130A11 11 Connecting using a digital audio cable To connect using headphones, adjust the headphone volume to avoid excessively loud volume... highlight Mode, then press or to select Manual (to set the date/time manually), or Auto (the date/time are automatically set by the TV signal source, based on the time zone you selected). 7 If you want, then press ENTER. You can damage your hearing. Note: The ...
... To connect headphones: • Plug the headphones (not included) into the (headphone) jack on the side of TV Digital sound system Turning on your TV for the first time DX-32L151A11/DX-37L130A11 11 Connecting using a digital audio cable To connect using headphones, adjust the headphone volume to avoid excessively loud volume... highlight Mode, then press or to select Manual (to set the date/time manually), or Auto (the date/time are automatically set by the TV signal source, based on the time zone you selected). 7 If you want, then press ENTER. You can damage your hearing. Note: The ...

User Manual (English)
Page 16
...connection you have made your TV source screen opens. -ORIf you select Retail Mode, a message stating "Are you sure you want from the list, then press ENTER to that channel. While scanning, the TV displays a progress report. - 12 DX-32L151A11/DX-37L130A11 Understanding the basics ...9 Press or to close the menu. At this mode Energy saving is connected to your TV is still receiving power. Warning: When your TV through the INPUT SOURCE menu. ...
...connection you have made your TV source screen opens. -ORIf you select Retail Mode, a message stating "Are you sure you want from the list, then press ENTER to that channel. While scanning, the TV displays a progress report. - 12 DX-32L151A11/DX-37L130A11 Understanding the basics ...9 Press or to close the menu. At this mode Energy saving is connected to your TV is still receiving power. Warning: When your TV through the INPUT SOURCE menu. ...

User Manual (English)
Page 17
..., video input source, and resolution. • Digital signal information-Displays channel number, station name, channel label (if preset), broadcast program name, TV rating, signal type, audio information, resolution, CC mode, current time, and current program start and end times when watching a digital channel. &#... Channel menu Picture Audio Setup Channel Off Select MENU Exit TV Source Auto Scan F avorites Show/Hide Channel No. Adjusting the volume To adjust the volume: • Press VOL+ or VOL- Understanding the basics DX-32L151A11/DX-37L130A11 13 Note: If the list has more than one...
..., video input source, and resolution. • Digital signal information-Displays channel number, station name, channel label (if preset), broadcast program name, TV rating, signal type, audio information, resolution, CC mode, current time, and current program start and end times when watching a digital channel. &#... Channel menu Picture Audio Setup Channel Off Select MENU Exit TV Source Auto Scan F avorites Show/Hide Channel No. Adjusting the volume To adjust the volume: • Press VOL+ or VOL- Understanding the basics DX-32L151A11/DX-37L130A11 13 Note: If the list has more than one...


