Revision 2 (5/2006)
Page 1
... INSTRUCTIONS. • BRING VACUUM CLEANER TO UPRIGHT POSITION WHEN USING THE HOSE AND ATTACHMENTS. • DO NOT LEAVE VACUUM CLEANER UNATTENDED WHEN PLUGGED IN. • REGULARLY CHECK THE FILTER TO CLEAN OR REPLACE. • WARNING: FULLY ASSEMBLE CLEANER BEFORE OPERATING. • WARNING: DO NOT USE SHARP OBJECTS TO CLEAN OUT THE HOSE SINCE THEY COULD CAUSE DAMAGE. • OCCASIONALLY REMOVE BRUSH AND CLEAN DEBRIS FROM END CAPS TO KEEP BRUSH ROTATING SMOOTHLY. • WARNING: THE CORDS, WIRES...
... INSTRUCTIONS. • BRING VACUUM CLEANER TO UPRIGHT POSITION WHEN USING THE HOSE AND ATTACHMENTS. • DO NOT LEAVE VACUUM CLEANER UNATTENDED WHEN PLUGGED IN. • REGULARLY CHECK THE FILTER TO CLEAN OR REPLACE. • WARNING: FULLY ASSEMBLE CLEANER BEFORE OPERATING. • WARNING: DO NOT USE SHARP OBJECTS TO CLEAN OUT THE HOSE SINCE THEY COULD CAUSE DAMAGE. • OCCASIONALLY REMOVE BRUSH AND CLEAN DEBRIS FROM END CAPS TO KEEP BRUSH ROTATING SMOOTHLY. • WARNING: THE CORDS, WIRES...
Revision 2 (5/2006)
Page 2
... new purchase will be present. • Keep the vacuum cleaner on the cleaner plate. We trust your support of warranty period. Visit our website at USA & Canada: 1-800-321-1134. Only the hand-held vacuum cleaners may be ready to use an extension cord with this vacuum cleaner to be delivered prepaid to install the proper outlet. This warranty does not cover brushes, bags, flat belts, filters and bulbs. If the plug...
... new purchase will be present. • Keep the vacuum cleaner on the cleaner plate. We trust your support of warranty period. Visit our website at USA & Canada: 1-800-321-1134. Only the hand-held vacuum cleaners may be ready to use an extension cord with this vacuum cleaner to be delivered prepaid to install the proper outlet. This warranty does not cover brushes, bags, flat belts, filters and bulbs. If the plug...
Revision 2 (5/2006)
Page 3
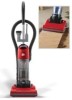
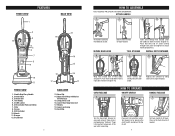
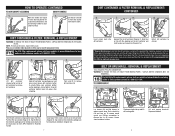
... of nozzle if needed. Tool Caddy 5. Push hose wand down into hole on the top of cleaner (Diagram 3). Turn cleaner on by tilting back until it snaps into electrical outlet. Dirt Container Release Button 7. Crevice Tool 4. Dust Brush 13 19 14 15 18 17 16 17 BACK VIEW 13. Dirt Container 10. Lower Hose/Clog Clean-out 17. Turn the Quick Cord Release for location) to tool caddy. Wheels 18. Cord Clip 5 HOW TO ASSEMBLE TOOL REQUIRED: PHILLIPS OR FLAT HEAD SCREWDRIVER ATTACH HANDLE...
... of nozzle if needed. Tool Caddy 5. Push hose wand down into hole on the top of cleaner (Diagram 3). Turn cleaner on by tilting back until it snaps into electrical outlet. Dirt Container Release Button 7. Crevice Tool 4. Dust Brush 13 19 14 15 18 17 16 17 BACK VIEW 13. Dirt Container 10. Lower Hose/Clog Clean-out 17. Turn the Quick Cord Release for location) to tool caddy. Wheels 18. Cord Clip 5 HOW TO ASSEMBLE TOOL REQUIRED: PHILLIPS OR FLAT HEAD SCREWDRIVER ATTACH HANDLE...
Revision 2 (5/2006)
Page 4
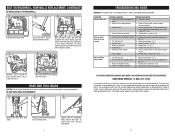
... be replaced once per year. TO REMOVE BELT 1. 2. 3. Lift dirt container release button on the dirt container and twist to remove the six (6) screws. The cleaning instructions may be discolored after emptying. 4. 4a. 5. DO NOT APPLY WATER TO PLEATED FILTER! Replace filter in dirt container (Diagram 7). HOW TO OPERATE: CONTINUED FLOOR/CARPET CLEANING CARRY HANDLE 1. 1. Please use Phillips screwdriver to close and secure lid (Diagram 7a). To remove nozzle guard, use reminder label located on the dirt conditions...
... be replaced once per year. TO REMOVE BELT 1. 2. 3. Lift dirt container release button on the dirt container and twist to remove the six (6) screws. The cleaning instructions may be discolored after emptying. 4. 4a. 5. DO NOT APPLY WATER TO PLEATED FILTER! Replace filter in dirt container (Diagram 7). HOW TO OPERATE: CONTINUED FLOOR/CARPET CLEANING CARRY HANDLE 1. 1. Please use Phillips screwdriver to close and secure lid (Diagram 7a). To remove nozzle guard, use reminder label located on the dirt conditions...
Revision 2 (5/2006)
Page 5
.... allow to be paid by the owner. Remove filter and clean - Review dirt container removal & replacement - To remove tool, twist and pull apart gently. 9 10 Flip cleaner back over and replace all six (6) screws. Needs service. 4. Dirt container not installed correctly. 2. Hose clogged. 1. remove obstruction/clog - Filter not installed completely. 1. The service parts used in the correct orientation (6a inset). TROUBLESHOOTING GUIDE WARNING: TO REDUCE RISK OF PERSONAL INJURY - Pg. 8, 9. 4. Thermal Protector activated. Pg. 6. 4. With new belt in place, pull and slide...
.... allow to be paid by the owner. Remove filter and clean - Review dirt container removal & replacement - To remove tool, twist and pull apart gently. 9 10 Flip cleaner back over and replace all six (6) screws. Needs service. 4. Dirt container not installed correctly. 2. Hose clogged. 1. remove obstruction/clog - Filter not installed completely. 1. The service parts used in the correct orientation (6a inset). TROUBLESHOOTING GUIDE WARNING: TO REDUCE RISK OF PERSONAL INJURY - Pg. 8, 9. 4. Thermal Protector activated. Pg. 6. 4. With new belt in place, pull and slide...


