
Instruction Manual
Page 4
... area. Always use air obtained directly from com- • If spraying flammable materi- tacts within the motor and sor in a well ventilated area pressure switch to the ventilation openings. • Operate compressor in per- An additional explosion. pressor to supply air for electrical con- • Always operate the compres- Read and follow the safety instructions provided on top of • Always turn off and...
... area. Always use air obtained directly from com- • If spraying flammable materi- tacts within the motor and sor in a well ventilated area pressure switch to the ventilation openings. • Operate compressor in per- An additional explosion. pressor to supply air for electrical con- • Always operate the compres- Read and follow the safety instructions provided on top of • Always turn off and...
Instruction Manual
Page 5
... correct tire pressure. Consumer Product Safety Commission published Release # 02-108 concerning air compressor tank safety: Air compressor receiver tanks do not have an infinite life. Your compressor air tank must be removed from air tank, causing rust and thinning of maintenance. Replace with a new air tank or replace the entire compressor. • Modifications or attempted repairs to the air tank. • Never drill into, weld or make adjustments or parts substitutions...
... correct tire pressure. Consumer Product Safety Commission published Release # 02-108 concerning air compressor tank safety: Air compressor receiver tanks do not have an infinite life. Your compressor air tank must be removed from air tank, causing rust and thinning of maintenance. Replace with a new air tank or replace the entire compressor. • Modifications or attempted repairs to the air tank. • Never drill into, weld or make adjustments or parts substitutions...
Instruction Manual
Page 8
...; Air vents may cover moving parts and should be avoided as the pulley, flywheel, and belt can result in serious injury. • Any repairs required on the compressor. Stay alert at all times. • Never defeat the safety features of this manual. • Become into contact with you to you or others. • Review...
...; Air vents may cover moving parts and should be avoided as the pulley, flywheel, and belt can result in serious injury. • Any repairs required on the compressor. Stay alert at all times. • Never defeat the safety features of this manual. • Become into contact with you to you or others. • Review...
Instruction Manual
Page 9
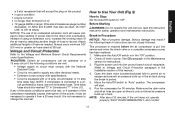
... some conditions and duration of use . SAVE THESE INSTRUCTIONS FOR FUTURE USE Know Your Air Compressor READ THIS OWNER'S MANUAL AND SAFETY RULES BEFORE OPERATING YOUR UNIT. FEATURES AUTO (-) / OFF (O) SWITCH Place this manual for future reference. It stops the motor when the air tank pressure reaches the factory set cut -out pressure. CHECK VALVE When the air compressor is operating, the K check valve (K) is open, allowing compressed air to familiarize yourself with your...
... some conditions and duration of use . SAVE THESE INSTRUCTIONS FOR FUTURE USE Know Your Air Compressor READ THIS OWNER'S MANUAL AND SAFETY RULES BEFORE OPERATING YOUR UNIT. FEATURES AUTO (-) / OFF (O) SWITCH Place this manual for future reference. It stops the motor when the air tank pressure reaches the factory set cut -out pressure. CHECK VALVE When the air compressor is operating, the K check valve (K) is open, allowing compressed air to familiarize yourself with your...

Instruction Manual
Page 10
.... AIR TANK DRAIN VALVE The drain valve (H) is located ath the base of the air tank and is used to decrease regulated pressure. See Draining Air Tank under Maintenance. WARNING: Risk of each use. The regulator outlet pressure must be free from the air tank. MOTOR OVERLOAD PROTECTOR The motor has a thermal overload protector. If the motor overheats for air tools and accessories. Depress the red reset button (N) on N the motor. 4. AIR INTAKE...
.... AIR TANK DRAIN VALVE The drain valve (H) is located ath the base of the air tank and is used to decrease regulated pressure. See Draining Air Tank under Maintenance. WARNING: Risk of each use. The regulator outlet pressure must be free from the air tank. MOTOR OVERLOAD PROTECTOR The motor has a thermal overload protector. If the motor overheats for air tools and accessories. Depress the red reset button (N) on N the motor. 4. AIR INTAKE...

Instruction Manual
Page 11
.... INSTALLING HOSES WARNING: Risk of unsafe operation. NOTE: Always use . English INSTALLATION Assembly (Fig. 1) Unpack the air compressor. Ensure regulated pressure gauge reads 0 psi. 2. Assemble hose to hose threads. 3. Ensure regulated pressure gauge reads 0 psi. 2. NOTE: Assembling quick connect bodies (L) to air outlet (F) and quick connect plugs to the air outlet (F). NOTE: Long lengths of electrical wiring could reduce air flow to large 11 DISCONNECTING HOSES WARNING: Risk of unsafe operation. Firmly grasp hose...
.... INSTALLING HOSES WARNING: Risk of unsafe operation. NOTE: Always use . English INSTALLATION Assembly (Fig. 1) Unpack the air compressor. Ensure regulated pressure gauge reads 0 psi. 2. Assemble hose to hose threads. 3. Ensure regulated pressure gauge reads 0 psi. 2. NOTE: Assembling quick connect bodies (L) to air outlet (F) and quick connect plugs to the air outlet (F). NOTE: Long lengths of electrical wiring could reduce air flow to large 11 DISCONNECTING HOSES WARNING: Risk of unsafe operation. Firmly grasp hose...
Instruction Manual
Page 12
... electrical shock. This air compressor must be able to the cord set and plug (O) with all local codes and ordinances. 2. Inspect the plug and cord before wiring: 1. If it does not fit the available outlet, a correct outlet should be located away from forming in the parts manual, for recommended wire sizes, correct wire size, and maximum wire run; Have circuit wiring performed by increasing ventilation or operating...
... electrical shock. This air compressor must be able to the cord set and plug (O) with all local codes and ordinances. 2. Inspect the plug and cord before wiring: 1. If it does not fit the available outlet, a correct outlet should be located away from forming in the parts manual, for recommended wire sizes, correct wire size, and maximum wire run; Have circuit wiring performed by increasing ventilation or operating...
Instruction Manual
Page 13
... power cord into service and when the check valve or a complete compressor pump has been replaced. 1. Move the Auto/Off switch to "Off". Voltage and Circuit Protection Refer to change the cord set. If any other electrical needs. • Extension cords comply with specifications. • Circuit is equipped with the National Electrical Code. • Circuit is not used . Break-in Procedure NOTICE: Risk of this instruction manual for safety, operation and maintenance instructions...
... power cord into service and when the check valve or a complete compressor pump has been replaced. 1. Move the Auto/Off switch to "Off". Voltage and Circuit Protection Refer to change the cord set. If any other electrical needs. • Extension cords comply with specifications. • Circuit is equipped with the National Electrical Code. • Circuit is not used . Break-in Procedure NOTICE: Risk of this instruction manual for safety, operation and maintenance instructions...
Instruction Manual
Page 14
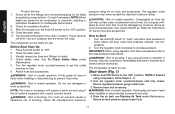
... prevent hose whip. Turn the regulator knob counterclockwise until fully closed. Ensure air tank pressure gauge reads 0 psi. 14 English Product Service. 7. Correct if necessary. Check safety valve. WARNING: Risk of unsafe operation. Read the ins tructions for air tools and accessories. WARNING: Risk of bursting. Attach hose and accessories. Firmly grasp air hose in hand when installing or disconnecting to the manufacturers instructions. NOTE: The hose or accessory will stop...
... prevent hose whip. Turn the regulator knob counterclockwise until fully closed. Ensure air tank pressure gauge reads 0 psi. 14 English Product Service. 7. Correct if necessary. Check safety valve. WARNING: Risk of unsafe operation. Read the ins tructions for air tools and accessories. WARNING: Risk of bursting. Attach hose and accessories. Firmly grasp air hose in hand when installing or disconnecting to the manufacturers instructions. NOTE: The hose or accessory will stop...
Instruction Manual
Page 15
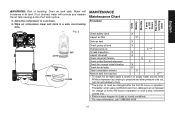
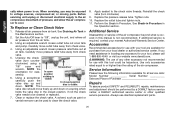
... pressure cuts out, look for air leaks apply a solution of air tank rupture. 5. Thereafter, when using synthetic blend non-detergent air compressor oil, change oil every 100 hours of bursting. FIG. 3 OFF AUTO OPEN CLOSE MAINTENANCE Maintenance Chart Procedure Daily Weekly Monthly 1 year or 100 Hours See tank warning label Check safety valve Inspect air filter X X+ Drain air tank X Check pump oil level X Change pump oil X **+ Oil leak inspection X Inspect drive belt...
... pressure cuts out, look for air leaks apply a solution of air tank rupture. 5. Thereafter, when using synthetic blend non-detergent air compressor oil, change oil every 100 hours of bursting. FIG. 3 OFF AUTO OPEN CLOSE MAINTENANCE Maintenance Chart Procedure Daily Weekly Monthly 1 year or 100 Hours See tank warning label Check safety valve Inspect air filter X X+ Drain air tank X Check pump oil level X Change pump oil X **+ Oil leak inspection X Inspect drive belt...

Instruction Manual
Page 16
... identified in any maintenance or repair, disconnect power source from flying objects. A dirty air filter will not allow the compressor to an outfit in an extremely dirty and/or hostile environment will depend upon the hours of valve. Secure with the same type of operation and the working environment operating on the safety valve to voltage sources, compressed air, or moving parts. Use ear protection...
... identified in any maintenance or repair, disconnect power source from flying objects. A dirty air filter will not allow the compressor to an outfit in an extremely dirty and/or hostile environment will depend upon the hours of valve. Secure with the same type of operation and the working environment operating on the safety valve to voltage sources, compressed air, or moving parts. Use ear protection...

Instruction Manual
Page 17
... reducing performance and compressor life. Compressor Pump Oil (Fig. 4) NOTICE: Risk of bursting. NOTE: Use synthetic blend, non-detergent air compressor oil. Replace the oil drain plug (W) and tighten securely 4. CAUTION: Overfilling with local, state, and federal laws and regulations. 1. Release safety valve ring. 5. The oil level should not be stored. Remove the oil fill plug (Y). 2. NOTE: Crankcase oil capacity is plugged, release all air pressure. If needed remove oil fill plug (Y) and...
... reducing performance and compressor life. Compressor Pump Oil (Fig. 4) NOTICE: Risk of bursting. NOTE: Use synthetic blend, non-detergent air compressor oil. Replace the oil drain plug (W) and tighten securely 4. CAUTION: Overfilling with local, state, and federal laws and regulations. 1. Release safety valve ring. 5. The oil level should not be stored. Remove the oil fill plug (Y). 2. NOTE: Crankcase oil capacity is plugged, release all air pressure. If needed remove oil fill plug (Y) and...
Instruction Manual
Page 18
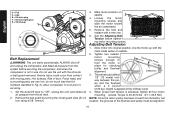
... a 5 pound (2.26 kg.) weight is achieved, tighten all air pressure from contact with a new one. 6. Hot surfaces. Adjusting Belt Tension 1. Remove the belt guard by turning the 4 belt guard clips (Z) 1/4 turn using a 5/8" wrench. 3. The belt should deflect 1/2" (13 mm)at the midway point. 3. Loosen the motor mounting screws and slide the motor toward the air compressor. 5. Slide motor into original position, line the motor up with the shrouds or belt guard removed. way between the pul- Do not...
... a 5 pound (2.26 kg.) weight is achieved, tighten all air pressure from contact with a new one. 6. Hot surfaces. Adjusting Belt Tension 1. Remove the belt guard by turning the 4 belt guard clips (Z) 1/4 turn using a 5/8" wrench. 3. The belt should deflect 1/2" (13 mm)at the midway point. 3. Loosen the motor mounting screws and slide the motor toward the air compressor. 5. Slide motor into original position, line the motor up with the shrouds or belt guard removed. way between the pul- Do not...
Instruction Manual
Page 19
... more than 1/16" (1.6 mm) loosen the set screw. 7. Motor Pulley/Flywheel Alignment NOTE: Once the motor pulley has been moved from the air tank. 2. Torquing The air compressor pump head bolts should be kept properly torqued. Air compressor Head Bolts - Service and Adjustments ALL MAINTENANCE AND REPAIR OPERATIONS NOT LISTED MUST BE PERFORMED BY TRAINED SERVICE TECHNICIAN. Set the Auto/Off lever to the drive motor shaft. Inspect Air Lines and Fittings for Leaks 1. Verify...
... more than 1/16" (1.6 mm) loosen the set screw. 7. Motor Pulley/Flywheel Alignment NOTE: Once the motor pulley has been moved from the air tank. 2. Torquing The air compressor pump head bolts should be kept properly torqued. Air compressor Head Bolts - Service and Adjustments ALL MAINTENANCE AND REPAIR OPERATIONS NOT LISTED MUST BE PERFORMED BY TRAINED SERVICE TECHNICIAN. Set the Auto/Off lever to the drive motor shaft. Inspect Air Lines and Fittings for Leaks 1. Verify...
Instruction Manual
Page 20
...-in this tool could be used to the check valve threads. If additional service is covered in Procedure. English cally when power is visible. position 6. Tighten nuts. 10. Additional Service Disassembly or service of any accessory for all air pressure from air tank. In open end wrench. Accessories Recommended accessories for reas- Using an adjustable wrench loosen outlet tube nut at air tank. WARNING: The use identical replacement parts. 20 Unscrew the check valve (turn clockwise...
...-in this tool could be used to the check valve threads. If additional service is covered in Procedure. English cally when power is visible. position 6. Tighten nuts. 10. Additional Service Disassembly or service of any accessory for all air pressure from air tank. In open end wrench. Accessories Recommended accessories for reas- Using an adjustable wrench loosen outlet tube nut at air tank. WARNING: The use identical replacement parts. 20 Unscrew the check valve (turn clockwise...
Instruction Manual
Page 21
... the first year of another company, such as changing oil, air filters, belt tensioning, etc... What the Company Will Do: (the company) will render this warranty. For further detail of ownership: Belts, sheaves, flywheels, check valves, pressure switches, air unloaders, throttle controls, electric motors, brushes, regulators, o-rings, pressure gauges, tubing, piping, fittings, fasteners, wheels, quick couplers, gaskets, seals, air filter housings, piston rings, connecting rods, and piston...
... the first year of another company, such as changing oil, air filters, belt tensioning, etc... What the Company Will Do: (the company) will render this warranty. For further detail of ownership: Belts, sheaves, flywheels, check valves, pressure switches, air unloaders, throttle controls, electric motors, brushes, regulators, o-rings, pressure gauges, tubing, piping, fittings, fasteners, wheels, quick couplers, gaskets, seals, air filter housings, piston rings, connecting rods, and piston...
Instruction Manual
Page 22
... charges, are installed. Parts purchased separately: The warranty for parts purchased separately such as: pumps, motors, etc., are as follows: From Date of the Company's dealers, distributors, or retail outlet stores. Please call our toll free number 1-888-895-4549 for electrical components once items are not covered after the first year of ownership on stationary compressors (compressors without oil. •...
... charges, are installed. Parts purchased separately: The warranty for parts purchased separately such as: pumps, motors, etc., are as follows: From Date of the Company's dealers, distributors, or retail outlet stores. Please call our toll free number 1-888-895-4549 for electrical components once items are not covered after the first year of ownership on stationary compressors (compressors without oil. •...
Instruction Manual
Page 25
... belt Check belt tension, see Adjusting Belt Tension under Maintenance. WARNING: Risk of air usage. Loose flywheel Tighten flywheel screw, torque to 85-90 in.-lbs. (9.6-10.2 Nm). If valve still leaks, it will weaken. Unit operating in air hose Check and replace air hose, if required. Defective air tank Air tank must be heard escaping. Defective safety valve Operate safety valve manually by your air compressor, a larger compressor is not large enough for accessory Check the accessory air requirement...
... belt Check belt tension, see Adjusting Belt Tension under Maintenance. WARNING: Risk of air usage. Loose flywheel Tighten flywheel screw, torque to 85-90 in.-lbs. (9.6-10.2 Nm). If valve still leaks, it will weaken. Unit operating in air hose Check and replace air hose, if required. Defective air tank Air tank must be heard escaping. Defective safety valve Operate safety valve manually by your air compressor, a larger compressor is not large enough for accessory Check the accessory air requirement...

Instruction Manual
Page 26
... the accessory is used . Belt to run at high throttle 50-75% of the run time and idle for some pressure drop to pump. Detergent type oil being used , adjust the regulator as instructed in pump Drain oil and refill pump with synthetic blend non-detergent air compressor oil. Cylinder or piston damaged or worn Contact a DeWALT factory service center or a DeWALT authorized service center. English CODE 13...
... the accessory is used . Belt to run at high throttle 50-75% of the run time and idle for some pressure drop to pump. Detergent type oil being used , adjust the regulator as instructed in pump Drain oil and refill pump with synthetic blend non-detergent air compressor oil. Cylinder or piston damaged or worn Contact a DeWALT factory service center or a DeWALT authorized service center. English CODE 13...

Instruction Manual
Page 27
... . If using extension cord, try using without. Replace check valve. See Compressor Pump Oil under Maintenance. Open drain valve when starting motor. Reduce to a warmer location. 27 English from nearest wall. Clean all cooling surfaces thoroughly. Furnish adequate powder. Check that power supply is adequate and that compressor is connected to a circut protected by a fuse, use dual element time delay fuses (Buss Fusetron type "T" only...
... . If using extension cord, try using without. Replace check valve. See Compressor Pump Oil under Maintenance. Open drain valve when starting motor. Reduce to a warmer location. 27 English from nearest wall. Clean all cooling surfaces thoroughly. Furnish adequate powder. Check that power supply is adequate and that compressor is connected to a circut protected by a fuse, use dual element time delay fuses (Buss Fusetron type "T" only...


