
Instruction Manual
Page 3
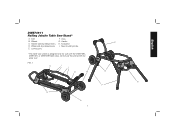
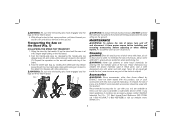
Axle B. Handle-side leg release levers D. Saw mounting holes * This table saw stand is designed only for use this stand with the DWE7490, DWE7491, or DWE7499 table saws. Locking pins F. Handle H. FIG. 1 C I I . Legs G. English DWE74911 Rolling Jobsite Table Saw Stand* A. Wheel-side leg release levers E. Do not use with any other tool. Kickstand I D B H D G F E A 1 Wheels C.
Axle B. Handle-side leg release levers D. Saw mounting holes * This table saw stand is designed only for use this stand with the DWE7490, DWE7491, or DWE7499 table saws. Locking pins F. Handle H. FIG. 1 C I I . Legs G. English DWE74911 Rolling Jobsite Table Saw Stand* A. Wheel-side leg release levers E. Do not use with any other tool. Kickstand I D B H D G F E A 1 Wheels C.
Instruction Manual
Page 4
..., please call 1-800-4-DEWALT (1-800-433-9258). CAUTION: Indicates a potentially hazardous situation which , if not avoided, could result in death or serious injury. All users and bystanders must wear eye protection that all stand fasteners are securely fastened and that conforms to the table saw . 2 WARNING...saw and the accessory. IF YOU HAVE ANY QUESTIONS OR COMMENTS ABOUT THIS OR ANY DEWALT TOOL, CALL US TOLL FREE AT: 1-800-4-DEWALT (1-800-433-9258) DW74911 Rolling Table Saw Stand with table saws only. NOTICE: Indicates a practice not related to these warnings may ...
..., please call 1-800-4-DEWALT (1-800-433-9258). CAUTION: Indicates a potentially hazardous situation which , if not avoided, could result in death or serious injury. All users and bystanders must wear eye protection that all stand fasteners are securely fastened and that conforms to the table saw . 2 WARNING...saw and the accessory. IF YOU HAVE ANY QUESTIONS OR COMMENTS ABOUT THIS OR ANY DEWALT TOOL, CALL US TOLL FREE AT: 1-800-4-DEWALT (1-800-433-9258) DW74911 Rolling Table Saw Stand with table saws only. NOTICE: Indicates a practice not related to these warnings may ...
Instruction Manual
Page 5
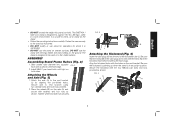
... in a work environment. FIG. 4 N N K M L M K 3 The DWE74911 table saw securely to be used on uneven surfaces. ASSEMBLY Assembling Stand Frame Halves (Fig. 2) 1. Attaching the Wheels and Axle (Fig. 3) 1. Place the wheels (B) on the stand. • Follow the mounting instructions carefully. Be sure that the holes (M) in the...bolts and nuts provided as shown until tight on both sides. English • DO NOT exceed the weight this stand can hold. DO NOT use the stand on a flat, stable surface. Attach the axle (A) to end bracket using two carriage bolts and lock nuts provided...
... in a work environment. FIG. 4 N N K M L M K 3 The DWE74911 table saw securely to be used on uneven surfaces. ASSEMBLY Assembling Stand Frame Halves (Fig. 2) 1. Attaching the Wheels and Axle (Fig. 3) 1. Place the wheels (B) on the stand. • Follow the mounting instructions carefully. Be sure that the holes (M) in the...bolts and nuts provided as shown until tight on both sides. English • DO NOT exceed the weight this stand can hold. DO NOT use the stand on a flat, stable surface. Attach the axle (A) to end bracket using two carriage bolts and lock nuts provided...
Instruction Manual
Page 6
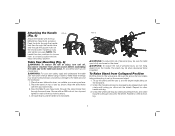
...of injury, turn unit off, disconnect machine from power source before assembling the table saw to set up the saw and stand. 1. Unfold the wheel side legs by stand handle onto kickstand. Install four nuts and tighten securely. WARNING: For your own safety, read and understand the table ...4 Lift assembly by rotating leg release levers and rotate leg until locking pin clicks into the detent. To Raise Stand from Collapsed Position Roll the stand to the table saw stand. Place the stand on top of personal injury, be sure the table saw as shown. FIG. 6 WARNING: To reduce the...
...of injury, turn unit off, disconnect machine from power source before assembling the table saw to set up the saw and stand. 1. Unfold the wheel side legs by stand handle onto kickstand. Install four nuts and tighten securely. WARNING: For your own safety, read and understand the table ...4 Lift assembly by rotating leg release levers and rotate leg until locking pin clicks into the detent. To Raise Stand from Collapsed Position Roll the stand to the table saw stand. Place the stand on top of personal injury, be sure the table saw as shown. FIG. 6 WARNING: To reduce the...
Instruction Manual
Page 7
... clean, dry air at extra cost from power source before installing and removing accessories, before adjusting or when making repairs. An accidental start-up the stand until locking pin clicks into a liquid. MAINTENANCE WARNING: To reduce the risk of personal injury, DO NOT operate the table saw is at a 90...risk of injury, turn unit off and disconnect it from your tool are available at least once a week. To reduce the risk of the tool. dewalt.com. 5 With all four feet are on the ground. English WARNING: Be sure that the locking pins have engaged and the legs are firmly ...
... clean, dry air at extra cost from power source before installing and removing accessories, before adjusting or when making repairs. An accidental start-up the stand until locking pin clicks into a liquid. MAINTENANCE WARNING: To reduce the risk of personal injury, DO NOT operate the table saw is at a 90...risk of injury, turn unit off and disconnect it from your tool are available at least once a week. To reduce the risk of the tool. dewalt.com. 5 With all four feet are on the ground. English WARNING: Be sure that the locking pins have engaged and the legs are firmly ...


