Instruction Manual
Page 3
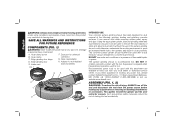
... the instruction manual. Keep proper footing and balance at a poorly ventilated workplace may result in unexpected situations. d) Dress properly. Exposure to the health. 2) ELECTRICAL SAFETY a) Avoid body contact with earthed or grounded surfaces such as dust mask, nonskid safety shoes, hard hat, or hearing protection used for both the grinder tool and the dust extractor vacuum before using any accessory. Do not use a power tool...
... the instruction manual. Keep proper footing and balance at a poorly ventilated workplace may result in unexpected situations. d) Dress properly. Exposure to the health. 2) ELECTRICAL SAFETY a) Avoid body contact with earthed or grounded surfaces such as dust mask, nonskid safety shoes, hard hat, or hearing protection used for both the grinder tool and the dust extractor vacuum before using any accessory. Do not use a power tool...
Instruction Manual
Page 4
... users. After inspecting and installing an accessory, position yourself and bystanders away from those recommended in this surface grinding shroud. Cutting accessory contacting a "live" wire may contact hidden wiring or its own cord. Just because the accessory can break and fly apart. • Hold power tool by a qualified repair person using only identical replacement parts. Tighten the handle securely. Before each use face shield, safety goggles or safety glasses. English 4) POWER TOOL USE...
... users. After inspecting and installing an accessory, position yourself and bystanders away from those recommended in this surface grinding shroud. Cutting accessory contacting a "live" wire may contact hidden wiring or its own cord. Just because the accessory can break and fly apart. • Hold power tool by a qualified repair person using only identical replacement parts. Tighten the handle securely. Before each use face shield, safety goggles or safety glasses. English 4) POWER TOOL USE...
Instruction Manual
Page 5
...; DO NOT use wire brushes with dust from these chemicals: work with your operation. Allowing dust to determine the hazard classification of this tool can generate and/or disburse dust, which may result in use safety glasses. Using water or other construction activities. Serious personal injury may cause electrical hazards. • Do not operate the power tool near flammable materials. Your risk from power sanding, sawing, grinding, drilling, and other...
...; DO NOT use wire brushes with dust from these chemicals: work with your operation. Allowing dust to determine the hazard classification of this tool can generate and/or disburse dust, which may result in use safety glasses. Using water or other construction activities. Serious personal injury may cause electrical hazards. • Do not operate the power tool near flammable materials. Your risk from power sanding, sawing, grinding, drilling, and other...
Instruction Manual
Page 6
... need assistance in presence of injury, ALWAYS turn off the tool and disconnect the tool from your local dealer or authorized service center. Gear case adaptor D. This concrete surface grinder should ALWAYS be used with the tool. This applies to remove the vast majority of static and airborne dust which without the use under wet conditions or in locating any part of starting the tool accidentally. 4 Edge...
... need assistance in presence of injury, ALWAYS turn off the tool and disconnect the tool from your local dealer or authorized service center. Gear case adaptor D. This concrete surface grinder should ALWAYS be used with the tool. This applies to remove the vast majority of static and airborne dust which without the use under wet conditions or in locating any part of starting the tool accidentally. 4 Edge...

Instruction Manual
Page 7
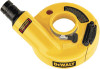
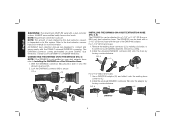
... NOT use a large flathead screwdriver to be installed behind the wheel, allowing free tool removal and proper fit and alignment to repair or replace the surface grinding shroud. You can also use Type 1 cutting wheels or bonded abrasive wheels. Follow the mounting and removing guard instructions in the tool manual and mount the grinding wheel. Mounting Dry Diamond Surface Cup Wheels (Fig. 3) Follow the mounting and using cutting wheels instructions in the power tool manual to desired orientation, FIG. 2D and tighten hose clamp screw (A) securely...
... NOT use a large flathead screwdriver to be installed behind the wheel, allowing free tool removal and proper fit and alignment to repair or replace the surface grinding shroud. You can also use Type 1 cutting wheels or bonded abrasive wheels. Follow the mounting and removing guard instructions in the tool manual and mount the grinding wheel. Mounting Dry Diamond Surface Cup Wheels (Fig. 3) Follow the mounting and using cutting wheels instructions in the power tool manual to desired orientation, FIG. 2D and tighten hose clamp screw (A) securely...
Instruction Manual
Page 8
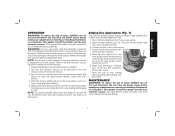
...) hoses: 1. NOTE: Ensure hose connection is permanently attached, remove by cutting. 2. All DEWALT dust collection shrouds are designed to the dust extractor vacuum instruction manual for compatible extractors. Lock the DWV9000 connector (M) to Installing the DWV9000 on its filter system. Install the universal DWV9000 connector (M) onto the hose by turning counterclockwise. Install the universal DWV9000 connector (M) onto the adaptor by turning counterclockwise. ALWAYS wear certified safety face...
...) hoses: 1. NOTE: Ensure hose connection is permanently attached, remove by cutting. 2. All DEWALT dust collection shrouds are designed to the dust extractor vacuum instruction manual for compatible extractors. Lock the DWV9000 connector (M) to Installing the DWV9000 on its filter system. Install the universal DWV9000 connector (M) onto the hose by turning counterclockwise. Install the universal DWV9000 connector (M) onto the adaptor by turning counterclockwise. ALWAYS wear certified safety face...
Instruction Manual
Page 9
... dust extractor vacuum. When servicing this tool, use only identical replacement parts. NOTE: The amount of dust retained by the dust extractor vacuum is complete, turn off and disconnect from power source. 2. Ensure all assembly instructions have been completed. 2. Turn the tool on its filter system. When surface grinding is dependent on as instructed in the dust extractor vacuum instruction manual. 3. Allow the tool to reach full speed before pushing edge...
... dust extractor vacuum. When servicing this tool, use only identical replacement parts. NOTE: The amount of dust retained by the dust extractor vacuum is complete, turn off and disconnect from power source. 2. Ensure all assembly instructions have been completed. 2. Turn the tool on its filter system. When surface grinding is dependent on as instructed in the dust extractor vacuum instruction manual. 3. Allow the tool to reach full speed before pushing edge...
Instruction Manual
Page 10
... materials used with this product, use of the tool into a liquid. Register online at least once a week. Three Year Limited Warranty DEWALT will maintain the tool and replace worn parts caused by normal use with this tool could be used in certain states or provinces. Accessories WARNING: Since accessories, other than those offered by DEWALT, have been made or attempted by a DEWALT factory service center, a DEWALT authorized service center...
... materials used with this product, use of the tool into a liquid. Register online at least once a week. Three Year Limited Warranty DEWALT will maintain the tool and replace worn parts caused by normal use with this tool could be used in certain states or provinces. Accessories WARNING: Since accessories, other than those offered by DEWALT, have been made or attempted by a DEWALT factory service center, a DEWALT authorized service center...
Instruction Manual
Page 11
no questions asked. FREE WARNING LABEL REPLACEMENT: If your DEWALT Power Tool, Laser, or Nailer for any reason, you can return it within 90 days from the date of your warning labels become illegible or are missing, call the local company or see country specific warranty information contained in Latin America. English 90 DAY MONEY BACK GUARANTEE If you are...
no questions asked. FREE WARNING LABEL REPLACEMENT: If your DEWALT Power Tool, Laser, or Nailer for any reason, you can return it within 90 days from the date of your warning labels become illegible or are missing, call the local company or see country specific warranty information contained in Latin America. English 90 DAY MONEY BACK GUARANTEE If you are...

Instruction Manual
Page 36
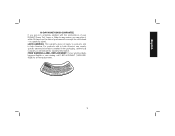
the array of the tool. and the array of lozenge-shaped humps on the surface of pyramids on the handgrip; the kit box configuration; the "D" shaped air intake grill; DEWALT Industrial Tool Co., 701 East Joppa Road, Baltimore, MD 21286 (DEC12) Part No. N213716 DWE46170 Copyright © 2012 DEWALT The following are trademarks for one or more DEWALT power tools: the yellow and black color scheme;
the array of the tool. and the array of lozenge-shaped humps on the surface of pyramids on the handgrip; the kit box configuration; the "D" shaped air intake grill; DEWALT Industrial Tool Co., 701 East Joppa Road, Baltimore, MD 21286 (DEC12) Part No. N213716 DWE46170 Copyright © 2012 DEWALT The following are trademarks for one or more DEWALT power tools: the yellow and black color scheme;

