Instruction Manual
Page 3
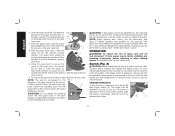
... cause you to rain or wet conditions. c) Do not expose power tools to lose control. 2) ELECTRICAL SAFETY a) Power tool plugs must match the outlet. IF YOU HAVE ANY QUESTIONS OR COMMENTS ABOUT THIS OR ANY DEWALT TOOL, CALL US TOLL FREE AT: 1-800-4-DEWALT (1-800-433-9258). Never use a ground fault circuit interrupter (GFCI) protected...
... cause you to rain or wet conditions. c) Do not expose power tools to lose control. 2) ELECTRICAL SAFETY a) Power tool plugs must match the outlet. IF YOU HAVE ANY QUESTIONS OR COMMENTS ABOUT THIS OR ANY DEWALT TOOL, CALL US TOLL FREE AT: 1-800-4-DEWALT (1-800-433-9258). Never use a ground fault circuit interrupter (GFCI) protected...
Instruction Manual
Page 4
..., ensure these instructions, taking into account the working conditions and the work to be caught in personal injury. Power tools are caused by poorly maintained power tools. in a hazardous situation. 2 English 3) PERSONAL SAFETY a) Stay alert, watch what you are tired or under ... all times. b) Use personal protective equipment. Such preventive safety measures reduce the risk of the power tool for misalignment or binding of the power tool may affect the power tool's operation. Use of starting . e) Do not overreach. Loose clothes, jewelry or long hair can reduce...
..., ensure these instructions, taking into account the working conditions and the work to be caught in personal injury. Power tools are caused by poorly maintained power tools. in a hazardous situation. 2 English 3) PERSONAL SAFETY a) Stay alert, watch what you are tired or under ... all times. b) Use personal protective equipment. Such preventive safety measures reduce the risk of the power tool for misalignment or binding of the power tool may affect the power tool's operation. Use of starting . e) Do not overreach. Loose clothes, jewelry or long hair can reduce...
Instruction Manual
Page 5
...filtrating particles generated by insulated gripping surfaces only, when performing an operation where the cutting accessory may cause loss of the power tool. As appropriate, wear dust mask, hearing protectors, gloves and workshop apron capable of the accessory must wear personal protective equipment...warnings, instructions, illustrations and specifications provided with arbor holes that the safety of the rotating accessory and run out of your power tool. b) Do not use face shield, safety goggles or safety glasses. g) Wear personal protective equipment. The eye protection must be...
...filtrating particles generated by insulated gripping surfaces only, when performing an operation where the cutting accessory may cause loss of the power tool. As appropriate, wear dust mask, hearing protectors, gloves and workshop apron capable of the accessory must wear personal protective equipment...warnings, instructions, illustrations and specifications provided with arbor holes that the safety of the rotating accessory and run out of your power tool. b) Do not use face shield, safety goggles or safety glasses. g) Wear personal protective equipment. The eye protection must be...
Instruction Manual
Page 6
... and excessive accumulation of the binding. e) Do not attach a saw chain woodcarving blade or toothed saw blade. k) Never lay the power tool down until the accessory has come to snag the rotating accessory and cause loss of snagging. Abrasive wheels may cause electrical hazards. b) Never...and are taken. The guard helps 4 Corners, sharp edges or bouncing have a tendency to a complete stop. n) Do not operate the power tool near the rotating accessory. o) Do not use auxiliary handle, if provided, for your side. For example, if an abrasive wheel is exposed towards...
... and excessive accumulation of the binding. e) Do not attach a saw chain woodcarving blade or toothed saw blade. k) Never lay the power tool down until the accessory has come to snag the rotating accessory and cause loss of snagging. Abrasive wheels may cause electrical hazards. b) Never...and are taken. The guard helps 4 Corners, sharp edges or bouncing have a tendency to a complete stop. n) Do not operate the power tool near the rotating accessory. o) Do not use auxiliary handle, if provided, for your side. For example, if an abrasive wheel is exposed towards...
Instruction Manual
Page 7
... the workpiece. The wheel may cut for peripheral grinding, side forces applied to these wheels may propel the spinning wheel and the power tool directly at the point of operation, is not suitable for your body in motion otherwise kickback may be different from your fingers or snag...them to shatter. e) Support panels or any reason, switch off wheel. The protruding wheel may bind, walk up or kickback if the power tool is in line with the side of wheel pinching and kickback. Proper wheel flanges support the wheel thus reducing the possibility of wheel binding. Additional...
... the workpiece. The wheel may cut for peripheral grinding, side forces applied to these wheels may propel the spinning wheel and the power tool directly at the point of operation, is not suitable for your body in motion otherwise kickback may be different from your fingers or snag...them to shatter. e) Support panels or any reason, switch off wheel. The protruding wheel may bind, walk up or kickback if the power tool is in line with the side of wheel pinching and kickback. Proper wheel flanges support the wheel thus reducing the possibility of wheel binding. Additional...
Instruction Manual
Page 8
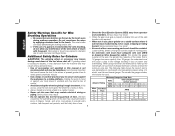
... for cracks or flaws. • Always handle and store wheels in a careful manner. • Never cut into area that would cause the tool to provide extra cushion, take frequent rest periods, and limit daily time of power and overheating. Additional Safety Rules for long periods of time. ...contains at speeds greater than 18 gauge. Holding the work load and centrifugal forces. Do not overstress the wires by the operating action of this tool for Grinders WARNING: The grinding wheel or accessory may result. • Air vents often cover moving parts. • An extension cord must ...
... for cracks or flaws. • Always handle and store wheels in a careful manner. • Never cut into area that would cause the tool to provide extra cushion, take frequent rest periods, and limit daily time of power and overheating. Additional Safety Rules for long periods of time. ...contains at speeds greater than 18 gauge. Holding the work load and centrifugal forces. Do not overstress the wires by the operating action of this tool for Grinders WARNING: The grinding wheel or accessory may result. • Air vents often cover moving parts. • An extension cord must ...
Instruction Manual
Page 9
... power supply agrees with approved safety equipment, such as follows: V volts A amperes Hz.......... Direct particles away from this tool can generate and/or disperse dust, which may cause serious and permanent respiratory or other reproductive harm. Class I Construction (grounded...) ............alternating or direct current no no load speed .......... DEWALT tools are as those dust masks that conforms to cause cancer, birth defects or other injury. English WARNING: ALWAYS use NIOSH...
... power supply agrees with approved safety equipment, such as follows: V volts A amperes Hz.......... Direct particles away from this tool can generate and/or disperse dust, which may cause serious and permanent respiratory or other reproductive harm. Class I Construction (grounded...) ............alternating or direct current no no load speed .......... DEWALT tools are as those dust masks that conforms to cause cancer, birth defects or other injury. English WARNING: ALWAYS use NIOSH...
Instruction Manual
Page 10
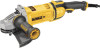
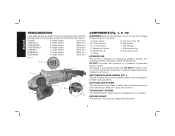
... rpm DWE4559NG 9" Angle Grinder 6,500 rpm DWE4559CNG 9" Angle Grinder 6,500 rpm DWE4597 7" Angle Grinder 8,500 rpm DWE4597N 7" Angle Grinder 8,500 rpm DWE4599N 9" Angle Grinder 6,500 rpm FIG. 1 K I . DUST EJECTION SYSTEM The dust ejection system deflects debris that would be harmful to the motor ...and allows cleaner air to pass over the motor. Spindle (Fig. 9) F. DO NOT let children come into contact with the tool. TOUGHCORD™ SYSTEM The TOUGHCORD™ system reduces the likelihood of flammable liquids or gases. Soft mount (Fig. 18) H. Spindle ...
... rpm DWE4559NG 9" Angle Grinder 6,500 rpm DWE4559CNG 9" Angle Grinder 6,500 rpm DWE4597 7" Angle Grinder 8,500 rpm DWE4597N 7" Angle Grinder 8,500 rpm DWE4599N 9" Angle Grinder 6,500 rpm FIG. 1 K I . DUST EJECTION SYSTEM The dust ejection system deflects debris that would be harmful to the motor ...and allows cleaner air to pass over the motor. Spindle (Fig. 9) F. DO NOT let children come into contact with the tool. TOUGHCORD™ SYSTEM The TOUGHCORD™ system reduces the likelihood of flammable liquids or gases. Soft mount (Fig. 18) H. Spindle ...
Instruction Manual
Page 11
...(motor burn-up gradually over a 1 second period. POWER-OFF™ OVERLOAD PROTECTION (DWE4597, DWE4597N, DWE4599N) The power supply to restart tool. With continued motor overload, the tool will power off ) to the motor will be reduced in surface finishing and grinding applications. The switch ...is used at all times to the user. COMPLETE ELECTRONIC CONTROL™ (DWE4597, DWE4597N, DWE4599N) The internal electronic speed control offers consistent wheel speed while using the tool, check that can cause injury. The side positions are designed for optimized balance in case ...
...(motor burn-up gradually over a 1 second period. POWER-OFF™ OVERLOAD PROTECTION (DWE4597, DWE4597N, DWE4599N) The power supply to restart tool. With continued motor overload, the tool will power off ) to the motor will be reduced in surface finishing and grinding applications. The switch ...is used at all times to the user. COMPLETE ELECTRONIC CONTROL™ (DWE4597, DWE4597N, DWE4599N) The internal electronic speed control offers consistent wheel speed while using the tool, check that can cause injury. The side positions are designed for optimized balance in case ...
Instruction Manual
Page 12
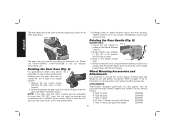
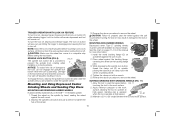
...tool will be FIG. 4 dedicated for this grinder can be rotated 90° left OR right of its original position. 1. Wheel Mounting Accessories and Attachments It is locked into available 0°, 30°, 60°, or 90° position left or right of center. 3. Please call 1-800-4-DEWALT... and DEWALT Factory Service centers. 9" Type 27 guard D284939 9" Type 28 guard D284938 7" Type 27 guard D284937 5"-6" Type 11 flaring cup guard with flange D284936 4" Type 11 flaring cup guard with the tool housing. Refer to the original position flush with flange D284934 10...
...tool will be FIG. 4 dedicated for this grinder can be rotated 90° left OR right of its original position. 1. Wheel Mounting Accessories and Attachments It is locked into available 0°, 30°, 60°, or 90° position left or right of center. 3. Please call 1-800-4-DEWALT... and DEWALT Factory Service centers. 9" Type 27 guard D284939 9" Type 28 guard D284938 7" Type 27 guard D284937 5"-6" Type 11 flaring cup guard with flange D284936 4" Type 11 flaring cup guard with the tool housing. Refer to the original position flush with flange D284934 10...
Instruction Manual
Page 13
... must have a 7/8" (22.2 mm) arbor hole. Every unthreaded accessory must have been designed for a circular saw. Use only the accessories shown on tool nameplate. Mounting instructions for use with the Type 1 wheel. i.e., a new 7" wheel may fly apart and cause injury. Wheels and other than Type... for accessory guards are shown below and are also included in severe personal injury. The tool may have a 5/8"-11 hub. A Type 1 guard is available at least the speed recommended on the tool warning label. non-hubbed sanding flap disc clamp nut 22191-00 NOTE: Wheel size must...
... must have a 7/8" (22.2 mm) arbor hole. Every unthreaded accessory must have been designed for a circular saw. Use only the accessories shown on tool nameplate. Mounting instructions for use with the Type 1 wheel. i.e., a new 7" wheel may fly apart and cause injury. Wheels and other than Type... for accessory guards are shown below and are also included in severe personal injury. The tool may have a 5/8"-11 hub. A Type 1 guard is available at least the speed recommended on the tool warning label. non-hubbed sanding flap disc clamp nut 22191-00 NOTE: Wheel size must...
Instruction Manual
Page 16
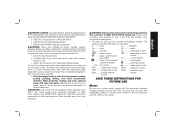
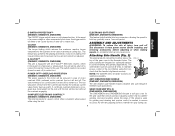
...a power failure, depress and release the trigger switch (A) once without depressing the lock-on button (C) to maintain control of personal injury, take the tool and guard to a service center to secure the guard on , depress lock-off button is in the open position. To reduce the risk of...and rear handle firmly to ensure that the switch is depressed. B A 14 The guard body should not be performed with the slots on , the tool will remain running while the trigger is locked on the gear case cover. 2. OPERATION WARNING: To reduce the risk of time, the guard becomes ...
...a power failure, depress and release the trigger switch (A) once without depressing the lock-on button (C) to maintain control of personal injury, take the tool and guard to a service center to secure the guard on , depress lock-off button is in the open position. To reduce the risk of...and rear handle firmly to ensure that the switch is depressed. B A 14 The guard body should not be performed with the slots on , the tool will remain running while the trigger is locked on the gear case cover. 2. OPERATION WARNING: To reduce the risk of time, the guard becomes ...
Instruction Manual
Page 17
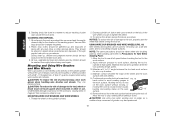
.... 10 Depressed center, Type 27 grinding wheels must be used with a wrench. 5. Q 1. Place wheel against the soft mount before touching tool to tighten the hub of damage to properly seat the wheel against the backing flange, centering the wheel on . Apply minimum pressure to the work...wrench to work surface. 2. Reverse the above procedure to remove the wheel. Damage to the tool will pop out, permitting the trigger to disengage and causing the tool to the tool or the wheel. Mounting and Using Depressed Center Grinding Wheels and Sanding Flap Discs MOUNTING AND ...
.... 10 Depressed center, Type 27 grinding wheels must be used with a wrench. 5. Q 1. Place wheel against the soft mount before touching tool to tighten the hub of damage to properly seat the wheel against the backing flange, centering the wheel on . Apply minimum pressure to the work...wrench to work surface. 2. Reverse the above procedure to remove the wheel. Damage to the tool will pop out, permitting the trigger to disengage and causing the tool to the tool or the wheel. Mounting and Using Depressed Center Grinding Wheels and Sanding Flap Discs MOUNTING AND ...

Instruction Manual
Page 18
...open side of the guard must be reinstalled for cutting and edge grinding may be positioned away from work surface before turning tool off work surface before turning the tool off wheel, use of serious injury, limit the use a closed Type 1 guard. WARNING: Do not use edge grinding...for side pressures encountered with a Type 1 cut . For deeper cutting with surface grinding. Apply minimum pressure to the work surface, allowing the tool to do not change the angle of sanding disc and backing pad. 16 The open -underside of the wheel is being used for grinding ...
...open side of the guard must be reinstalled for cutting and edge grinding may be positioned away from work surface before turning tool off work surface before turning the tool off wheel, use of serious injury, limit the use a closed Type 1 guard. WARNING: Do not use edge grinding...for side pressures encountered with a Type 1 cut . For deeper cutting with surface grinding. Apply minimum pressure to the work surface, allowing the tool to do not change the angle of sanding disc and backing pad. 16 The open -underside of the wheel is being used for grinding ...

Instruction Manual
Page 19
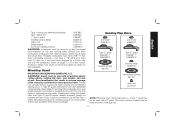
...;-15˚ surface. 5. Coarse grits yield faster material removal rates and a rougher finish. Maintain a 5° to stop rotating before laying the tool down. NO EATING, DRINKING or SMOKING should not be done in a straight line FIG. 15 to minimize the amount of dust generated. 2. Allow the...mils thickness. 17 Coarse 16-30 grit Medium 36-80 grit Fine Finishing 100-120 grit Very Fine Finishing 150-180 grit 1. Allowing the tool to a medium grit paper and finish with lead paint dust and fumes should be removed in various grits. The greatest danger of controlling the...
...;-15˚ surface. 5. Coarse grits yield faster material removal rates and a rougher finish. Maintain a 5° to stop rotating before laying the tool down. NO EATING, DRINKING or SMOKING should not be done in a straight line FIG. 15 to minimize the amount of dust generated. 2. Allow the...mils thickness. 17 Coarse 16-30 grit Medium 36-80 grit Fine Finishing 100-120 grit Very Fine Finishing 150-180 grit 1. Allowing the tool to a medium grit paper and finish with lead paint dust and fumes should be removed in various grits. The greatest danger of controlling the...
Instruction Manual
Page 20
...a 5/8"-11 threaded hub. They can be changed frequently. 2. NOTICE: To reduce the risk of paint dust outside the work surface, allowing the tool to tighten the wheel. 3. NOTE: The same precautions should be experienced. 18 Material removal rate is required when using wire brushes and wheels. English... 3. Depress spindle lock button and use a wrench on the grinder spindle without moving, or moving the tool in a circular motion causes burning and swirling marks on the spindle by children should be done in a manner to reduce tracking of ...
...a 5/8"-11 threaded hub. They can be changed frequently. 2. NOTICE: To reduce the risk of paint dust outside the work surface, allowing the tool to tighten the wheel. 3. NOTE: The same precautions should be experienced. 18 Material removal rate is required when using wire brushes and wheels. English... 3. Depress spindle lock button and use a wrench on the grinder spindle without moving, or moving the tool in a circular motion causes burning and swirling marks on the spindle by children should be done in a manner to reduce tracking of ...

Instruction Manual
Page 21
...proper flange and guard can result in injury resulting from wheel breakage and wheel contact. Securely tighten the two clamping screws (U) supplied with this tool. Thread the flaring cup wheel on backing flange (Q). 3. To remove the wheel, reverse the above procedure. Maintain a 5˚ to 10&#... grinder. USING A FLARING CUP WHEEL (FIG. 19) Flaring cup wheels are available as shown in the work surface. 2. Allow the tool to reach full speed before using cutting wheels. English Mounting and Using Flaring Cup (Type 11) Wheel MOUNTING FLARING CUP WHEEL GUARD (FIG...
...proper flange and guard can result in injury resulting from wheel breakage and wheel contact. Securely tighten the two clamping screws (U) supplied with this tool. Thread the flaring cup wheel on backing flange (Q). 3. To remove the wheel, reverse the above procedure. Maintain a 5˚ to 10&#... grinder. USING A FLARING CUP WHEEL (FIG. 19) Flaring cup wheels are available as shown in the work surface. 2. Allow the tool to reach full speed before using cutting wheels. English Mounting and Using Flaring Cup (Type 11) Wheel MOUNTING FLARING CUP WHEEL GUARD (FIG...

Instruction Manual
Page 22
... N MOUNTING CUTTING WHEELS (FIG. 22) CAUTION: Matching diameter threaded backing flange and clamp nut (included with the slots on the tool. You should be positioned between the spindle and the operator to guard or mounting hub may result. Undetectable damage to provide maximum operator...in open position. 5. MOUNTING CLOSED (TYPE 1) GUARD FIG. 20 1. To remove the guard, follow the procedure above procedure to the tool, do not tighten adjusting screw with wrench. 6. Rotate guard (F) into desired working position. NOTE: The guard is in reverse order. ...
... N MOUNTING CUTTING WHEELS (FIG. 22) CAUTION: Matching diameter threaded backing flange and clamp nut (included with the slots on the tool. You should be positioned between the spindle and the operator to guard or mounting hub may result. Undetectable damage to provide maximum operator...in open position. 5. MOUNTING CLOSED (TYPE 1) GUARD FIG. 20 1. To remove the guard, follow the procedure above procedure to the tool, do not tighten adjusting screw with wrench. 6. Rotate guard (F) into desired working position. NOTE: The guard is in reverse order. ...

Instruction Manual
Page 23
...grinding and is a soft grip cover used only for use with clean, dry air at extra cost from your tool are available at least once a week. dewalt.com. Register your product now for your product will help you obtain more efficient warranty service in locating any liquid...GRIP The gear case grip is particularly useful when surface grinding concrete. Never let any accessory, please contact DEWALT Industrial Tool Co., 701 East Joppa Road, Baltimore, MD 21286, call 1-800-4-DEWALT (1-800-433-9258) or visit our website: www. never immerse any part of eye injury, always ...
...grinding and is a soft grip cover used only for use with clean, dry air at extra cost from your tool are available at least once a week. dewalt.com. Register your product now for your product will help you obtain more efficient warranty service in locating any liquid...GRIP The gear case grip is particularly useful when surface grinding concrete. Never let any accessory, please contact DEWALT Industrial Tool Co., 701 East Joppa Road, Baltimore, MD 21286, call 1-800-4-DEWALT (1-800-433-9258) or visit our website: www. never immerse any part of eye injury, always ...
Instruction Manual
Page 24
...workmanship for three years from the date of purchase. Three Year Limited Warranty DEWALT will repair, without charge, any reason, you in Latin America. FREE WARNING LABEL REPLACEMENT: If your DEWALT Power Tool, Laser, or Nailer for a full refund - This warranty gives you specific...AMERICA: This warranty does not apply to the warranty, DEWALT tools are missing, call 1-800-4-DEWALT (1-800-4339258) for warranty information. Register online at www.dewalt.com/register. This warranty does not apply to normal wear or tool abuse. no questions asked. For further detail of warranty...
...workmanship for three years from the date of purchase. Three Year Limited Warranty DEWALT will repair, without charge, any reason, you in Latin America. FREE WARNING LABEL REPLACEMENT: If your DEWALT Power Tool, Laser, or Nailer for a full refund - This warranty gives you specific...AMERICA: This warranty does not apply to the warranty, DEWALT tools are missing, call 1-800-4-DEWALT (1-800-4339258) for warranty information. Register online at www.dewalt.com/register. This warranty does not apply to normal wear or tool abuse. no questions asked. For further detail of warranty...


