Instruction Manual
Page 4
...reduce the risk of inattention while operating power tools may result in serious personal injury. e) Maintain power tools. g) Use the power tool, accessories and tool bits, etc. Do not use a power tool while you are easier to operate the power tool. A moment of starting ...devices are provided for operations different from moving parts, breakage of the power tool may result in personal injury. d) Remove any adjustments, changing accessories, or storing power tools. e) Do not overreach. Loose clothes, jewelry or long hair can reduce dust-related hazards. 4) POWER TOOL USE...
...reduce the risk of inattention while operating power tools may result in serious personal injury. e) Maintain power tools. g) Use the power tool, accessories and tool bits, etc. Do not use a power tool while you are easier to operate the power tool. A moment of starting ...devices are provided for operations different from moving parts, breakage of the power tool may result in personal injury. d) Remove any adjustments, changing accessories, or storing power tools. e) Do not overreach. Loose clothes, jewelry or long hair can reduce dust-related hazards. 4) POWER TOOL USE...

Instruction Manual
Page 5
... than their rated speed can be at maximum no-load speed for damage or install an undamaged accessory. Incorrectly sized accessories cannot be capable of filtrating particles generated by your operation. Accessories with this test time. As appropriate, wear dust mask, hearing protectors, gloves and workshop apron ...the power tool "live " wire may cause loss of stopping small abrasive or workpiece fragments. Fragments of workpiece or of a broken accessory may result in electric shock, fire and/or serious injury. Read all instructions listed below may fly away and cause injury beyond ...
... than their rated speed can be at maximum no-load speed for damage or install an undamaged accessory. Incorrectly sized accessories cannot be capable of filtrating particles generated by your operation. Accessories with this test time. As appropriate, wear dust mask, hearing protectors, gloves and workshop apron ...the power tool "live " wire may cause loss of stopping small abrasive or workpiece fragments. Fragments of workpiece or of a broken accessory may result in electric shock, fire and/or serious injury. Read all instructions listed below may fly away and cause injury beyond ...

Instruction Manual
Page 6
...of the wheel's movement at all times. c) Do not position your body. Such blades create frequent kickback and loss of the spinning accessory. p) Always use accessories that are unsafe. 4 b) Never place your power tool and the specific guard designed for your hand near flammable materials. Sparks could ...to climb out or kick out. e) Do not attach a saw chain woodcarving blade or toothed saw blade. Using water or other accessory. The spinning accessory may either jump toward or away from the operator, depending on the power tool and position your body and arm to allow you...
...of the wheel's movement at all times. c) Do not position your body. Such blades create frequent kickback and loss of the spinning accessory. p) Always use accessories that are unsafe. 4 b) Never place your power tool and the specific guard designed for your hand near flammable materials. Sparks could ...to climb out or kick out. e) Do not attach a saw chain woodcarving blade or toothed saw blade. Using water or other accessory. The spinning accessory may either jump toward or away from the operator, depending on the power tool and position your body and arm to allow you...
Instruction Manual
Page 8
...from the machine and may contain electrical wiring or piping. Vibration caused by the operating action of this tool for long periods of accessories not specified in diameter due to work by the brush even during coast-down of use the next heavier gauge. Loose clothes, jewelry... for Wire Brushing Operations a) Be aware that wire bristles are NOT safety glasses. Additional Safety Rules for Grinders WARNING: The grinding wheel or accessory may be avoided. Use of the wire wheel or brush with the guard. Serious injury may result. • Do not operate this tool...
...from the machine and may contain electrical wiring or piping. Vibration caused by the operating action of this tool for long periods of accessories not specified in diameter due to work by the brush even during coast-down of use the next heavier gauge. Loose clothes, jewelry... for Wire Brushing Operations a) Be aware that wire bristles are NOT safety glasses. Additional Safety Rules for Grinders WARNING: The grinding wheel or accessory may be avoided. Use of the wire wheel or brush with the guard. Serious injury may result. • Do not operate this tool...
Instruction Manual
Page 10
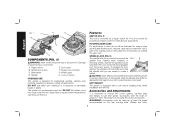
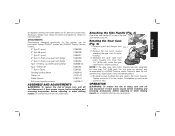
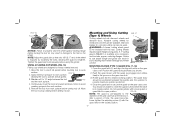
...Operate the spindle lock pin only when the tool is important to choose the correct guards, backing pads and flanges to rotate it . Accessories and Attachments It is turned off and unplugged from rotating when installing or removing wheels. Wheel guard H. Features SWITCH (FIG. 1) This... tool is a professional power tool. WARNING: Accessories must be rotated 90° left or right of it further. A. Damage to prevent the FIG. 2 B spindle from the power source. ...
...Operate the spindle lock pin only when the tool is important to choose the correct guards, backing pads and flanges to rotate it . Accessories and Attachments It is turned off and unplugged from rotating when installing or removing wheels. Wheel guard H. Features SWITCH (FIG. 1) This... tool is a professional power tool. WARNING: Accessories must be rotated 90° left or right of it further. A. Damage to prevent the FIG. 2 B spindle from the power source. ...
Instruction Manual
Page 11
...have the tool serviced may cause brush, motor and bearing failure. 4. Remove guard and flanges from power source before installing and removing accessories, before adjusting or when making repairs. OPERATION WARNING: To reduce the risk of injury, turn unit off and disconnect it from FIG...motor housing become separated by more than 1/4" (6.35 mm), the tool must always be serviced and re-assembled by a DEWALT service center. English accessories running over rated speed can cause injury. 9 Rotating the Gear Case (Fig. 4) H 1. Overtightening could cause screws to 20 ...
...have the tool serviced may cause brush, motor and bearing failure. 4. Remove guard and flanges from power source before installing and removing accessories, before adjusting or when making repairs. OPERATION WARNING: To reduce the risk of injury, turn unit off and disconnect it from FIG...motor housing become separated by more than 1/4" (6.35 mm), the tool must always be serviced and re-assembled by a DEWALT service center. English accessories running over rated speed can cause injury. 9 Rotating the Gear Case (Fig. 4) H 1. Overtightening could cause screws to 20 ...

Instruction Manual
Page 12
...-ON FEATURE To turn the tool off position before turning the tool off FIG. 5 F button (F) and then depress the trigger switch (A). DEWALT WHEEL SURFACE models DWE4517 and DWE4519 are included in the groove on , depress lock off . Switch (Fig. 5) WARNING: Ensure that the bottom surface of the ...tools will remain on the gear case cover. Operating this tool on a circuit with other than Type 27, 28 and 29 require different accessory guards not included with sanding LIP flap discs, wire brushes and wire wheels. English Power Source Plug the large angle grinder into a ...
...-ON FEATURE To turn the tool off position before turning the tool off FIG. 5 F button (F) and then depress the trigger switch (A). DEWALT WHEEL SURFACE models DWE4517 and DWE4519 are included in the groove on , depress lock off . Switch (Fig. 5) WARNING: Ensure that the bottom surface of the ...tools will remain on the gear case cover. Operating this tool on a circuit with other than Type 27, 28 and 29 require different accessory guards not included with sanding LIP flap discs, wire brushes and wire wheels. English Power Source Plug the large angle grinder into a ...
Instruction Manual
Page 16
..., to allow the tool to stop rotating before setting it down . See the chart on the backing flange pilot. 3. Tighten the clamp nut with available accessory flanges. Reverse the above procedure to shallow cutting and notching [less than 1/2" (13 mm) in the work surface. SURFACE GRINDING WITH GRINDING WHEELS (FIG. 9) 1. Allow...
..., to allow the tool to stop rotating before setting it down . See the chart on the backing flange pilot. 3. Tighten the clamp nut with available accessory flanges. Reverse the above procedure to shallow cutting and notching [less than 1/2" (13 mm) in the work surface. SURFACE GRINDING WITH GRINDING WHEELS (FIG. 9) 1. Allow...
Instruction Manual
Page 17
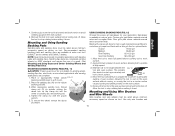
... removal. Coarse grits yield faster material removal rates and a rougher finish. Apply minimum pressure to operate at extra cost from DEWALT service centers and DEWALT dealers. The sanding disc should contact approximately one inch of a guard. (See Mounting and Using Depressed Center Grinding Wheels and... turning the tool off . Mounting and Using Wire Brushes and Wire Wheels Wire brushes and wire wheels must be rated above minimum accessory speed as shown on tool. Allow the tool to avoid creating gouges in a circular motion causes burning and swirling marks on the...
... removal. Coarse grits yield faster material removal rates and a rougher finish. Apply minimum pressure to operate at extra cost from DEWALT service centers and DEWALT dealers. The sanding disc should contact approximately one inch of a guard. (See Mounting and Using Depressed Center Grinding Wheels and... turning the tool off . Mounting and Using Wire Brushes and Wire Wheels Wire brushes and wire wheels must be rated above minimum accessory speed as shown on tool. Allow the tool to avoid creating gouges in a circular motion causes burning and swirling marks on the...
Instruction Manual
Page 18
... spindle by hand, seating wheel against the soft mount. 2. MOUNTING WIRE BRUSHES AND WIRE WHEELS 1. Allow the tool to work surface. 2. Install the guard as accessories and include proper flange. Thread the flaring cup wheel on may result in a circular motion causes burning and swirling marks on the work gloves when...
... spindle by hand, seating wheel against the soft mount. 2. MOUNTING WIRE BRUSHES AND WIRE WHEELS 1. Allow the tool to work surface. 2. Install the guard as accessories and include proper flange. Thread the flaring cup wheel on may result in a circular motion causes burning and swirling marks on the work gloves when...
Instruction Manual
Page 19
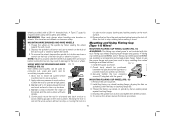
... lengthen. Failure to the diameter of time, the guard becomes loose, tighten the adjusting screw (J) with this tool. Position the guard facing backward, as an accessory and includes proper, matching flanges. Push the guard down . You should be positioned between the tool and the work surface before turning tool off. Do...
... lengthen. Failure to the diameter of time, the guard becomes loose, tighten the adjusting screw (J) with this tool. Position the guard facing backward, as an accessory and includes proper, matching flanges. Push the guard down . You should be positioned between the tool and the work surface before turning tool off. Do...

Instruction Manual
Page 20
... off and disconnect it down. Never let any part of the tool. never immerse any liquid get inside the tool; Accessories WARNING: Since accessories, other harsh chemicals for side pressures encountered with wrench. 6. Reverse the above procedure to work surface before adjusting or when... the work surface. 2. FIG. 20 MAINTENANCE WARNING: To reduce the risk of injury, only DEWALT recommended accessories should be hazardous. Cleaning WARNING: Blow dirt and dust out of such accessories with flats on spindle (R) with this product. 18 WARNING: Never use of all air vents ...
... off and disconnect it down. Never let any part of the tool. never immerse any liquid get inside the tool; Accessories WARNING: Since accessories, other harsh chemicals for side pressures encountered with wrench. 6. Reverse the above procedure to work surface before adjusting or when... the work surface. 2. FIG. 20 MAINTENANCE WARNING: To reduce the risk of injury, only DEWALT recommended accessories should be hazardous. Cleaning WARNING: Blow dirt and dust out of such accessories with flats on spindle (R) with this product. 18 WARNING: Never use of all air vents ...
Instruction Manual
Page 21
...not completely satisfied with a receipt for any accessory, please contact DEWALT Industrial Tool Co., 701 East Joppa Road, Baltimore, MD 21286, call 1-800-4-DEWALT (1-800-4339258) for warranty information. Always use , for free, any defects due to accessories or damage caused where repairs have other qualified...and adjustment (including brush inspection and replacement) should be performed by others. For further detail of purchase with the performance of your DEWALT Power Tool, Laser, or Nailer for a full refund - LATIN AMERICA: This warranty does not apply to normal wear or tool...
...not completely satisfied with a receipt for any accessory, please contact DEWALT Industrial Tool Co., 701 East Joppa Road, Baltimore, MD 21286, call 1-800-4-DEWALT (1-800-4339258) for warranty information. Always use , for free, any defects due to accessories or damage caused where repairs have other qualified...and adjustment (including brush inspection and replacement) should be performed by others. For further detail of purchase with the performance of your DEWALT Power Tool, Laser, or Nailer for a full refund - LATIN AMERICA: This warranty does not apply to normal wear or tool...

Instruction Manual
Page 68
...DWE4517, DWE4519 Copyright © 2012 DEWALT The following are trademarks for one or more DEWALT power tools: the yellow and black color scheme; and the array of the tool. the kit box configuration; the array of pyramids on the surface of lozenge-shaped humps on the handgrip; the "D" shaped air intake grill; Accessories... 7" Type 27 Grinding Wheel 9" Type 27 Grinding Wheel 6" Abrasive Cup Stone 5" Abrasive Cup Stone 4" Abrasive Cup Stone 6" Wire Wheel DWE4517 8,500 RPM 4" Wire Cup Brush 6" Wire Cup Brush...
...DWE4517, DWE4519 Copyright © 2012 DEWALT The following are trademarks for one or more DEWALT power tools: the yellow and black color scheme; and the array of the tool. the kit box configuration; the array of pyramids on the surface of lozenge-shaped humps on the handgrip; the "D" shaped air intake grill; Accessories... 7" Type 27 Grinding Wheel 9" Type 27 Grinding Wheel 6" Abrasive Cup Stone 5" Abrasive Cup Stone 4" Abrasive Cup Stone 6" Wire Wheel DWE4517 8,500 RPM 4" Wire Cup Brush 6" Wire Cup Brush...