
Instruction Manual
Page 12
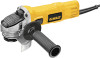
... disc threaded clamp nut Type 27 guard hubbed sanding flap disc Type 27 guard backing flange non-hubbed sanding flap disc threaded clamp nut 4. NOTE: H The guard release lever should K be rotated in the clockwise direction. Press the guard release lever (H). 2. With the spindle... hub. 4-1/2" (114.3 mm) Cutting Wheels Sanding Discs 4-1/2" (114.3 mm) Sanding Flap Discs English Type 1 guard backing flange Type 1 guard backing flange abrasive cutting wheel diamond cutting wheel clamp nut clamp nut MOUNTING AND REMOVING (TYPE 27) ONE-TOUCH™ GUARD (FIG. 4, 5) 1.
... disc threaded clamp nut Type 27 guard hubbed sanding flap disc Type 27 guard backing flange non-hubbed sanding flap disc threaded clamp nut 4. NOTE: H The guard release lever should K be rotated in the clockwise direction. Press the guard release lever (H). 2. With the spindle... hub. 4-1/2" (114.3 mm) Cutting Wheels Sanding Discs 4-1/2" (114.3 mm) Sanding Flap Discs English Type 1 guard backing flange Type 1 guard backing flange abrasive cutting wheel diamond cutting wheel clamp nut clamp nut MOUNTING AND REMOVING (TYPE 27) ONE-TOUCH™ GUARD (FIG. 4, 5) 1.

Instruction Manual
Page 13
... pressing the rear part of injury, turn unit off and disconnect it down . Lift the tool from power source before installing and removing accessories, before touching the work surface. To stop the tool while operating in reverse. For continuous operation, slide the switch toward the front of a ...at start -up and during use with Type 27 wheels designed and specified for this purpose. To start unexpectedly. This insures that the guard is in power supply to a complete stop rotating before putting it from the surface before laying the tool down . Make sure the...
... pressing the rear part of injury, turn unit off and disconnect it down . Lift the tool from power source before installing and removing accessories, before touching the work surface. To stop the tool while operating in reverse. For continuous operation, slide the switch toward the front of a ...at start -up and during use with Type 27 wheels designed and specified for this purpose. To start unexpectedly. This insures that the guard is in power supply to a complete stop rotating before putting it from the surface before laying the tool down . Make sure the...
Instruction Manual
Page 15
...withstand side pressures caused by bending. 5. Edge grinding wheels are complete. 13 WARNING: Do not use a closed, Type 1 guard. Allow the tool to reach full speed before touching the tool to stop rotating before laying it down . English SURFACE GRINDING WITH GRINDING WHEELS (FIG. 9) 1. Allow the tool..., allowing the tool to operate at high speed. Grinding rate is being used for side pressures encountered with surface grinding. Remove the tool from work surface. 2. EDGE GRINDING WITH GRINDING WHEELS (FIG. 10) WARNING: Wheels used to do not change the angle of...
...withstand side pressures caused by bending. 5. Edge grinding wheels are complete. 13 WARNING: Do not use a closed, Type 1 guard. Allow the tool to reach full speed before touching the tool to stop rotating before laying it down . English SURFACE GRINDING WITH GRINDING WHEELS (FIG. 9) 1. Allow the tool..., allowing the tool to operate at high speed. Grinding rate is being used for side pressures encountered with surface grinding. Remove the tool from work surface. 2. EDGE GRINDING WITH GRINDING WHEELS (FIG. 10) WARNING: Wheels used to do not change the angle of...
Instruction Manual
Page 16
...tool to prevent burning and swirling of work gloves when handling wire brushes and wheels. Allow the tool to fragment from work surface. To remove the wheel, grasp and turn the backing pad and sanding pad while depressing the spindle lock button. Coarse 16 - 30 grit Medium 36... wheel on the work surface without the use of flanges. English 1. Begin with a 5/8"-11 threaded hub. CAUTION: Wheel or brush must not touch guard when mounted or while in a circular motion causes burning and swirling marks on the hub of sanding disc and backing pad. 4. Use only wire...
...tool to prevent burning and swirling of work gloves when handling wire brushes and wheels. Allow the tool to fragment from work surface. To remove the wheel, grasp and turn the backing pad and sanding pad while depressing the spindle lock button. Coarse 16 - 30 grit Medium 36... wheel on the work surface without the use of flanges. English 1. Begin with a 5/8"-11 threaded hub. CAUTION: Wheel or brush must not touch guard when mounted or while in a circular motion causes burning and swirling marks on the hub of sanding disc and backing pad. 4. Use only wire...
Instruction Manual
Page 17
... marks on the work surface for more information. WARNING: A closed position. MOUNTING CLOSED (TYPE 1) GUARD (FIG. 16 -18) NOTE: If present, the One-Touch™ Guard lever, screw, and spring should be positioned between the tool and work surface. 6. Remove the tool from wheel breakage and wheel contact. Mounting and Using Cutting (Type 1) Wheels...
... marks on the work surface for more information. WARNING: A closed position. MOUNTING CLOSED (TYPE 1) GUARD (FIG. 16 -18) NOTE: If present, the One-Touch™ Guard lever, screw, and spring should be positioned between the tool and work surface. 6. Remove the tool from wheel breakage and wheel contact. Mounting and Using Cutting (Type 1) Wheels...
Instruction Manual
Page 18
... Never use the tool. Never let any part of the tool. CAUTION: If the guard cannot be against the wheel when the wheel is installed. 2. Remove the tool from power source before installing and removing accessories, before adjusting or when making repairs. English NOTE: If, after a period of.... Use a cloth dampened only with surface grinding. Once a cut . Allow the tool to stop rotating before setting it from work surface before touching tool to work surface, allowing tool to work surface. 2. An accidental start-up . USING CUTTING WHEELS (FIG. 19) WARNING: Do not ...
... Never use the tool. Never let any part of the tool. CAUTION: If the guard cannot be against the wheel when the wheel is installed. 2. Remove the tool from power source before installing and removing accessories, before adjusting or when making repairs. English NOTE: If, after a period of.... Use a cloth dampened only with surface grinding. Once a cut . Allow the tool to stop rotating before setting it from work surface before touching tool to work surface, allowing tool to work surface. 2. An accidental start-up . USING CUTTING WHEELS (FIG. 19) WARNING: Do not ...


