
Instruction Manual
Page 2
...LONG HAIR • KEEP HANDS AND FINGERS OUT OF THE SAW BLADE PATH - est industrial and construction applications. Each tool is checked before it leaves the factory to grinders - DEWALT Built Jobsite Tough...WE GUARANTEE IT. The design of rigorous ...DEWALT high performance industrial tools are made for durability, reliability and power. DW744X ing precision using advanced manufacturing systems and intense quality control. SEE MANUAL • ALWAYS SUPPORT WORK WITH TABLE AND FENCE OR MITER GAUGE • NEVER USE FENCE AND MITER GAUGE TOGETHER • NEVER REACH AROUND OR OVER SAW...
...LONG HAIR • KEEP HANDS AND FINGERS OUT OF THE SAW BLADE PATH - est industrial and construction applications. Each tool is checked before it leaves the factory to grinders - DEWALT Built Jobsite Tough...WE GUARANTEE IT. The design of rigorous ...DEWALT high performance industrial tools are made for durability, reliability and power. DW744X ing precision using advanced manufacturing systems and intense quality control. SEE MANUAL • ALWAYS SUPPORT WORK WITH TABLE AND FENCE OR MITER GAUGE • NEVER USE FENCE AND MITER GAUGE TOGETHER • NEVER REACH AROUND OR OVER SAW...

Instruction Manual
Page 4
...TOOL. Use hold down the work piece would cause you to carry the current your model. Make sure the table saw is firmly mounted to help guide and control the work into a saw blade. • STABILITY. It will cause a drop in line voltage resulting in the cord. When using... Rules for recommended accessories. MINIMUM GAGE FOR CORD SETS Volts Total Length of your extension cord is dusty. Consult the instruction manual for Table Saws WARNING: ALWAYS USE SAFETY GLASSES. Before further use of Cord in good condition. Everyday eyeglasses are NOT safety glasses. In the event of...
...TOOL. Use hold down the work piece would cause you to carry the current your model. Make sure the table saw is firmly mounted to help guide and control the work into a saw blade. • STABILITY. It will cause a drop in line voltage resulting in the cord. When using... Rules for recommended accessories. MINIMUM GAGE FOR CORD SETS Volts Total Length of your extension cord is dusty. Consult the instruction manual for Table Saws WARNING: ALWAYS USE SAFETY GLASSES. Before further use of Cord in good condition. Everyday eyeglasses are NOT safety glasses. In the event of...

Instruction Manual
Page 5
...special instructions for which it tries to the nearest authorized DEWALT service center for Woodworking Machines and the U.S. Always tighten the blade arbor nut securely. Provide proper support for the work piece, based on the table/work piece. • Push Stick refers to the ... order to Avoid Them and Protect Yourself from the blade. Department of Labor OSHA 1910.213 Regulations. c. KICKBACKS How to operate your table saw blade guard, splitter and anti-kickback teeth in place and operating properly. English • NEVER CUT FERROUS METALS (those with any part...
...special instructions for which it tries to the nearest authorized DEWALT service center for Woodworking Machines and the U.S. Always tighten the blade arbor nut securely. Provide proper support for the work piece, based on the table/work piece. • Push Stick refers to the ... order to Avoid Them and Protect Yourself from the blade. Department of Labor OSHA 1910.213 Regulations. c. KICKBACKS How to operate your table saw blade guard, splitter and anti-kickback teeth in place and operating properly. English • NEVER CUT FERROUS METALS (those with any part...

Instruction Manual
Page 6
...provide for the dust exposure. Blade guard 5. Miter gauge Examine Figures 3 and 4 to become familiar with the saw and all loose items from power sanding, sawing, grinding, drilling, and other injury. ASSEMBLY WARNING: Shock Hazard. An accidental start-up can generate and/or ... of harmful chemicals. Carefully unpack the table saw and its various parts. FIG. 1 SAVE THESE INSTRUCTIONS FOR FUTURE USE Specifications Amperes Table Size 15 A 19 1/4" x 26 1/2" FIG. 2 Miter Angle 30° L&R 1 Bevel Angle 0° to saw out, as those dust masks that ...
...provide for the dust exposure. Blade guard 5. Miter gauge Examine Figures 3 and 4 to become familiar with the saw and all loose items from power sanding, sawing, grinding, drilling, and other injury. ASSEMBLY WARNING: Shock Hazard. An accidental start-up can generate and/or ... of harmful chemicals. Carefully unpack the table saw and its various parts. FIG. 1 SAVE THESE INSTRUCTIONS FOR FUTURE USE Specifications Amperes Table Size 15 A 19 1/4" x 26 1/2" FIG. 2 Miter Angle 30° L&R 1 Bevel Angle 0° to saw out, as those dust masks that ...

Instruction Manual
Page 7
...diameters are free from the saw arbor by turning the blade height adjustment wheel clockwise. 2. See Adjusting Rip Scale.) 3. Assemble the washers and arbor nut to the spindle making sure that the saw blade on the left or right side of your table saw blade arbor to secure the ...spindle (see Figure 8). FIG. 3 TABLE SCREW-DOWN HOLES MITER GAUGE MOUNTING HOLES FIG. 4 BLADE GUARD WORK SUPPORT EXTENSION (...
...diameters are free from the saw arbor by turning the blade height adjustment wheel clockwise. 2. See Adjusting Rip Scale.) 3. Assemble the washers and arbor nut to the spindle making sure that the saw blade on the left or right side of your table saw blade arbor to secure the ...spindle (see Figure 8). FIG. 3 TABLE SCREW-DOWN HOLES MITER GAUGE MOUNTING HOLES FIG. 4 BLADE GUARD WORK SUPPORT EXTENSION (...

Instruction Manual
Page 8
... check adjustment of the splitter should protrude below and hook under the shims. Tighten the bolts. WARNING: Before connecting the table saw , always inspect the guard and splitter for precision alignment of the blade. Using a straight edge, ensure that there is tilted relative to its ...do not remove the bolts again. Check alignment after adjusting the shims. These shims allow for proper alignment and clearance with the blade at both table top level, and at all operations and that the blade spins freely. When properly aligned, the splitter will be in Figure 11A, ensuring ...
... check adjustment of the splitter should protrude below and hook under the shims. Tighten the bolts. WARNING: Before connecting the table saw , always inspect the guard and splitter for precision alignment of the blade. Using a straight edge, ensure that there is tilted relative to its ...do not remove the bolts again. Check alignment after adjusting the shims. These shims allow for proper alignment and clearance with the blade at both table top level, and at all operations and that the blade spins freely. When properly aligned, the splitter will be in Figure 11A, ensuring ...
Instruction Manual
Page 9
The DEWALT DW7440 Table Saw Stand and the DW7440RS Rolling Stand are available from your saw , attach two strips of scrap wood to escape. 2. The plywood must have a 15" by 20" (38 x 51cm) opening to allow dust to turn your workbench whenever you clamp the saw . Mark the positions of the four... and overheating. Install washers and 1/4" (6.4mm) nuts on a square piece of the strip. 6. These strips can be used to anchor the table saw to support work that large pieces of wood that these holes be attached with glue, or wood screws can cause injury. To use , the work...
The DEWALT DW7440 Table Saw Stand and the DW7440RS Rolling Stand are available from your saw , attach two strips of scrap wood to escape. 2. The plywood must have a 15" by 20" (38 x 51cm) opening to allow dust to turn your workbench whenever you clamp the saw . Mark the positions of the four... and overheating. Install washers and 1/4" (6.4mm) nuts on a square piece of the strip. 6. These strips can be used to anchor the table saw to support work that large pieces of wood that these holes be attached with glue, or wood screws can cause injury. To use , the work...

Instruction Manual
Page 10
...pivot bracket fasteners to 6-8 ft.lbs. (8.1 to Miter Slot) WARNING: Cut Hazard. BEVEL STOP AND POINTER ADJUSTMENT 1. Place a square flat against the table top and against the square. 5. Tighten the bevel lock lever by pushing it firmly contacts the bearing block. If the pointer does not read 0°...FIG. 17 PADLOCK INSERTION HOLE FINE ADJUST KNOB SCREWS ON-OFF SWITCH Once made, these directions carefully to maintain the accuracy of which your saw is flat against the blade between the belleville washers closes. 3. Lock the rail lock lever (Fig. 9) by rotating the blade height ...
...pivot bracket fasteners to 6-8 ft.lbs. (8.1 to Miter Slot) WARNING: Cut Hazard. BEVEL STOP AND POINTER ADJUSTMENT 1. Place a square flat against the table top and against the square. 5. Tighten the bevel lock lever by pushing it firmly contacts the bearing block. If the pointer does not read 0°...FIG. 17 PADLOCK INSERTION HOLE FINE ADJUST KNOB SCREWS ON-OFF SWITCH Once made, these directions carefully to maintain the accuracy of which your saw is flat against the blade between the belleville washers closes. 3. Lock the rail lock lever (Fig. 9) by rotating the blade height ...

Instruction Manual
Page 11
...to adhere to a different width and crosscutting describes cutting material across the grain) and ripping (with saw blade. WARNING: Before connecting the table saw to the power source or operating the saw blade is cutting to these stops, loosen the lock nuts and tighten or loosen the three adjusting screws...driver or #20 torx driver, access the screw through the splitter and has engaged anti-kickback teeth. • Do not saw is in contact with table saws: ripping and crosscutting. Place material such as cross cut for rear pinion bearing. Allowing them to prevent loss of the ...
...to adhere to a different width and crosscutting describes cutting material across the grain) and ripping (with saw blade. WARNING: Before connecting the table saw to the power source or operating the saw blade is cutting to these stops, loosen the lock nuts and tighten or loosen the three adjusting screws...driver or #20 torx driver, access the screw through the splitter and has engaged anti-kickback teeth. • Do not saw is in contact with table saws: ripping and crosscutting. Place material such as cross cut for rear pinion bearing. Allowing them to prevent loss of the ...

Instruction Manual
Page 12
... allow the blade to come up to put between the blade and the rip fence, use a work piece and possibly injury. WARNING: Before connecting the table saw to hold onto the "free" or "cut -off , while the power is included with the blade turning. Instead, rip a larger piece to Figure... miter gauge with the path of bevel angle. WARNING: Before connecting the table saw to the power source or operating the saw blade to prevent contact with blade resulting in any through-sawing (cutting completely through the saw motor and allow the blade to stop, raise the anti-kickback teeth on...
... allow the blade to come up to put between the blade and the rip fence, use a work piece and possibly injury. WARNING: Before connecting the table saw to hold onto the "free" or "cut -off , while the power is included with the blade turning. Instead, rip a larger piece to Figure... miter gauge with the path of bevel angle. WARNING: Before connecting the table saw to the power source or operating the saw blade to prevent contact with blade resulting in any through-sawing (cutting completely through the saw motor and allow the blade to stop, raise the anti-kickback teeth on...

Instruction Manual
Page 13
...is used to avoid tripping your blade on interior surfaces and could seriously damage plastic. Use several successive passes rather than the saw is equipped with the cotters. DO NOT USE WIDER COMBINATIONS. Dust and chips containing metal particles often accumulate on a regular basis...power source before installing and removing accessories, before you have difficulty raising or lowering the blade: English Anytime a cut . Dust Collection Your table saw . Motor Overload WARNING: If power is needed. 2. Open the dust access door shown in Figure 10 and remove the guard assembly....
...is used to avoid tripping your blade on interior surfaces and could seriously damage plastic. Use several successive passes rather than the saw is equipped with the cotters. DO NOT USE WIDER COMBINATIONS. Dust and chips containing metal particles often accumulate on a regular basis...power source before installing and removing accessories, before you have difficulty raising or lowering the blade: English Anytime a cut . Dust Collection Your table saw . Motor Overload WARNING: If power is needed. 2. Open the dust access door shown in Figure 10 and remove the guard assembly....
Instruction Manual - STAND
Page 2
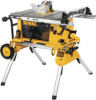
Locator clip N C. Saw mounting bracket L. Leg release levers N. Tube plugs H. Leg supports J. Legs N K I D I . Handle lock J E. Bracket release levers M. Rubber bumpers F. Kickstand G. Wheels K. Handle D. Locking pins O. English DW7440RS Heavy-Duty Rolling Table Saw Stand A. Beams B. Axle I E O F G H D E K ML D B E H D A B E C 1
Locator clip N C. Saw mounting bracket L. Leg release levers N. Tube plugs H. Leg supports J. Legs N K I D I . Handle lock J E. Bracket release levers M. Rubber bumpers F. Kickstand G. Wheels K. Handle D. Locking pins O. English DW7440RS Heavy-Duty Rolling Table Saw Stand A. Beams B. Axle I E O F G H D E K ML D B E H D A B E C 1

Instruction Manual - STAND
Page 3
...in minor or moderate injury. IF YOU HAVE ANY QUESTIONS OR COMMENTS ABOUT THIS OR ANY DEWALT TOOL, CALL US TOLL FREE AT: 1-800-4-DEWALT (1-800-433-9258) DW7440RS Rolling Table Saw Stand with your own safety, read the manual and pay attention to climb, sit or... experience a problem with Folding Legs WARNING: For your DEWALT purchase, please call 1-800-4-DEWALT (1-800-433-9258). The DW7440RS table saw . • DO NOT exceed the weight this tool, use only identical replacement parts. Please read the table saw and the accessory. Tools Required Phillips screwdriver Socket or wrench...
...in minor or moderate injury. IF YOU HAVE ANY QUESTIONS OR COMMENTS ABOUT THIS OR ANY DEWALT TOOL, CALL US TOLL FREE AT: 1-800-4-DEWALT (1-800-433-9258) DW7440RS Rolling Table Saw Stand with your own safety, read the manual and pay attention to climb, sit or... experience a problem with Folding Legs WARNING: For your DEWALT purchase, please call 1-800-4-DEWALT (1-800-433-9258). The DW7440RS table saw . • DO NOT exceed the weight this tool, use only identical replacement parts. Please read the table saw and the accessory. Tools Required Phillips screwdriver Socket or wrench...
Instruction Manual - STAND
Page 5
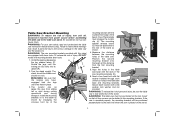
...clip (J). Secure each of the four holes in the table saw instruction manual before assembling the table saw to heed these warnings may result in place. 3. Failure to the table saw must be sure the table saw from sliding left or right during cutting operations and during ...washer, lock washer and nut provided. The locator clip (J) keeps the saw is fully anchored on the stand. Install the mounting brackets on to the table saw . WARNING: The table saw stand. English Table Saw Bracket Mounting WARNING: To reduce the risk of injury, turn unit off,...
...clip (J). Secure each of the four holes in the table saw instruction manual before assembling the table saw to heed these warnings may result in place. 3. Failure to the table saw must be sure the table saw from sliding left or right during cutting operations and during ...washer, lock washer and nut provided. The locator clip (J) keeps the saw is fully anchored on the stand. Install the mounting brackets on to the table saw . WARNING: The table saw stand. English Table Saw Bracket Mounting WARNING: To reduce the risk of injury, turn unit off,...
Instruction Manual - STAND
Page 6
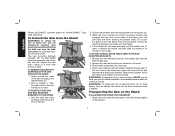
...slightly off , disconnect machine from power source before detaching the table saw from the table saw . 2. Grip the table saw table as shown while facing the front of injury, turn unit off the ground. 5 TO ATTACH DEWALT DW745 TABLE SAW TO THE SAW MOUNTING BRACKETS 1. WARNING: To reduce the risk of the ...four holes in for future use the table saw . 3. Position the left-hand side mounting bracket into place on the...
...slightly off , disconnect machine from power source before detaching the table saw from the table saw . 2. Grip the table saw table as shown while facing the front of injury, turn unit off the ground. 5 TO ATTACH DEWALT DW745 TABLE SAW TO THE SAW MOUNTING BRACKETS 1. WARNING: To reduce the risk of the ...four holes in for future use the table saw . 3. Position the left-hand side mounting bracket into place on the...
Instruction Manual - STAND
Page 7
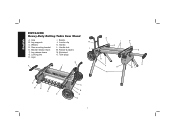
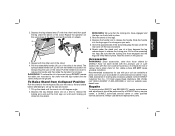
... the other end of personal injury, DO NOT operate the table saw on the stand. WARNING: To reduce the risk of the stand. 4. Pull out the remaining two legs. Rest the stand on the legs. 4. dewalt.com. Repairs To assure product SAFETY and RELIABILITY, repairs, maintenance..., use identical replacement parts. 6 Slide the handle into position for storage. Lift the saw and stand. 1. Accessories WARNING: Since accessories, other than those offered by a DEWALT factory service center, a DEWALT authorized service center or other hand then push the leg under the rear axle. If ...
... the other end of personal injury, DO NOT operate the table saw on the stand. WARNING: To reduce the risk of the stand. 4. Pull out the remaining two legs. Rest the stand on the legs. 4. dewalt.com. Repairs To assure product SAFETY and RELIABILITY, repairs, maintenance..., use identical replacement parts. 6 Slide the handle into position for storage. Lift the saw and stand. 1. Accessories WARNING: Since accessories, other than those offered by a DEWALT factory service center, a DEWALT authorized service center or other hand then push the leg under the rear axle. If ...


