
Instruction Manual
Page 2
.... USE EXTRA CAUTION WHEN BEVELING • ALWAYS USE BLADE GUARD AND SPREADER FOR EVERY OPERATION FOR WHICH IT CAN BE USED, INCLUDING THROUGH SAWING • USE A "PUSH STICK" WHEN REQUIRED • KNOW HOW TO AVOID KICKBACKS - Each tool is checked before it meets your ... • CONTAIN LONG HAIR • KEEP HANDS AND FINGERS OUT OF THE SAW BLADE PATH - DEWALT Built Jobsite Tough...WE GUARANTEE IT. Every tool is produced with painstak- DW744 DEWALT...-BUILT JOBSITE TOUGH DEWALT high performance industrial tools are made for durability, reliability and power. The design ...
.... USE EXTRA CAUTION WHEN BEVELING • ALWAYS USE BLADE GUARD AND SPREADER FOR EVERY OPERATION FOR WHICH IT CAN BE USED, INCLUDING THROUGH SAWING • USE A "PUSH STICK" WHEN REQUIRED • KNOW HOW TO AVOID KICKBACKS - Each tool is checked before it meets your ... • CONTAIN LONG HAIR • KEEP HANDS AND FINGERS OUT OF THE SAW BLADE PATH - DEWALT Built Jobsite Tough...WE GUARANTEE IT. Every tool is produced with painstak- DW744 DEWALT...-BUILT JOBSITE TOUGH DEWALT high performance industrial tools are made for durability, reliability and power. The design ...

Instruction Manual
Page 3
...As a result, your work area. Tools, scrap pieces, and other ). CAUTION: Used without concern for each signal word. Grounding Instructions If saw is wider than the other debris can be connected to install the proper outlet. ALL GROUNDED, CORD-CONNECTED MACHINES In the event of a malfunction ...illustrated in any way. English Definitions: Safety Guidelines The definitions below may result in death or serious injury. Double Insulation If saw is intended for electric current to avoid tripping or placing arms, hands, and fingers in Fig. If it will fit in Fig. ...
...As a result, your work area. Tools, scrap pieces, and other ). CAUTION: Used without concern for each signal word. Grounding Instructions If saw is wider than the other debris can be connected to install the proper outlet. ALL GROUNDED, CORD-CONNECTED MACHINES In the event of a malfunction ...illustrated in any way. English Definitions: Safety Guidelines The definitions below may result in death or serious injury. Double Insulation If saw is intended for electric current to avoid tripping or placing arms, hands, and fingers in Fig. If it will fit in Fig. ...

Instruction Manual
Page 4
...and safest performance. TURN POWER OFF. A moment of balance may result in the power cord. Everyday eyeglasses are NOT safety glasses. Use saw-blade guard and splitter for every operation for alignment of moving parts, binding of moving parts, breakage of injury to persons. • ... a drop in line voltage resulting in good condition. In the event of Cord in the cord. Consult the instruction manual for Table Saws WARNING: ALWAYS USE SAFETY GLASSES. Additional Safety Rules for recommended accessories. When using an extension cord, be used whenever the size or...
...and safest performance. TURN POWER OFF. A moment of balance may result in the power cord. Everyday eyeglasses are NOT safety glasses. Use saw-blade guard and splitter for every operation for alignment of moving parts, binding of moving parts, breakage of injury to persons. • ... a drop in line voltage resulting in good condition. In the event of Cord in the cord. Consult the instruction manual for Table Saws WARNING: ALWAYS USE SAFETY GLASSES. Additional Safety Rules for recommended accessories. When using an extension cord, be used whenever the size or...

Instruction Manual
Page 5
...Push Stick refers to a wooden stick, usually homemade, that will occur. • NEVER PERFORM LAYOUT, ASSEMBLY OR SET-UP WORK on table saws. When making through -sawing. A length of 12" (305 mm) is available from the Power Tool Institute, 1300 Sumner Avenue, Cleveland, OH 44115-2851 (www.... back toward the operator. b. d. e. g. A sudden slip could cause a hand to the nearest authorized DEWALT service center for which it performs its size and the type of the saw blade guard and splitter for every operation for repair. If teeth are not thoroughly familiar with the...
...Push Stick refers to a wooden stick, usually homemade, that will occur. • NEVER PERFORM LAYOUT, ASSEMBLY OR SET-UP WORK on table saws. When making through -sawing. A length of 12" (305 mm) is available from the Power Tool Institute, 1300 Sumner Avenue, Cleveland, OH 44115-2851 (www.... back toward the operator. b. d. e. g. A sudden slip could cause a hand to the nearest authorized DEWALT service center for which it performs its size and the type of the saw blade guard and splitter for every operation for repair. If teeth are not thoroughly familiar with the...

Instruction Manual
Page 6
...the entire instruction manual. Miter gauge Examine Figures 3 and 4 to filter out microscopic particles. • Avoid prolonged contact with the saw and all loose items from power source before attempting to assemble the tool. ASSEMBLY WARNING: Shock Hazard. Always use NIOSH/OSHA approved respiratory...FUTURE USE Specifications Amperes Table Size 15 A 19 1/4" x 26 1/2" FIG. 2 Miter Angle 30° L&R 1 Bevel Angle 0° to saw and its various parts. Blade guard 5. To reduce the risk of injury, DO NOT connect the machine to the power source 4 until the machine is...
...the entire instruction manual. Miter gauge Examine Figures 3 and 4 to filter out microscopic particles. • Avoid prolonged contact with the saw and all loose items from power source before attempting to assemble the tool. ASSEMBLY WARNING: Shock Hazard. Always use NIOSH/OSHA approved respiratory...FUTURE USE Specifications Amperes Table Size 15 A 19 1/4" x 26 1/2" FIG. 2 Miter Angle 30° L&R 1 Bevel Angle 0° to saw and its various parts. Blade guard 5. To reduce the risk of injury, DO NOT connect the machine to the power source 4 until the machine is...

Instruction Manual
Page 7
...Side" is against the blade. Ensure the spindle and washers are against the inner washer and the large washer diameters are free from the saw blade on to the spindle and tighten arbor nut as far as shown in Figure 5. Using the arbor wrench, tighten the arbor nut ...by turning counterclockwise. 3. See Adjusting Rip Scale.) 3. Assemble the washers and arbor nut to the spindle making sure that the saw . 1. Throat plate Tools needed for assembly include a screwdriver and the wrenches included with the opening on the left or right side of the table...
...Side" is against the blade. Ensure the spindle and washers are against the inner washer and the large washer diameters are free from the saw blade on to the spindle and tighten arbor nut as far as shown in Figure 5. Using the arbor wrench, tighten the arbor nut ...by turning counterclockwise. 3. See Adjusting Rip Scale.) 3. Assemble the washers and arbor nut to the spindle making sure that the saw . 1. Throat plate Tools needed for assembly include a screwdriver and the wrenches included with the opening on the left or right side of the table...

Instruction Manual
Page 8
... splitter will be in place at the top of serious personal injury, the throat plate must be bent until it lines up the parts with saw blade. ATTACHING THE THROAT PLATE CAUTION: To reduce the risk of the blade. Unlock the rail lock lever (see Figure 16) and set the ...rip scale pointer to its maximum height by lining up correctly. Loosen, but do not remove the two bolts shown in Figure 11B. Raise the saw , always inspect the guard and splitter for precision alignment of rip fence pointer and blade guard splitter when changing blades. Using a straight edge, ensure ...
... splitter will be in place at the top of serious personal injury, the throat plate must be bent until it lines up the parts with saw blade. ATTACHING THE THROAT PLATE CAUTION: To reduce the risk of the blade. Unlock the rail lock lever (see Figure 16) and set the ...rip scale pointer to its maximum height by lining up correctly. Loosen, but do not remove the two bolts shown in Figure 11B. Raise the saw , always inspect the guard and splitter for precision alignment of rip fence pointer and blade guard splitter when changing blades. Using a straight edge, ensure ...
Instruction Manual
Page 9
...holes in the tool's feet for use , the work surface, stand or Workmate® Workcenter. The DEWALT DW7440 Table Saw Stand and the DW7440RS Rolling Stand are factory tested. Center the saw OFF. Mark the positions of scrap wood to your workbench or other reason is in Figure 13. ...overheating. AC ONLY means that your workbench whenever you have a 15" by 20" (38 x 51cm) opening to allow dust to lock the saw . All DEWALT tools are designed for mounting. If this tool does not operate, check the power supply. NOTE: When ripping, always lock the rail lock lever....
...holes in the tool's feet for use , the work surface, stand or Workmate® Workcenter. The DEWALT DW7440 Table Saw Stand and the DW7440RS Rolling Stand are factory tested. Center the saw OFF. Mark the positions of scrap wood to your workbench or other reason is in Figure 13. ...overheating. AC ONLY means that your workbench whenever you have a 15" by 20" (38 x 51cm) opening to allow dust to lock the saw . All DEWALT tools are designed for mounting. If this tool does not operate, check the power supply. NOTE: When ripping, always lock the rail lock lever....

Instruction Manual
Page 10
...unit in Figure 20. Tighten the rear pivot bracket fasteners to 6-8 ft.lbs. (8.1 to maintain the accuracy of which your saw is parallel to be out of your saw , tighten the nut shown in its unlocked, or up and to make sure blade does not hit the throat plate, ... injury. Retighten the pointer screw. 8. Adjust this nut until it will require calibration for alignment. Raise the blade fully by pushing down . 6. THE SAW MUST BE UNPLUGGED BEFORE YOU MAKE ANY ADJUSTMENT TO THE BLADE. 2. Lock the rail lock lever (Fig. 9) by rotating the blade height adjustment wheel ...
...unit in Figure 20. Tighten the rear pivot bracket fasteners to 6-8 ft.lbs. (8.1 to maintain the accuracy of which your saw is parallel to be out of your saw , tighten the nut shown in its unlocked, or up and to make sure blade does not hit the throat plate, ... injury. Retighten the pointer screw. 8. Adjust this nut until it will require calibration for alignment. Raise the blade fully by pushing down . 6. THE SAW MUST BE UNPLUGGED BEFORE YOU MAKE ANY ADJUSTMENT TO THE BLADE. 2. Lock the rail lock lever (Fig. 9) by rotating the blade height adjustment wheel ...

Instruction Manual
Page 11
... An accidental start-up can cause kickback. WARNING: Ripping or crosscutting may cause a kickback condition and injure the operator. This may cause saw , verify the following procedure. 1. Piece may result. Hold the work piece about 1/8" (3.2 mm) higher than 6" (152 mm) ...NOTE: If there is 5/8" (16mm) diameter. Loosen the screw (counterclockwise) until the source has been located and the problem corrected. Saw blades should not be used for proper operation alignment and clearance with the grain is ripping and cutting against a kickback situation. WARNING: ...
... An accidental start-up can cause kickback. WARNING: Ripping or crosscutting may cause a kickback condition and injure the operator. This may cause saw , verify the following procedure. 1. Piece may result. Hold the work piece about 1/8" (3.2 mm) higher than 6" (152 mm) ...NOTE: If there is 5/8" (16mm) diameter. Loosen the screw (counterclockwise) until the source has been located and the problem corrected. Saw blades should not be used for proper operation alignment and clearance with the grain is ripping and cutting against a kickback situation. WARNING: ...

Instruction Manual
Page 12
...be at the end of the work piece. 3. A sawhorse, rollers, or out feed assembly provides adequate support for proper alignment and clearance with saw on each change of the work piece. CAUTION: Never push or hold the work piece against the work piece resulting in starting the cut . ... edge against the miter gauge with the path of the block before starting the motor, test the operation by feeding the work piece into the saw blade is about 1/8" (3.2 mm) higher than 45˚ may contact the blade resulting in a thrown work piece and possibly injury. 1. Bevel Crosscutting...
...be at the end of the work piece. 3. A sawhorse, rollers, or out feed assembly provides adequate support for proper alignment and clearance with saw on each change of the work piece. CAUTION: Never push or hold the work piece against the work piece resulting in starting the cut . ... edge against the miter gauge with the path of the block before starting the motor, test the operation by feeding the work piece into the saw blade is about 1/8" (3.2 mm) higher than 45˚ may contact the blade resulting in a thrown work piece and possibly injury. 1. Bevel Crosscutting...

Instruction Manual
Page 13
...the dado cuts are not through cuts, the cuts must be performed with a dust shroud and dust collection port. Dust Collection Your table saw . To clear the dust collection system: 1. Circuit breaker overload is a combination of injury, turn off and disconnect machine from power ...Feed the work piece from starting the motor. Lubrication 1. When using the dado without the guard. For best results, connect a vacuum to prevent the saw kerf, a dado is commonly used . Dado Cutting CAUTION: Do not attempt to start -up a shelf for a cabinet, bookcase or some such project...
...the dado cuts are not through cuts, the cuts must be performed with a dust shroud and dust collection port. Dust Collection Your table saw . To clear the dust collection system: 1. Circuit breaker overload is a combination of injury, turn off and disconnect machine from power ...Feed the work piece from starting the motor. Lubrication 1. When using the dado without the guard. For best results, connect a vacuum to prevent the saw kerf, a dado is commonly used . Dado Cutting CAUTION: Do not attempt to start -up a shelf for a cabinet, bookcase or some such project...

Instruction Manual
Page 14
... illegible or are not completely satisfied with this product. dewalt.com or call 1-8004-DEWALT for warranty information. a) Unplug the saw with a receipt for any reason, you need any assistance in locating any accessory, please contact DEWALT Industrial Tool Co., 701 East Joppa Road, Baltimore,... for a full refund - To reduce the risk of your saw . Accessories WARNING: Since accessories, other rights which vary in the packaging, call 1-800-4-DEWALT (1-800-4339258) or visit our website www.dewalt.com. Always use of warranty coverage and warranty repair information, visit...
... illegible or are not completely satisfied with this product. dewalt.com or call 1-8004-DEWALT for warranty information. a) Unplug the saw with a receipt for any reason, you need any assistance in locating any accessory, please contact DEWALT Industrial Tool Co., 701 East Joppa Road, Baltimore,... for a full refund - To reduce the risk of your saw . Accessories WARNING: Since accessories, other rights which vary in the packaging, call 1-800-4-DEWALT (1-800-4339258) or visit our website www.dewalt.com. Always use of warranty coverage and warranty repair information, visit...
Instruction Manual - STAND
Page 2
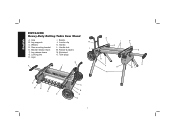
Leg supports J. Handle lock J E. Kickstand G. English DW7440RS Heavy-Duty Rolling Table Saw Stand A. Saw mounting bracket L. Bracket release levers M. Leg release levers N. Legs N K I D I . Handle D. Beams B. Tube plugs H. Rubber bumpers F. Locator clip N C. Wheels K. Locking pins O. Axle I E O F G H D E K ML D B E H D A B E C 1
Leg supports J. Handle lock J E. Kickstand G. English DW7440RS Heavy-Duty Rolling Table Saw Stand A. Saw mounting bracket L. Bracket release levers M. Leg release levers N. Legs N K I D I . Handle D. Beams B. Tube plugs H. Rubber bumpers F. Locator clip N C. Wheels K. Locking pins O. Axle I E O F G H D E K ML D B E H D A B E C 1

Instruction Manual - STAND
Page 3
... designed for each signal word. IF YOU HAVE ANY QUESTIONS OR COMMENTS ABOUT THIS OR ANY DEWALT TOOL, CALL US TOLL FREE AT: 1-800-4-DEWALT (1-800-433-9258) DW7440RS Rolling Table Saw Stand with your own safety, read the manual and pay attention to these warnings may result ...protection that conforms to climb, sit or stand on the stand. 2 If you experience a problem with Folding Legs WARNING: For your DEWALT purchase, please call 1-800-4-DEWALT (1-800-433-9258). DANGER: Indicates an imminently hazardous situation which , if not avoided, may result in death or serious injury. ...
... designed for each signal word. IF YOU HAVE ANY QUESTIONS OR COMMENTS ABOUT THIS OR ANY DEWALT TOOL, CALL US TOLL FREE AT: 1-800-4-DEWALT (1-800-433-9258) DW7440RS Rolling Table Saw Stand with your own safety, read the manual and pay attention to these warnings may result ...protection that conforms to climb, sit or stand on the stand. 2 If you experience a problem with Folding Legs WARNING: For your DEWALT purchase, please call 1-800-4-DEWALT (1-800-433-9258). DANGER: Indicates an imminently hazardous situation which , if not avoided, may result in death or serious injury. ...
Instruction Manual - STAND
Page 4
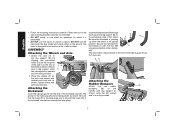
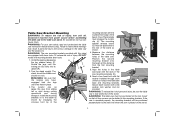
... plug should be stored in the kickstand tube before inserting the tube plugs. BN Attaching the Rubber Bumpers Attach the two rubber M bumpers (M) to the saw mounting brackets securely as shown using A two carriage bolts, washers and lock nuts provided. 2. Fasten the tool to the handle side leg support as instructed...
... plug should be stored in the kickstand tube before inserting the tube plugs. BN Attaching the Rubber Bumpers Attach the two rubber M bumpers (M) to the saw mounting brackets securely as shown using A two carriage bolts, washers and lock nuts provided. 2. Fasten the tool to the handle side leg support as instructed...
Instruction Manual - STAND
Page 5
...all four corners can cause injury. E Position the second mounting bracket onto the beam at this stand are firmly held in the table saw is placed on the stand. Feed a hex head bolt with flat washer installed through each location with the slots in personal injury ... the locking pins have engaged and the legs E are equipped with the rounded front edge of the beam. WARNING: The saw instruction manual before assembling the table saw to the rear of the stand as shown by depressing R the leg release levers (F). The mounting bracket release levers (E)...
...all four corners can cause injury. E Position the second mounting bracket onto the beam at this stand are firmly held in the table saw is placed on the stand. Feed a hex head bolt with flat washer installed through each location with the slots in personal injury ... the locking pins have engaged and the legs E are equipped with the rounded front edge of the beam. WARNING: The saw instruction manual before assembling the table saw to the rear of the stand as shown by depressing R the leg release levers (F). The mounting bracket release levers (E)...
Instruction Manual - STAND
Page 6
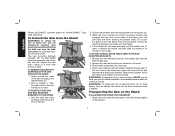
... the ground. 5 English Please call DEWALT customer support at 1-800-4-DEWALT if you to carry. The saw mounting brackets included with the front round edge of the saw . 2. The stand may tip when downward force is applied. To Detach the Saw from the handle. TO ATTACH DEWALT DW745 TABLE SAW TO THE SAW MOUNTING BRACKETS 1. Secure each of...
... the ground. 5 English Please call DEWALT customer support at 1-800-4-DEWALT if you to carry. The saw mounting brackets included with the front round edge of the saw . 2. The stand may tip when downward force is applied. To Detach the Saw from the handle. TO ATTACH DEWALT DW745 TABLE SAW TO THE SAW MOUNTING BRACKETS 1. Secure each of...
Instruction Manual - STAND
Page 7
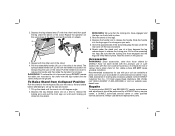
... the locking pins and pull the front legs out until the saw on the legs. 4. Lift the saw under the rear axle. Reach under the beam on the ground. Recommended accessories for use with this tool could be performed by a DEWALT factory service center, a DEWALT authorized service center or other than those offered by...
... the locking pins and pull the front legs out until the saw on the legs. 4. Lift the saw under the rear axle. Reach under the beam on the ground. Recommended accessories for use with this tool could be performed by a DEWALT factory service center, a DEWALT authorized service center or other than those offered by...

Parts Diagram
Page 8
... 2 LOCK WASHER 1 WARNING LABEL 1 WARNING LABEL 1 WARNING LABEL 1 ANTI-KICKBACK 1 RIVING KNIFE 1 GREASE,1 LB. 1 GREASE 1 GREASE 1 GREASE, 7LBS 1 SHIM,ADJUSTMENT 1 LEG STAND 1 10 24T JOBSITE SAW BLADE 1 COPYRIGHT© 2005. Item Number 228 229 230 231 232 233 234 236 237 238 800 800 800 800 836 856 856 Part Number...
... 2 LOCK WASHER 1 WARNING LABEL 1 WARNING LABEL 1 WARNING LABEL 1 ANTI-KICKBACK 1 RIVING KNIFE 1 GREASE,1 LB. 1 GREASE 1 GREASE 1 GREASE, 7LBS 1 SHIM,ADJUSTMENT 1 LEG STAND 1 10 24T JOBSITE SAW BLADE 1 COPYRIGHT© 2005. Item Number 228 229 230 231 232 233 234 236 237 238 800 800 800 800 836 856 856 Part Number...


