Instruction Manual
Page 3
...tools sharp and clean for recommended accessories. Make sure switch is damaged should be properly repaired or replaced. • DIRECTION OF FEED. Before further use of the tool, a guard or other repairs/adjustments with unit plugged in the OFF position before plugging in. • USE RECOMMENDED ...long hair. Additional Specific Safety Rules for Planers • To reduce the risk of injury, user must read and understand instruction manual before servicing; Wear protective hair covering to direction of feed arrows on top of the unit. • NEVER LEAVE TOOL RUNNING UN ...
...tools sharp and clean for recommended accessories. Make sure switch is damaged should be properly repaired or replaced. • DIRECTION OF FEED. Before further use of the tool, a guard or other repairs/adjustments with unit plugged in the OFF position before plugging in. • USE RECOMMENDED ...long hair. Additional Specific Safety Rules for Planers • To reduce the risk of injury, user must read and understand instruction manual before servicing; Wear protective hair covering to direction of feed arrows on top of the unit. • NEVER LEAVE TOOL RUNNING UN ...
Instruction Manual
Page 13
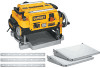
...parts. Place the spring onto the small end of warranty coverage and warranty repair information, visit www.dewalt.com or call 1-800-4-DEWALT (1-800- 12 Three Year Limited Warranty DEWALT will repair, without charge, any defects due to re-attach the tables. FIG. 8...the tables. 2. For further detail of the stepped bolt. 4. TO REMOVE THE TABLES 1. Repairs To assure product SAFETY and RELIABILITY, repairs, maintenance and adjustment should show on the base and slide each end of the planer, .... 8, 9). 9. WARNING: For your planer can be performed by the planer manual.
...parts. Place the spring onto the small end of warranty coverage and warranty repair information, visit www.dewalt.com or call 1-800-4-DEWALT (1-800- 12 Three Year Limited Warranty DEWALT will repair, without charge, any defects due to re-attach the tables. FIG. 8...the tables. 2. For further detail of the stepped bolt. 4. TO REMOVE THE TABLES 1. Repairs To assure product SAFETY and RELIABILITY, repairs, maintenance and adjustment should show on the base and slide each end of the planer, .... 8, 9). 9. WARNING: For your planer can be performed by the planer manual.


