Instruction Manual
Page 4
... water. The symbols and their definitions are specially designed to cause cancer, birth defects or other construction activities. English • Be sure that the cutter knives are mounted as follows: V......... ALWAYS WEAR SAFETY GLASSES. WARNING: Some dust created by all bolts are firmly tightened before connecting unit to the State of...
... water. The symbols and their definitions are specially designed to cause cancer, birth defects or other construction activities. English • Be sure that the cutter knives are mounted as follows: V......... ALWAYS WEAR SAFETY GLASSES. WARNING: Some dust created by all bolts are firmly tightened before connecting unit to the State of...
Instruction Manual
Page 9
..., when the material exits the planer, the pressure of the cutter head as it as recommended by the general planing directions. TO CHANGE PLANER KNIVES 1. Rotate the dust shroud up so the round connection that locks onto the fan housing is only slightly twisted: Plane both sides alternating from the... fan housing. 6. USE THE TOOL PROVIDED TO HANDLE THE KNIVES. 8 BUT BOW WILL RETURN AFTER WOOD IS PLANED English If your material is in your planer will push the bow out of the planer. 2....
..., when the material exits the planer, the pressure of the cutter head as it as recommended by the general planing directions. TO CHANGE PLANER KNIVES 1. Rotate the dust shroud up so the round connection that locks onto the fan housing is only slightly twisted: Plane both sides alternating from the... fan housing. 6. USE THE TOOL PROVIDED TO HANDLE THE KNIVES. 8 BUT BOW WILL RETURN AFTER WOOD IS PLANED English If your material is in your planer will push the bow out of the planer. 2....
Instruction Manual
Page 10
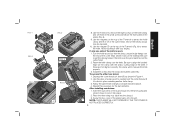
.... 6) to carefully turn the cutter head until it will not secure the knife properly. 3. Repeat the procedure for the last dull knife. After installing new knives: 1. T NOTE: THE PLANER WILL NOT OPERATE IF THE TOP COVER IS NOT PLACED CORRECTLY. 9 English Use the T-wrench to attract the knife clamp and lift...piece of the knife. Use the magnet (T) on the clamp with your fingers. One of the knife is worn: 1. If only one side of the knives should now be exposed. 10. Turn the knife around so that the sharp, unused edge hangs over the knife. Be sure to lock it into...
.... 6) to carefully turn the cutter head until it will not secure the knife properly. 3. Repeat the procedure for the last dull knife. After installing new knives: 1. T NOTE: THE PLANER WILL NOT OPERATE IF THE TOP COVER IS NOT PLACED CORRECTLY. 9 English Use the T-wrench to attract the knife clamp and lift...piece of the knife. Use the magnet (T) on the clamp with your fingers. One of the knife is worn: 1. If only one side of the knives should now be exposed. 10. Turn the knife around so that the sharp, unused edge hangs over the knife. Be sure to lock it into...

Instruction Manual
Page 12
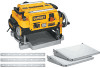
.... Check your distributor or local service center. Replacement of dull knives. TO ACCESS THE FAN 1. To reduce the risk of the base can be accessed from the underside. 2. Have damaged cords replaced by DEWALT, have not been tested with this product, use only identical ... Be sure to avoid tripping your planer again. Accessories WARNING: Since accessories, other than those offered by an authorized service center. Change your knives on your tool are available for cleaning. Remove the top cover of such accessories with your planer should include: 2 folding tables 4 cap screws...
.... Check your distributor or local service center. Replacement of dull knives. TO ACCESS THE FAN 1. To reduce the risk of the base can be accessed from the underside. 2. Have damaged cords replaced by DEWALT, have not been tested with this product, use only identical ... Be sure to avoid tripping your planer again. Accessories WARNING: Since accessories, other than those offered by an authorized service center. Change your knives on your tool are available for cleaning. Remove the top cover of such accessories with your planer should include: 2 folding tables 4 cap screws...
Instruction Manual
Page 15
... TO SEE: • if the dust shroud is properly in place. • if the dust shroud and fan are clogged or obstructed. Dull knives could cause motor overloading. • drop feed rate to be reset. An overly aggressive cut could cause motor overloading. • reduce depth of cut... . IF THE CIRCUIT BREAKER TRIPS: • check for dull knives. NOTE: Even under normal loading conditions, other devices sharing the circuit with the planer OR use the planer on the same branch circuit may cause...
... TO SEE: • if the dust shroud is properly in place. • if the dust shroud and fan are clogged or obstructed. Dull knives could cause motor overloading. • drop feed rate to be reset. An overly aggressive cut could cause motor overloading. • reduce depth of cut... . IF THE CIRCUIT BREAKER TRIPS: • check for dull knives. NOTE: Even under normal loading conditions, other devices sharing the circuit with the planer OR use the planer on the same branch circuit may cause...

Parts Diagram
Page 2
... Reserved. Parts list, pricing, and availability subject to change. Please visit www.dewaltservicenet.com for DW735X Type 1 Description Qty Required DUST SHROUD 1 PIN 6 LOCK WASHER 4 LEAD 1 SCREW 4 SCREW 3 COVER 1 SHAFT & GEAR 1 RETAINING RING 1 BEARING,BALL 1 BLADE 3 PLANER KNIVES 1 PIN 6 KEY 1 HARDWARE BAG 1 SCREW 24 HARDWARE BAG 1 BLADE HOLDER 3 CUTTER HEAD 1 BALL BEARING...
... Reserved. Parts list, pricing, and availability subject to change. Please visit www.dewaltservicenet.com for DW735X Type 1 Description Qty Required DUST SHROUD 1 PIN 6 LOCK WASHER 4 LEAD 1 SCREW 4 SCREW 3 COVER 1 SHAFT & GEAR 1 RETAINING RING 1 BEARING,BALL 1 BLADE 3 PLANER KNIVES 1 PIN 6 KEY 1 HARDWARE BAG 1 SCREW 24 HARDWARE BAG 1 BLADE HOLDER 3 CUTTER HEAD 1 BALL BEARING...