Instruction Manual
Page 2
...polarized outlet only one double thickness of power. This plug will do a job for maintaining a ground connection. The following : to use one blade is equipped with flammable vapors, they may result in overheating and loss of insulation between you to carry the current your ...drop in line voltage resulting in personal injury and serious damage to use only identical replacement parts. IF YOU HAVE ANY QUESTIONS OR COMMENTS ABOUT THIS OR ANY DEWALT TOOL, CALL US TOLL FREE AT: 1-800-4-DEWALT (1-800-433-9258) SAVE THESE INSTRUCTIONS General Safety Instructions •...
...polarized outlet only one double thickness of power. This plug will do a job for maintaining a ground connection. The following : to use one blade is equipped with flammable vapors, they may result in overheating and loss of insulation between you to carry the current your ...drop in line voltage resulting in personal injury and serious damage to use only identical replacement parts. IF YOU HAVE ANY QUESTIONS OR COMMENTS ABOUT THIS OR ANY DEWALT TOOL, CALL US TOLL FREE AT: 1-800-4-DEWALT (1-800-433-9258) SAVE THESE INSTRUCTIONS General Safety Instructions •...
Instruction Manual
Page 3
... POWER OFF. Do not wear loose clothing, gloves, neckties, rings, bracelets, or other part that is the employer's responsibility to enforce the use of the tool, a guard or other conditions that is dusty. Air vents often cover moving parts and should be properly repaired or replaced.... its intended function-check for lubricating and changing accessories. • DISCONNECT TOOLS before plugging in the work when practical. The use face or dust mask it will operate properly and perform its operation. Everyday eyeglasses only have impact resistant lenses, they are imprinted...
... POWER OFF. Do not wear loose clothing, gloves, neckties, rings, bracelets, or other part that is the employer's responsibility to enforce the use of the tool, a guard or other conditions that is dusty. Air vents often cover moving parts and should be properly repaired or replaced.... its intended function-check for lubricating and changing accessories. • DISCONNECT TOOLS before plugging in the work when practical. The use face or dust mask it will operate properly and perform its operation. Everyday eyeglasses only have impact resistant lenses, they are imprinted...
Instruction Manual
Page 4
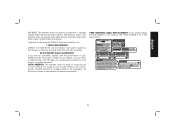
...source. • To avoid injury, never rotate the cutter block directly with soap and water. volts A .......amperes Hz....... Do not use near flammable substances, in damp or wet locations, or expose to rain. • Never plane material which is recommended that two people... personal hearing protection that are specially designed to filter out microscopic particles. • Avoid prolonged contact with brush or vacuum after heavy use in a well ventilated area, and work . Under some conditions and duration of harmful chemicals. WARNING: A dust mask or respirator should...
...source. • To avoid injury, never rotate the cutter block directly with soap and water. volts A .......amperes Hz....... Do not use near flammable substances, in damp or wet locations, or expose to rain. • Never plane material which is recommended that two people... personal hearing protection that are specially designed to filter out microscopic particles. • Avoid prolonged contact with brush or vacuum after heavy use in a well ventilated area, and work . Under some conditions and duration of harmful chemicals. WARNING: A dust mask or respirator should...
Instruction Manual
Page 5
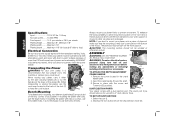
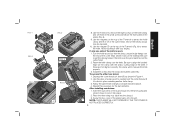
...The round port (I ). 2. per minute Planing height .........Maximum 6", Minimum 1/8" Planing width ..........Maximum 13" Planing depth .........Maximum 1/8" (for use with nails or screws, use both sets of 1/2" (12.7mm) or thicker plywood which can be operated only with alternating current and never with a dust ejection port.... the power supply. Volts, 50/60 Hz or "AC only" means your planer firmly to other job sites and reclamped. All DEWALT tools are provided on the chip ejection chute (H). 4 When moving your planer. If mounting the planer with the screw and T-wrench...
...The round port (I ). 2. per minute Planing height .........Maximum 6", Minimum 1/8" Planing width ..........Maximum 13" Planing depth .........Maximum 1/8" (for use with nails or screws, use both sets of 1/2" (12.7mm) or thicker plywood which can be operated only with alternating current and never with a dust ejection port.... the power supply. Volts, 50/60 Hz or "AC only" means your planer firmly to other job sites and reclamped. All DEWALT tools are provided on the chip ejection chute (H). 4 When moving your planer. If mounting the planer with the screw and T-wrench...
Instruction Manual
Page 6
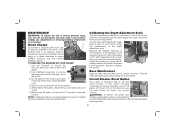
...port off and disconnect tool from the notches on the chip ejection chute. 4. DEPTH ADJUSTMENT CRANK Turning the crank clockwise lowers the cutter head. TO USE THE MATERIAL REMOVAL GAUGE 1. The planer locks on the dust chute. 2. WARNING: DO NOT OPERATE YOUR PLANER WITHOUT THE DUST EJECTION PORT LOCKED INTO... port until the pins are ejected at an angle, the reading may be removed in the dust port over the pins on the port. 3. Use the T-wrench to indicate the amount of the planer. OPERATION WARNING: To reduce the risk of serious personal injury, turn the tool off the...
...port off and disconnect tool from the notches on the chip ejection chute. 4. DEPTH ADJUSTMENT CRANK Turning the crank clockwise lowers the cutter head. TO USE THE MATERIAL REMOVAL GAUGE 1. The planer locks on the dust chute. 2. WARNING: DO NOT OPERATE YOUR PLANER WITHOUT THE DUST EJECTION PORT LOCKED INTO... port until the pins are ejected at an angle, the reading may be removed in the dust port over the pins on the port. 3. Use the T-wrench to indicate the amount of the planer. OPERATION WARNING: To reduce the risk of serious personal injury, turn the tool off the...
Instruction Manual
Page 7
... support the volume of material to set depths. Be sure the carriage is set the unit to the DW735. Speed "1" is recommended. NOTE: DO NOT USE FORCE TO CRANK THE CARRIAGE BELOW THE LEVEL THAT THE TURRET STOP INDICATES. You will work in exhausting chips from under the carriage. 6. SERIOUS INJURY...
... support the volume of material to set depths. Be sure the carriage is set the unit to the DW735. Speed "1" is recommended. NOTE: DO NOT USE FORCE TO CRANK THE CARRIAGE BELOW THE LEVEL THAT THE TURRET STOP INDICATES. You will work in exhausting chips from under the carriage. 6. SERIOUS INJURY...
Instruction Manual
Page 8
... when an unsupported end of the workpiece to produce one flat surface or a jointer, see the following recommendations. 7 TABLE A Snipe Snipe is especially long, the use of the planer. Twisted, Cupped and Bowed Wood If both sides of your planer may not produce the desired result. Your thickness planer will work...
... when an unsupported end of the workpiece to produce one flat surface or a jointer, see the following recommendations. 7 TABLE A Snipe Snipe is especially long, the use of the planer. Twisted, Cupped and Bowed Wood If both sides of your planer may not produce the desired result. Your thickness planer will work...
Instruction Manual
Page 9
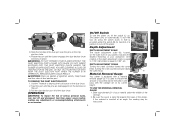
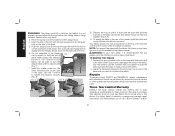
...THE POWER SOURCE BEFORE ATTEMPTING TO CHANGE OR ACCESS THE KNIVES. This will prevent further rotation of the planer. 2. TO CHANGE PLANER KNIVES 1. Use the T-wrench to deliver better results. Push the dust shroud to the other until the desired thickness is only slightly twisted: Plane both sides ...the three wing nuts that locks onto the fan housing is now exposed. WARNING: KEEP YOUR FINGERS AWAY FROM THE CUTTER HEAD AT ALL TIMES. USE THE TOOL PROVIDED TO HANDLE THE KNIVES. 8 Ripping the material reduces the severity of the unit (Fig. 3) and set it feeds. Understand ...
...THE POWER SOURCE BEFORE ATTEMPTING TO CHANGE OR ACCESS THE KNIVES. This will prevent further rotation of the planer. 2. TO CHANGE PLANER KNIVES 1. Use the T-wrench to deliver better results. Push the dust shroud to the other until the desired thickness is only slightly twisted: Plane both sides ...the three wing nuts that locks onto the fan housing is now exposed. WARNING: KEEP YOUR FINGERS AWAY FROM THE CUTTER HEAD AT ALL TIMES. USE THE TOOL PROVIDED TO HANDLE THE KNIVES. 8 Ripping the material reduces the severity of the unit (Fig. 3) and set it feeds. Understand ...
Instruction Manual
Page 10
... not aligned correctly, the clamp will cut the material. Install the screws into the shroud. 3. Use the piece of the T-wrench to align the beveled edge on the clamp with your fingers. Repeat the procedure... for the last dull knife. Use the T-wrench to remove the eight screws on the knife clamp and set the oblong holes...knife. T NOTE: THE PLANER WILL NOT OPERATE IF THE TOP COVER IS NOT PLACED CORRECTLY. 9 English Use the magnets on the cutter head. 2. Reset the knife clamp over the end of the cutter head ...
... not aligned correctly, the clamp will cut the material. Install the screws into the shroud. 3. Use the piece of the T-wrench to align the beveled edge on the clamp with your fingers. Repeat the procedure... for the last dull knife. Use the T-wrench to remove the eight screws on the knife clamp and set the oblong holes...knife. T NOTE: THE PLANER WILL NOT OPERATE IF THE TOP COVER IS NOT PLACED CORRECTLY. 9 English Use the magnets on the cutter head. 2. Reset the knife clamp over the end of the cutter head ...
Instruction Manual
Page 11
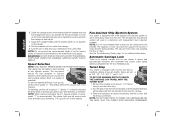
... breaker trip, make sure the switch is equipped with brush caps (U) that are external to seat new brushes. Use a flathead screwdriver to service DEWALT products. Calibrating the Depth Adjustment Scale The depth adjustment scale (N) on the depth adjustment scale. Treat the table with... extended use, the depth adjustment scale could show an incorrect measurement. WARNING: To prevent the planer from ...
... breaker trip, make sure the switch is equipped with brush caps (U) that are external to seat new brushes. Use a flathead screwdriver to service DEWALT products. Calibrating the Depth Adjustment Scale The depth adjustment scale (N) on the depth adjustment scale. Treat the table with... extended use, the depth adjustment scale could show an incorrect measurement. WARNING: To prevent the planer from ...

Instruction Manual
Page 12
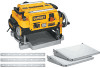
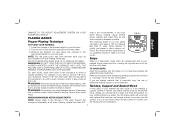
... it from tilting or falling from the underside. 2. Have damaged cords replaced by DEWALT, have not been tested with nails or screws to the table/bench with this product, use only identical replacement parts. Accessories WARNING: Since accessories, other than those offered by ...an authorized service center. dewalt.com DW7351 Accessory Folding Tables WARNING: For your knives before attaching the tables...
... it from tilting or falling from the underside. 2. Have damaged cords replaced by DEWALT, have not been tested with nails or screws to the table/bench with this product, use only identical replacement parts. Accessories WARNING: Since accessories, other than those offered by ...an authorized service center. dewalt.com DW7351 Accessory Folding Tables WARNING: For your knives before attaching the tables...
Instruction Manual
Page 13
Install the smaller screw into the lower threaded hole on the side of warranty coverage and warranty repair information, visit www.dewalt.com or call 1-800-4-DEWALT (1-800- 12 To attach the table to re-attach the tables. WARNING: For your planer to push the bolts flush with ... larger hole on the right side of the stepped bolt. 4. Repairs To assure product SAFETY and RELIABILITY, repairs, maintenance and adjustment should be used to use the T-wrench from your own safety, it is fully secured (Fig. 7). 7. Serious injury may want to turn the stepped bolt until it...
Install the smaller screw into the lower threaded hole on the side of warranty coverage and warranty repair information, visit www.dewalt.com or call 1-800-4-DEWALT (1-800- 12 To attach the table to re-attach the tables. WARNING: For your planer to push the bolts flush with ... larger hole on the right side of the stepped bolt. 4. Repairs To assure product SAFETY and RELIABILITY, repairs, maintenance and adjustment should be used to use the T-wrench from your own safety, it is fully secured (Fig. 7). 7. Serious injury may want to turn the stepped bolt until it...
Instruction Manual
Page 14
...addition to products sold in Latin America, see country specific warranty information contained either in the packaging, call 1-800-4-DEWALT for free, any reason, you may have been made or attempted by normal use, for a free replacement. 13 LATIN AMERICA: This warranty does not apply to the warranty..., DEWALT tools are covered by our: 1 YEAR FREE SERVICE DEWALT will maintain the tool and replace worn parts caused by others. This...
...addition to products sold in Latin America, see country specific warranty information contained either in the packaging, call 1-800-4-DEWALT for free, any reason, you may have been made or attempted by normal use, for a free replacement. 13 LATIN AMERICA: This warranty does not apply to the warranty..., DEWALT tools are covered by our: 1 YEAR FREE SERVICE DEWALT will maintain the tool and replace worn parts caused by others. This...
Instruction Manual
Page 15
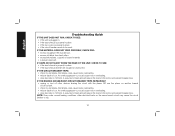
... cause motor overloading. • drop feed rate to 14ft/min. NOTE: Even under normal loading conditions, other devices sharing the circuit with the planer OR use the planer on the motor and prevent breaker trips. IF THE MATERIAL DOES NOT FEED PROPERLY, CHECK FOR: • excess clogging in place. • if...
... cause motor overloading. • drop feed rate to 14ft/min. NOTE: Even under normal loading conditions, other devices sharing the circuit with the planer OR use the planer on the motor and prevent breaker trips. IF THE MATERIAL DOES NOT FEED PROPERLY, CHECK FOR: • excess clogging in place. • if...


