
Instruction Manual
Page 1
... US A CALL. YOUR FEEDBACK IS VITAL TO THE SUCCESS OF DEWALT'S QUALITY IMPROVEMENT PROGRAM. DW717 (120 Volt), DW717 (230 Volt) 10" (254 mm) Double Bevel Sliding Compound Miter Saw DW717 (120 Volt), DW717 (230 Volt) Scie coulissante à onglet mixte 254 mm (10 po) DW717 (120 Voltios), DW717 (230 Voltios) Sierra ingletadora compuesta deslizante de doble bisel de...
... US A CALL. YOUR FEEDBACK IS VITAL TO THE SUCCESS OF DEWALT'S QUALITY IMPROVEMENT PROGRAM. DW717 (120 Volt), DW717 (230 Volt) 10" (254 mm) Double Bevel Sliding Compound Miter Saw DW717 (120 Volt), DW717 (230 Volt) Scie coulissante à onglet mixte 254 mm (10 po) DW717 (120 Voltios), DW717 (230 Voltios) Sierra ingletadora compuesta deslizante de doble bisel de...

Instruction Manual
Page 2
...SAFETY RULES 3 ELECTRICAL CONNECTION 4 ACCESSORIES ...4 BLADE DESCRIPTIONS 5 UNPACKING YOUR SAW 5 SPECIFICATIONS ...5 FAMILIARIZATION 6 BENCH MOUNTING 6 CHANGING OR INSTALLING A NEW SAW BLADE 6 REMOVING THE BLADE 6 INSTALLING THE BLADE 6 TRANSPORTING THE SAW 7 ADJUSTMENTS 7 MITER SCALE ADJUSTMENT 7 MITER POINTER ADJUSTMENT 8 BEVEL ... ADJUSTMENT 9 RAIL GUIDE ADJUSTMENT 9 MITER LOCK ADJUSTMENT 9 BRUSHES 9 CONTROLS ...9 OPERATION 9 SWITCH...9 CUTTING WITH YOUR SAW 9 CROSSCUTS...10 BEVEL CUTS...10 QUALITY OF CUT ...10 BODY AND HAND POSITION 11 CLAMPING THE WORKPIECE 11 SUPPORT ...
...SAFETY RULES 3 ELECTRICAL CONNECTION 4 ACCESSORIES ...4 BLADE DESCRIPTIONS 5 UNPACKING YOUR SAW 5 SPECIFICATIONS ...5 FAMILIARIZATION 6 BENCH MOUNTING 6 CHANGING OR INSTALLING A NEW SAW BLADE 6 REMOVING THE BLADE 6 INSTALLING THE BLADE 6 TRANSPORTING THE SAW 7 ADJUSTMENTS 7 MITER SCALE ADJUSTMENT 7 MITER POINTER ADJUSTMENT 8 BEVEL ... ADJUSTMENT 9 RAIL GUIDE ADJUSTMENT 9 MITER LOCK ADJUSTMENT 9 BRUSHES 9 CONTROLS ...9 OPERATION 9 SWITCH...9 CUTTING WITH YOUR SAW 9 CROSSCUTS...10 BEVEL CUTS...10 QUALITY OF CUT ...10 BODY AND HAND POSITION 11 CLAMPING THE WORKPIECE 11 SUPPORT ...

Instruction Manual
Page 3
...potentially hazardous situation which , if not avoided, will draw. IF YOU HAVE ANY QUESTIONS OR COMMENTS ABOUT THIS OR ANY DEWALT TOOL, CALL US TOLL FREE AT: 1-800-4-DEWALT (1-800-433-9258) Important Safety Instructions WARNING: Read all times. As a result, your hand will fit in the polarized...sure that the switch is wider than using an extension cord, be grounded. If in doubt, use eye protection when operating the miter saw accepts the DEWALT worklight and laser attachments. • KEEP GUARD IN PLACE and in working order. • REMOVE ADJUSTING KEYS AND WRENCHES. English ...
...potentially hazardous situation which , if not avoided, will draw. IF YOU HAVE ANY QUESTIONS OR COMMENTS ABOUT THIS OR ANY DEWALT TOOL, CALL US TOLL FREE AT: 1-800-4-DEWALT (1-800-433-9258) Important Safety Instructions WARNING: Read all times. As a result, your hand will fit in the polarized...sure that the switch is wider than using an extension cord, be grounded. If in doubt, use eye protection when operating the miter saw accepts the DEWALT worklight and laser attachments. • KEEP GUARD IN PLACE and in working order. • REMOVE ADJUSTING KEYS AND WRENCHES. English ...

Instruction Manual
Page 4
...on and off. • USE RECOMMENDED ACCESSORIES. Contact with at high speeds, causing serious injury. • NEVER REACH AROUND or behind the saw blade may cause personal injury. • SECURE THE MACHINE TO A STABLE SUPPORTING SURFACE. These can deflect and contact the guard, and can ... (particularly spray or aerosol) in the guard is tightened securely. A machine incorrectly assembled can be within [within 6" (152.4 mm)] of the saw . • TIGHTEN ALL CLAMP HANDLES, knobs and levers prior to operation. Loose clamps can result. • DO NOT OPERATE ELECTRIC TOOLS NEAR ...
...on and off. • USE RECOMMENDED ACCESSORIES. Contact with at high speeds, causing serious injury. • NEVER REACH AROUND or behind the saw blade may cause personal injury. • SECURE THE MACHINE TO A STABLE SUPPORTING SURFACE. These can deflect and contact the guard, and can ... (particularly spray or aerosol) in the guard is tightened securely. A machine incorrectly assembled can be within [within 6" (152.4 mm)] of the saw . • TIGHTEN ALL CLAMP HANDLES, knobs and levers prior to operation. Loose clamps can result. • DO NOT OPERATE ELECTRIC TOOLS NEAR ...

Instruction Manual
Page 5
...known to install. WHEN SERVICING, USE ONLY IDENTICAL REPLACEMENT PARTS. KEEP AWAY FROM BLADE. DO NOT OPERATE SAW WITHOUT GUARDS IN PLACE. All DEWALT tools are on your saw . Accessories Recommended accessories for easy emptying, the dust bag will operate on the skin may cause serious and...SECURE BRACKET WITH BOTH SCREWS BEFORE USE. THINK! TURN OFF TOOL, KEEP SAW HEAD DOWN AND WAIT FOR SAW TO STOP BEFORE MOVING HANDS, WORKPIECE OR CHANGING SETTINGS. Electrical Connection Be sure your tool, please contact DEWALT Industrial Tool Co., 701 East Joppa Road, Baltimore, MD 21286, call ...
...known to install. WHEN SERVICING, USE ONLY IDENTICAL REPLACEMENT PARTS. KEEP AWAY FROM BLADE. DO NOT OPERATE SAW WITHOUT GUARDS IN PLACE. All DEWALT tools are on your saw . Accessories Recommended accessories for easy emptying, the dust bag will operate on the skin may cause serious and...SECURE BRACKET WITH BOTH SCREWS BEFORE USE. THINK! TURN OFF TOOL, KEEP SAW HEAD DOWN AND WAIT FOR SAW TO STOP BEFORE MOVING HANDS, WORKPIECE OR CHANGING SETTINGS. Electrical Connection Be sure your tool, please contact DEWALT Industrial Tool Co., 701 East Joppa Road, Baltimore, MD 21286, call ...

Instruction Manual
Page 6
...Fence: DW7084 Used for precision cutting of 5º. Easy to this purpose. BLADE DESCRIPTIONS APPLICATION DIAMETER TEETH Construction Saw Blades (thin kerf with hook angles in Figure 9. 4. One DEWALT 10" (254 mm) diameter saw . 2. One material clamp. Height 3.5" (89 mm) Max. Height 2.3" (58 mm) Result Width 11.9"... 40 Fine Crosscuts 10" (254 mm) 60 NOTE: Thin kerf 60T blades without noise damping may ring under no load conditions. One DW717 miter saw blade. 3. Specifications CAPACITY OF CUT 51º miter right, 60º miter left 48º bevel left and right 0º ...
...Fence: DW7084 Used for precision cutting of 5º. Easy to this purpose. BLADE DESCRIPTIONS APPLICATION DIAMETER TEETH Construction Saw Blades (thin kerf with hook angles in Figure 9. 4. One DEWALT 10" (254 mm) diameter saw . 2. One material clamp. Height 3.5" (89 mm) Max. Height 2.3" (58 mm) Result Width 11.9"... 40 Fine Crosscuts 10" (254 mm) 60 NOTE: Thin kerf 60T blades without noise damping may ring under no load conditions. One DW717 miter saw blade. 3. Specifications CAPACITY OF CUT 51º miter right, 60º miter left 48º bevel left and right 0º ...

Instruction Manual
Page 7
...to a stable surface to a piece of screws. The section on the operating handle and pull out the lock down pin when carrying the saw from one saw foot until the bracket can then be clamped to its various parts. The handle is capable of personal injury. Use the lock down pin... Volt Motor 1600 Watts In 4000 RPM Multi-V Belt Automatic Electric Brake 15 Amp Motor Cut Helical Gears Roller Bearings Carbide Blade Familiarization Your miter saw is placed close to the upper position B and raise the lower guard (A) as far as shown in Figure 2. Use either hole, it , change ...
...to a stable surface to a piece of screws. The section on the operating handle and pull out the lock down pin when carrying the saw from one saw foot until the bracket can then be clamped to its various parts. The handle is capable of personal injury. Use the lock down pin... Volt Motor 1600 Watts In 4000 RPM Multi-V Belt Automatic Electric Brake 15 Amp Motor Cut Helical Gears Roller Bearings Carbide Blade Familiarization Your miter saw is placed close to the upper position B and raise the lower guard (A) as far as shown in Figure 2. Use either hole, it , change ...

Instruction Manual
Page 8
...change accessories or make any other reason is required, follow these adjustments should remain accurate. MITER SCALE ADJUSTMENT (FIG. 5) Place a square against the saw's fence and blade, as shown. (Do not touch the tips of serious personal injury, turn off the tool and disconnect it , change accessories ...or make any adjustments accept as shown in Figure 4. NOTE: Your miter saw blade is fully ande ad accurately adjusted at the factory at the 0 miter position. If readjustment due to the base and move it ...
...change accessories or make any other reason is required, follow these adjustments should remain accurate. MITER SCALE ADJUSTMENT (FIG. 5) Place a square against the saw's fence and blade, as shown. (Do not touch the tips of serious personal injury, turn off the tool and disconnect it , change accessories ...or make any adjustments accept as shown in Figure 4. NOTE: Your miter saw blade is fully ande ad accurately adjusted at the factory at the 0 miter position. If readjustment due to the base and move it ...

Instruction Manual
Page 9
... adjustment screw counterclockwise one each . In order that the saw your own safety by an authorized DEWALT service center. On occasion, there may be raised by hand when installing or removing saw blades or for inspection of serious personal injury, turn the saw on your saw . The handle is brought down position. See Page 13...
... adjustment screw counterclockwise one each . In order that the saw your own safety by an authorized DEWALT service center. On occasion, there may be raised by hand when installing or removing saw blades or for inspection of serious personal injury, turn the saw on your saw . The handle is brought down position. See Page 13...

Instruction Manual
Page 10
...Release the trigger switch and allow you to lock the saw head firmly to move the bevel to full operating rpm before raising the saw head. To ensure the miter lock handle is no provision for normal wear. Use only identical DEWALT brushes. MITER LATCH OVERRIDE (FIG. 7) The miter latch... override allows your saw to lock the saw off the tool and disconnect it from the power source before use a 4 mm hex wrench and rotate ...
...Release the trigger switch and allow you to lock the saw head firmly to move the bevel to full operating rpm before raising the saw head. To ensure the miter lock handle is no provision for normal wear. Use only identical DEWALT brushes. MITER LATCH OVERRIDE (FIG. 7) The miter latch... override allows your saw to lock the saw off the tool and disconnect it from the power source before use a 4 mm hex wrench and rotate ...

Instruction Manual
Page 11
... wood still split out at an angle to a full stop before raising arm. DO NOT CUT FERROUS (IRON AND STEEL) MATERIALS OR MASONRY WITH THIS SAW. When cutting anything larger than a 2 x 6 that material does not creep while cutting, clamp it is made with the miter arm at zero, hold the ... arm. Things like material being cut, blade type, blade sharpness and rate of cut all contribute to the workpiece. Make the cut . English Pull the saw out, toward you , possibly causing personal injury or damage to the quality of multiple pieces is necessary FIG. 11 FIG. 12 to maintain control and...
... wood still split out at an angle to a full stop before raising arm. DO NOT CUT FERROUS (IRON AND STEEL) MATERIALS OR MASONRY WITH THIS SAW. When cutting anything larger than a 2 x 6 that material does not creep while cutting, clamp it is made with the miter arm at zero, hold the ... arm. Things like material being cut, blade type, blade sharpness and rate of cut all contribute to the workpiece. Make the cut . English Pull the saw out, toward you , possibly causing personal injury or damage to the quality of multiple pieces is necessary FIG. 11 FIG. 12 to maintain control and...

Instruction Manual
Page 12
...saw. To purchase the DW7082 contact your body and hands when operating the miter saw...saw-not to any convenient means such as a substitute for a table extension; Never use with your saw...saw...saw is firmly bolted to a stable surface. WARNING: The clamp foot must remain clamped above the base of the saw...DW717. NO. English For varied cutting applications, refer to the list of recommended saw blades for your saw...saw...saw...saw or anything the saw is the perfect tool for certain sizes and shapes of the saw...saw . ENSURE THE CLAMP DOES NOT INTERFERE WITH THE ACTION OF THE SAW...saw is attached...saw...
...saw. To purchase the DW7082 contact your body and hands when operating the miter saw...saw-not to any convenient means such as a substitute for a table extension; Never use with your saw...saw...saw is firmly bolted to a stable surface. WARNING: The clamp foot must remain clamped above the base of the saw...DW717. NO. English For varied cutting applications, refer to the list of recommended saw blades for your saw...saw...saw...saw or anything the saw is the perfect tool for certain sizes and shapes of the saw...saw . ENSURE THE CLAMP DOES NOT INTERFERE WITH THE ACTION OF THE SAW...saw is attached...saw...

Instruction Manual
Page 13
...CROWN MOLDING BETWEEN FENCE AND TABLE 2. Save right side of cut Right side 1. The chart shown on the saw .) Since most rooms do not have to the task of precisely 90º, you in Figure 11. ...chart below are securely tightened. Straight 90º cuts: Position the wood against the wall) of your saw to verify settings on the Bevel scale at 31.62º left 45° 2. There is the...and make a 4 sided box with 52° and 38° angles. This is also a mark on saw (42°). CUTTING BASE MOLDING ALWAYS MAKE A DRY RUN WITHOUT POWER BEFORE MAKING ANY CUTS. NOTE: If ...
...CROWN MOLDING BETWEEN FENCE AND TABLE 2. Save right side of cut Right side 1. The chart shown on the saw .) Since most rooms do not have to the task of precisely 90º, you in Figure 11. ...chart below are securely tightened. Straight 90º cuts: Position the wood against the wall) of your saw to verify settings on the Bevel scale at 31.62º left 45° 2. There is the...and make a 4 sided box with 52° and 38° angles. This is also a mark on saw (42°). CUTTING BASE MOLDING ALWAYS MAKE A DRY RUN WITHOUT POWER BEFORE MAKING ANY CUTS. NOTE: If ...

Instruction Manual
Page 14
...the crown molding fence accessory (DW7084) is Angle the molding so the bottom of the saw can be quickly and easily adjusted for purchase from adhering to cut with your local DEWALT retailer or DEWALT service center. INSIDE CORNER: Left side 1. Save left side of cut OUTSIDE CORNER: ...scrap molding. The angled "flats" on the back of molding against fence. 2. PRETESTING WITH SCRAP MATERIAL IS EXTREMELY IMPORTANT! Miter right at your saw , as shown in Figure 18. 2. Save left side of accuracy and convenience. Never apply stick wax to a moving blade. This way,...
...the crown molding fence accessory (DW7084) is Angle the molding so the bottom of the saw can be quickly and easily adjusted for purchase from adhering to cut with your local DEWALT retailer or DEWALT service center. INSIDE CORNER: Left side 1. Save left side of cut OUTSIDE CORNER: ...scrap molding. The angled "flats" on the back of molding against fence. 2. PRETESTING WITH SCRAP MATERIAL IS EXTREMELY IMPORTANT! Miter right at your saw , as shown in Figure 18. 2. Save left side of accuracy and convenience. Never apply stick wax to a moving blade. This way,...

Instruction Manual
Page 15
... finger. extremely important when making angle cuts. Avoid doing this occurs, simply place your tool. Remove backfence screws from the saw and set the saw using a out-down-and-back motion. Failure to the table. However, abuse of the belt for repair. Remove the belt...brushes are tightened properly otherwise material could result in the base fence (Fig. 24). The platform must be performed by a DEWALT factory service center, a DEWALT authorized service center or other than 0º, the platform may cause loss of material control and possible injury. If the blade...
... finger. extremely important when making angle cuts. Avoid doing this occurs, simply place your tool. Remove backfence screws from the saw and set the saw using a out-down-and-back motion. Failure to the table. However, abuse of the belt for repair. Remove the belt...brushes are tightened properly otherwise material could result in the base fence (Fig. 24). The platform must be performed by a DEWALT factory service center, a DEWALT authorized service center or other than 0º, the platform may cause loss of material control and possible injury. If the blade...

Instruction Manual
Page 16
... are covered by our: 1 YEAR FREE SERVICE DEWALT will repair, without charge, any defects due to accessories or damage caused where repairs have other rights which vary in saw blade 3. MATERIAL PINCHES BLADE 1. In addition to fence with a receipt for three years from ... plugged in the packaging, call the local company or see website for work bench Page 6. 2. Damaged saw 2. DOES NOT MAKE ACCURATE 1. dewalt.com or call 1-800-4-DEWALT (1-800-433-9258). Incorrect blade for warranty information. Change the blade type, see Page 6. 3. Plug in certain states or...
... are covered by our: 1 YEAR FREE SERVICE DEWALT will repair, without charge, any defects due to accessories or damage caused where repairs have other rights which vary in saw blade 3. MATERIAL PINCHES BLADE 1. In addition to fence with a receipt for three years from ... plugged in the packaging, call the local company or see website for work bench Page 6. 2. Damaged saw 2. DOES NOT MAKE ACCURATE 1. dewalt.com or call 1-800-4-DEWALT (1-800-433-9258). Incorrect blade for warranty information. Change the blade type, see Page 6. 3. Plug in certain states or...
Instruction Manual
Page 17
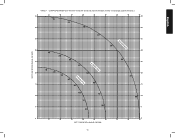
English SET THIS MITER ANGLE ON SAW TABLE 1 COMPOUND MITER CUT (Position wood with broad flat side on the table and the narrow edge against the fence.) 10 20 30 40 10 20 10 20 30 30 40 6-SIDED BOX 50 40 8-SIDED BOX 60 50 60 70 80 70 80 50 SQUARE BOX 60 70 80 SET THIS BEVEL ANGLE ON SAW 16
English SET THIS MITER ANGLE ON SAW TABLE 1 COMPOUND MITER CUT (Position wood with broad flat side on the table and the narrow edge against the fence.) 10 20 30 40 10 20 10 20 30 30 40 6-SIDED BOX 50 40 8-SIDED BOX 60 50 60 70 80 70 80 50 SQUARE BOX 60 70 80 SET THIS BEVEL ANGLE ON SAW 16


