
Instruction Manual
Page 1
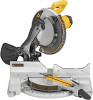
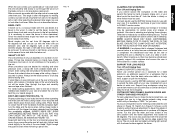
... US A CALL. YOUR FEEDBACK IS VITAL TO THE SUCCESS OF DEWALT'S QUALITY IMPROVEMENT PROGRAM. DW715 (120 Volt), DW715 (230 Volt) 12" Compound Miter Saw Scie à onglets mixtes, 305 mm (12 po) Sierra ingletadora de 305 mm (12") See us on the World Wide Web at www.dewalt.com INSTRUCTION MANUAL GUIDE D'UTILISATION MANUAL DE INSTRUCCIONES INSTRUCTIVO DE OPERACI...
... US A CALL. YOUR FEEDBACK IS VITAL TO THE SUCCESS OF DEWALT'S QUALITY IMPROVEMENT PROGRAM. DW715 (120 Volt), DW715 (230 Volt) 12" Compound Miter Saw Scie à onglets mixtes, 305 mm (12 po) Sierra ingletadora de 305 mm (12") See us on the World Wide Web at www.dewalt.com INSTRUCTION MANUAL GUIDE D'UTILISATION MANUAL DE INSTRUCCIONES INSTRUCTIVO DE OPERACI...
Instruction Manual
Page 3
...ADDITIONAL SAFETY RULES 2 ELECTRICAL CONNECTION 3 ACCESSORIES ...3 BLADE DESCRIPTIONS 4 UNPACKING YOUR SAW 4 SPECIFICATIONS ...4 FAMILIARIZATION ...5 BENCH MOUNTING ...5 CHANGING OR INSTALLING A NEW BLADE 6 TRANSPORTING THE SAW 6 ADJUSTMENTS ...6 MITER SCALE ADJUSTMENT 6 MITER POINTER ADJUSTMENT 7 BEVEL SQUARE TO TABLE 7 BEVEL POINTER ...7 BEVEL STOP ADJUSTMENT...TRIM MOLDING AND OTHER FRAMES 10 CUTTING COMPOUND MITERS 10 VERNIER SCALE ...10 CUTTING BASE MOLDING 10 CUTTING CROWN MOLDING 11 SPECIAL CUTS ...12 MAINTENANCE ...13 WARRANTY ...13 TROUBLESHOOTING GUIDE 14 TABLE 1: COMPOUND...
...ADDITIONAL SAFETY RULES 2 ELECTRICAL CONNECTION 3 ACCESSORIES ...3 BLADE DESCRIPTIONS 4 UNPACKING YOUR SAW 4 SPECIFICATIONS ...4 FAMILIARIZATION ...5 BENCH MOUNTING ...5 CHANGING OR INSTALLING A NEW BLADE 6 TRANSPORTING THE SAW 6 ADJUSTMENTS ...6 MITER SCALE ADJUSTMENT 6 MITER POINTER ADJUSTMENT 7 BEVEL SQUARE TO TABLE 7 BEVEL POINTER ...7 BEVEL STOP ADJUSTMENT...TRIM MOLDING AND OTHER FRAMES 10 CUTTING COMPOUND MITERS 10 VERNIER SCALE ...10 CUTTING BASE MOLDING 10 CUTTING CROWN MOLDING 11 SPECIAL CUTS ...12 MAINTENANCE ...13 WARRANTY ...13 TROUBLESHOOTING GUIDE 14 TABLE 1: COMPOUND...
Instruction Manual
Page 4
...101-200 201-300 Ampere Rating More Not more AWG ThanThan 0- 6 18 16 16 14 6 - 10 18 16 14 12 10 - 12 16 16 14 12 12 - 16 14 12 Not Recommended Additional Safety Rules For Miter Saws CAUTION: FAILURE TO HEED THESE WARNINGS MAY RESULT IN PERSONAL INJURY AND SERIOUS DAMAGE TO THE...Shut off . • NEVER LEAVE TOOL RUNNING UNATTENDED. English IF YOU HAVE ANY QUESTIONS OR COMMENTS ABOUT THIS OR ANY DEWALT TOOL, CALL US TOLL FREE AT: 1-800-4-DEWALT (1-800-433-9258) Important Safety Instructions WARNING: When using an extension cord, be sure to use one blade is wider ...
...101-200 201-300 Ampere Rating More Not more AWG ThanThan 0- 6 18 16 16 14 6 - 10 18 16 14 12 10 - 12 16 16 14 12 12 - 16 14 12 Not Recommended Additional Safety Rules For Miter Saws CAUTION: FAILURE TO HEED THESE WARNINGS MAY RESULT IN PERSONAL INJURY AND SERIOUS DAMAGE TO THE...Shut off . • NEVER LEAVE TOOL RUNNING UNATTENDED. English IF YOU HAVE ANY QUESTIONS OR COMMENTS ABOUT THIS OR ANY DEWALT TOOL, CALL US TOLL FREE AT: 1-800-4-DEWALT (1-800-433-9258) Important Safety Instructions WARNING: When using an extension cord, be sure to use one blade is wider ...
Instruction Manual
Page 6
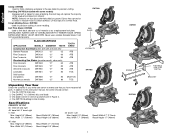
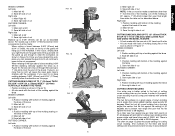
In addition to the saw carton to ground. DW715 miter saw blade 3. One DW7053 dustbag (some models) Equipped with a zipper for precision cutting of the sawdust produced (not shown). Left Max. It will capture the majority ... TCG Mod TCG TCG DW7080 END PLATE LOCKNUTS DW7082 Unpacking Your Saw Check the contents of material or as a replacement kerf plate. Never use a smaller diameter blade. NOTE: Deflector on dust spout channels debris to make sure that you have received all parts. One DEWALT 12" (305mm) dia. Width 7.7" (196mm) 45˚ miter Max.
In addition to the saw carton to ground. DW715 miter saw blade 3. One DW7053 dustbag (some models) Equipped with a zipper for precision cutting of the sawdust produced (not shown). Left Max. It will capture the majority ... TCG Mod TCG TCG DW7080 END PLATE LOCKNUTS DW7082 Unpacking Your Saw Check the contents of material or as a replacement kerf plate. Never use a smaller diameter blade. NOTE: Deflector on dust spout channels debris to make sure that you have received all parts. One DEWALT 12" (305mm) dia. Width 7.7" (196mm) 45˚ miter Max.
Instruction Manual
Page 11
...of recommended saw blade. Sketch A in Figure 12 shows a joint made . The cut all contribute to the quality of the two boards at the rear of the workpiece, stick a piece of your hand would be appropriate for purchase at extra cost. This angle is necessary to move the miter arm ... results. Make the cut depends on the wood where the cut with your local retailer or DEWALT service center. Things like the one that may become unbalanced, properly support the workpiece and ensure the saw blade at a bevel to make a dry run before raising arm. For varied cutting applications,...
...of recommended saw blade. Sketch A in Figure 12 shows a joint made . The cut all contribute to the quality of the two boards at the rear of the workpiece, stick a piece of your hand would be appropriate for purchase at extra cost. This angle is necessary to move the miter arm ... results. Make the cut depends on the wood where the cut with your local retailer or DEWALT service center. Things like the one that may become unbalanced, properly support the workpiece and ensure the saw blade at a bevel to make a dry run before raising arm. For varied cutting applications,...
Instruction Manual
Page 12
... lock and carefully move the arm to the right. English CUTTING TRIM MOLDING AND OTHER FRAMES Sketch B in Figure 12 shows a joint made by setting the miter arm at the same time. Set your project and locate that is not shown in the chart, use the following formula. 180 degrees divided by...°). The chart below (The plastic vernier plate is cut . To use the upper right arc. Turn off miter saw , allow the blade to align the appropriate vernier mark with it in place as described below gives the proper angles for this type of cut ...
... lock and carefully move the arm to the right. English CUTTING TRIM MOLDING AND OTHER FRAMES Sketch B in Figure 12 shows a joint made by setting the miter arm at the same time. Set your project and locate that is not shown in the chart, use the following formula. 180 degrees divided by...°). The chart below (The plastic vernier plate is cut . To use the upper right arc. Turn off miter saw , allow the blade to align the appropriate vernier mark with it in place as described below gives the proper angles for this type of cut ...
Instruction Manual
Page 13
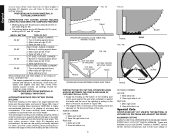
... special pre-set English Save right side of crown molding are not easy to 3-5/8" (91mm) can only cut Right side 1. Your miter saw is also a mark on a given piece of cut CUTTING BASE MOLDING UP TO 1.8" (45mm) THICK BY UP TO 7-11/16" (195.6mm) WIDE LAYING FLAT ... points at 31.62 degrees left and right for the miter and bevel settings are very precise and are at 45° bevel and 0 miter • All cuts made somewhere other than your right thumb on page 12 gives the proper settings for cutting crown molding. (The numbers for cutting crown molding at...
... special pre-set English Save right side of crown molding are not easy to 3-5/8" (91mm) can only cut Right side 1. Your miter saw is also a mark on a given piece of cut CUTTING BASE MOLDING UP TO 1.8" (45mm) THICK BY UP TO 7-11/16" (195.6mm) WIDE LAYING FLAT ... points at 31.62 degrees left and right for the miter and bevel settings are very precise and are at 45° bevel and 0 miter • All cuts made somewhere other than your right thumb on page 12 gives the proper settings for cutting crown molding. (The numbers for cutting crown molding at...
Instruction Manual
Page 14
...IMPORTANT! The crown molding fence accessory is required. The angled "flats" on the back of the molding must rest squarely on saw . Save the right side of cut 12 FIG. 19 FENCE FIG. 19A RIGHT BLADE BLADE FENCE WRONG OUTSIDE CORNER: Left side 1. Save left at 45° ... or DEWALT service center. This way, when corners other than 90 degrees are for all settings should be tested on your saw can be quickly and easily adjusted for crown moldings are available at your local dealer. Miter left side of molding against fence 2. Miter left side of molding against ...
...IMPORTANT! The crown molding fence accessory is required. The angled "flats" on the back of the molding must rest squarely on saw . Save the right side of cut 12 FIG. 19 FENCE FIG. 19A RIGHT BLADE BLADE FENCE WRONG OUTSIDE CORNER: Left side 1. Save left at 45° ... or DEWALT service center. This way, when corners other than 90 degrees are for all settings should be tested on your saw can be quickly and easily adjusted for crown moldings are available at your local dealer. Miter left side of molding against fence 2. Miter left side of molding against ...
Instruction Manual
Page 16
... 2. Turn blade around. See page 2. 2. Contact your electric company. Stand or bench on flat level surface. DOES NOT MAKE ACCURATE MITER CUTS WHAT'S WRONG? Workpiece moving 4. Cutting bowed material WHAT TO DO... 1. Have brushes replaced by authorized service center. 4. TROUBLE! TROUBLE...to fence with adequate size cord. Gum or pitch on page 12. 14 Remove blade and clean with turpentine and coarse steel wool or household oven cleaner. 4. Damaged saw . 2. See page 6. 2. Saw not mounted securely to table 3. Position bowed material as instructed ...
... 2. Turn blade around. See page 2. 2. Contact your electric company. Stand or bench on flat level surface. DOES NOT MAKE ACCURATE MITER CUTS WHAT'S WRONG? Workpiece moving 4. Cutting bowed material WHAT TO DO... 1. Have brushes replaced by authorized service center. 4. TROUBLE! TROUBLE...to fence with adequate size cord. Gum or pitch on page 12. 14 Remove blade and clean with turpentine and coarse steel wool or household oven cleaner. 4. Damaged saw . 2. See page 6. 2. Saw not mounted securely to table 3. Position bowed material as instructed ...


