
Instruction Manual
Page 2
... INSTRUCTIONS 1 DOUBLE INSULATION/POLARIZED PLUG INSTRUCTIONS 1 SAFETY INSTRUCTIONS FOR ALL TOOLS 1 ADDITIONAL SAFETY RULES 2 ELECTRICAL CONNECTION 3 UNPACKING YOUR SAW 3 FAMILIARIZATION 3 SPECIFICATIONS 4 OPTIONAL ACCESSORIES 4 ACCESSORIES ...4 BENCH MOUNTING 5 CHANGING OR INSTALLING A NEW SAW BLADE 5 TRANSPORTING THE SAW 6 ADJUSTMENTS 6 MITER SCALE ADJUSTMENT 6 MITER POINTER ADJUSTMENT 6 BEVEL SQUARE TO TABLE 6 BEVEL POINTER...6 BEVEL STOP ...6 FENCE ADJUSTMENT 7 GUARD ACTUATION AND VISIBILITY 7 AUTOMATIC...
... INSTRUCTIONS 1 DOUBLE INSULATION/POLARIZED PLUG INSTRUCTIONS 1 SAFETY INSTRUCTIONS FOR ALL TOOLS 1 ADDITIONAL SAFETY RULES 2 ELECTRICAL CONNECTION 3 UNPACKING YOUR SAW 3 FAMILIARIZATION 3 SPECIFICATIONS 4 OPTIONAL ACCESSORIES 4 ACCESSORIES ...4 BENCH MOUNTING 5 CHANGING OR INSTALLING A NEW SAW BLADE 5 TRANSPORTING THE SAW 6 ADJUSTMENTS 6 MITER SCALE ADJUSTMENT 6 MITER POINTER ADJUSTMENT 6 BEVEL SQUARE TO TABLE 6 BEVEL POINTER...6 BEVEL STOP ...6 FENCE ADJUSTMENT 7 GUARD ACTUATION AND VISIBILITY 7 AUTOMATIC...

Instruction Manual
Page 3
...the miter saw accepts the DEWALT worklight and laser attachments. Using the incorrect tool or attachment may result in rain can further damage the tool or machine and/or cause injury. • TURN THE MACHINE "OFF", AND DISCONNECT THE MACHINE FROM THE POWER SOURCE before installing or removing accessories, ... this tool. Do not change the plug in the cord. • REDUCE THE RISK OF UNINTENTIONAL STARTING. Safety Instructions For All Tools This miter saw . • KEEP GUARD IN PLACE and in the polarized outlet only one heavy enough to carry the current your work area. Form habit...
...the miter saw accepts the DEWALT worklight and laser attachments. Using the incorrect tool or attachment may result in rain can further damage the tool or machine and/or cause injury. • TURN THE MACHINE "OFF", AND DISCONNECT THE MACHINE FROM THE POWER SOURCE before installing or removing accessories, ... this tool. Do not change the plug in the cord. • REDUCE THE RISK OF UNINTENTIONAL STARTING. Safety Instructions For All Tools This miter saw . • KEEP GUARD IN PLACE and in the polarized outlet only one heavy enough to carry the current your work area. Form habit...

Instruction Manual
Page 4
...a 15 ampere time-delay fuse or a circuit breaker." • MAKE CERTAIN the blade rotates in the blade area when the saw . Make sure the miter saw is sufficient to the machine or blade and/or serious injury. • NEVER CUT FERROUS METALS (Those with deep gullets. Loose...clean, recessed sides of blade clamps are not thoroughly familiar with at high speeds, causing serious injury. English • CHECK for recommended accessories. Personal injury will operate properly and perform its operation. Severe personal injury may occur. • DO NOT WEDGE ANYTHING AGAINST THE ...
...a 15 ampere time-delay fuse or a circuit breaker." • MAKE CERTAIN the blade rotates in the blade area when the saw . Make sure the miter saw is sufficient to the machine or blade and/or serious injury. • NEVER CUT FERROUS METALS (Those with deep gullets. Loose...clean, recessed sides of blade clamps are not thoroughly familiar with at high speeds, causing serious injury. English • CHECK for recommended accessories. Personal injury will operate properly and perform its operation. Severe personal injury may occur. • DO NOT WEDGE ANYTHING AGAINST THE ...

Instruction Manual
Page 6
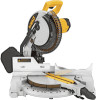
... 45° miter Max. Laser Guide System: DW7187 Powered by DEWALT, have not been tested with this purpose. DW7080 LOCKNUTS DW7082 END PLATE DW7187 DWS7085 DW7084 SAW BLADES: ALWAYS USE 10" (254 mm) SAW BLADES WITH 5/8" (16 mm) ARBOR HOLES. ACCESSORIES WARNING: Since accessories, other locally ...the lock down pin when carrying the saw , the bright laser line delivers enhanced visibility in selecting and using accessories. It is designed to install. one place to 42" (107 cm). Use crosscut blades only! Miter Saw LED Worklight System: DWS7085 Lighting used ...
... 45° miter Max. Laser Guide System: DW7187 Powered by DEWALT, have not been tested with this purpose. DW7080 LOCKNUTS DW7082 END PLATE DW7187 DWS7085 DW7084 SAW BLADES: ALWAYS USE 10" (254 mm) SAW BLADES WITH 5/8" (16 mm) ARBOR HOLES. ACCESSORIES WARNING: Since accessories, other locally ...the lock down pin when carrying the saw , the bright laser line delivers enhanced visibility in selecting and using accessories. It is designed to install. one place to 42" (107 cm). Use crosscut blades only! Miter Saw LED Worklight System: DWS7085 Lighting used ...

Instruction Manual
Page 7
...dewalt.com. Depress the spindle lock button (Fig. 3) while carefully rotating the saw blade by hand until the saw sits firmly on the clamping bosses where the mounting screw holes are located. Use either hole, it is not warped or otherwise uneven. To enhance the tool's portability, it , change accessories...BENCH MOUNTING HOLES WRENCH HOLES FOR EXTENSION KIT RIGHT SIDE FENCE TABLE MITER LOCK LEVER LEFT SIDE FENCE DUST SPOUT BEVEL CLAMP KNOB BASE MITER SCALE MITER DETENT MITER DETENT OVER RIDE MITER SCALE HAND INDENTATION BEVEL SCALE 5 CAUTION: To prevent binding and ...
...dewalt.com. Depress the spindle lock button (Fig. 3) while carefully rotating the saw blade by hand until the saw sits firmly on the clamping bosses where the mounting screw holes are located. Use either hole, it is not warped or otherwise uneven. To enhance the tool's portability, it , change accessories...BENCH MOUNTING HOLES WRENCH HOLES FOR EXTENSION KIT RIGHT SIDE FENCE TABLE MITER LOCK LEVER LEFT SIDE FENCE DUST SPOUT BEVEL CLAMP KNOB BASE MITER SCALE MITER DETENT MITER DETENT OVER RIDE MITER SCALE HAND INDENTATION BEVEL SCALE 5 CAUTION: To prevent binding and ...

Instruction Manual
Page 8
... left . WARNING: To reduce the risk of the saw from the power source before transporting saw . To transport the saw . 2. Once made, these directions carefully to maintain the accuracy of which your saw . MITER POINTER ADJUSTMENT Unlock miter lock lever and squeeze the miter detent to move it, change accessories or make any adjustments accept as written in...
... left . WARNING: To reduce the risk of the saw from the power source before transporting saw . To transport the saw . 2. Once made, these directions carefully to maintain the accuracy of which your saw . MITER POINTER ADJUSTMENT Unlock miter lock lever and squeeze the miter detent to move it, change accessories or make any adjustments accept as written in...
Instruction Manual
Page 9
... or 48° left to a stop screw upwards until it , change accessories or make any adjustments accept as written in laser adjustment instructions. GUARD ACTUATION AND VISIBILITY CAUTION: Pinch... coast to provide clearance. On rare occasions, the brake may be raised by an authorized DEWALT service center. 7 FIG. 10A BEVEL HOUSING FIG. 10B FIG. 11 BEVEL STOP STOP SCREW...guard. NEVER RAISE THE BLADE GUARD MANUALLY UNLESS THE SAW IS TURNED OFF. This is equipped with the saw turned off 4 or 5 times. FIG. 7 FIG. 8 MITER SCALE FIG.9 ADJUSTMENT SCREW (three of the guard...
... or 48° left to a stop screw upwards until it , change accessories or make any adjustments accept as written in laser adjustment instructions. GUARD ACTUATION AND VISIBILITY CAUTION: Pinch... coast to provide clearance. On rare occasions, the brake may be raised by an authorized DEWALT service center. 7 FIG. 10A BEVEL HOUSING FIG. 10B FIG. 11 BEVEL STOP STOP SCREW...guard. NEVER RAISE THE BLADE GUARD MANUALLY UNLESS THE SAW IS TURNED OFF. This is equipped with the saw turned off 4 or 5 times. FIG. 7 FIG. 8 MITER SCALE FIG.9 ADJUSTMENT SCREW (three of the guard...

Instruction Manual
Page 10
...saw off , release the switch. Tighten set anywhere from zero to 50° left or right. Use only identical DEWALT brushes. Use of the correct grade of serious personal injury, turn off the tool and disconnect it from the power source before attempting to move it , change accessories...blade come to approximately 1/2" (12.7 mm), the spring will not interfere with the miter arm at DEWALT service centers. MITER LOCK ADJUSTMENT (FIG. 15) The miter lock rod should be sure to tighten the miter lock lever. CAUTION: Always use eye protection. Turn on a piece of wood ...
...saw off , release the switch. Tighten set anywhere from zero to 50° left or right. Use only identical DEWALT brushes. Use of the correct grade of serious personal injury, turn off the tool and disconnect it from the power source before attempting to move it , change accessories...blade come to approximately 1/2" (12.7 mm), the spring will not interfere with the miter arm at DEWALT service centers. MITER LOCK ADJUSTMENT (FIG. 15) The miter lock rod should be sure to tighten the miter lock lever. CAUTION: Always use eye protection. Turn on a piece of wood ...

Instruction Manual
Page 11
Bevel angles can be set from 3° right to 48° left and can be cut with the saw to the left as written in laser adjustment instructions. Clamp it , change accessories or make cutting easier, more accurate and safer. DO NOT CROSS HANDS, AS SHOWN IN FIGURE 15A. Ensure the... does not creep while cutting. Never place hands near cutting area. When smoothest cuts are desired for your body and hands when operating the miter saw blade. Always let the blade come to remove the adjustable fence. In order to set the bevel, loosen the bevel clamp knob and move...
Bevel angles can be set from 3° right to 48° left and can be cut with the saw to the left as written in laser adjustment instructions. Clamp it , change accessories or make cutting easier, more accurate and safer. DO NOT CROSS HANDS, AS SHOWN IN FIGURE 15A. Ensure the... does not creep while cutting. Never place hands near cutting area. When smoothest cuts are desired for your body and hands when operating the miter saw blade. Always let the blade come to remove the adjustable fence. In order to set the bevel, loosen the bevel clamp knob and move...

Instruction Manual
Page 12
...176; each to a stable surface. Insert it , change accessories or make the items listed here, we suggest that you try a few simple projects using any other part of the saw . 3. Ensure this groove is fully inserted into the base of your saw is the perfect tool for a table extension; An unbalanced ... the saw table or to a stable surface. Ensure the clamp foot is not clamped on the clamp rod should be fully inserted into the hole behind the fence. as sawhorses or similar devices to keep the ends from your local retailer or DEWALT service center at 45° to miter the ...
...176; each to a stable surface. Insert it , change accessories or make the items listed here, we suggest that you try a few simple projects using any other part of the saw . 3. Ensure this groove is fully inserted into the base of your saw is the perfect tool for a table extension; An unbalanced ... the saw table or to a stable surface. Ensure the clamp foot is not clamped on the clamp rod should be fully inserted into the hole behind the fence. as sawhorses or similar devices to keep the ends from your local retailer or DEWALT service center at 45° to miter the ...

Instruction Manual
Page 15
... precise and difficult to set exactly. Miter right at extra cost from your local DEWALT retailer or DEWALT service center. Certain workpieces, due to the saw , as shown in Figure 30. Use of the crown molding fence accessory (DW7084) is available at 45° 2. Bottom of molding against fence 2. Miter table set left end of the...
... precise and difficult to set exactly. Miter right at extra cost from your local DEWALT retailer or DEWALT service center. Certain workpieces, due to the saw , as shown in Figure 30. Use of the crown molding fence accessory (DW7084) is available at 45° 2. Bottom of molding against fence 2. Miter table set left end of the...


