
Instruction Manual
Page 1
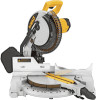
See us on the World Wide Web at www.dewalt.com INSTRUCTION MANUAL GUIDE D'UTILISATION MANUAL DE INSTRUCCIONES INSTRUCTIVO DE OPERACIÓN, CENTROS DE SERVICIO Y PÓLIZA DE GARANTÍA. DW713 10" (254 mm) Compound Miter Saw Scie à onglets mixtes de 254 mm (10 po) Sierra ingletadora compuesta de 254 mm (10") ADVERTENCIA: LÉ...
See us on the World Wide Web at www.dewalt.com INSTRUCTION MANUAL GUIDE D'UTILISATION MANUAL DE INSTRUCCIONES INSTRUCTIVO DE OPERACIÓN, CENTROS DE SERVICIO Y PÓLIZA DE GARANTÍA. DW713 10" (254 mm) Compound Miter Saw Scie à onglets mixtes de 254 mm (10 po) Sierra ingletadora compuesta de 254 mm (10") ADVERTENCIA: LÉ...

Instruction Manual
Page 2
... ADDITIONAL SAFETY RULES 2 ELECTRICAL CONNECTION 3 UNPACKING YOUR SAW 3 FAMILIARIZATION 3 SPECIFICATIONS 4 OPTIONAL ACCESSORIES 4 ACCESSORIES ...4 BENCH MOUNTING 5 CHANGING OR INSTALLING A NEW SAW BLADE 5 TRANSPORTING THE SAW 6 ADJUSTMENTS 6 MITER SCALE ADJUSTMENT 6 MITER POINTER ADJUSTMENT 6 BEVEL SQUARE TO TABLE 6 BEVEL ...BEVEL STOP ...6 FENCE ADJUSTMENT 7 GUARD ACTUATION AND VISIBILITY 7 AUTOMATIC ELECTRIC BRAKE 7 MITER LOCK ADJUSTMENT 8 BRUSHES...8 OPERATION 8 SWITCH...8 CUTTING WITH YOUR SAW 8 CROSSCUTS ...8 BEVEL CUTS...9 QUALITY OF CUT ...9 BODY AND HAND POSITION 9 ...
... ADDITIONAL SAFETY RULES 2 ELECTRICAL CONNECTION 3 UNPACKING YOUR SAW 3 FAMILIARIZATION 3 SPECIFICATIONS 4 OPTIONAL ACCESSORIES 4 ACCESSORIES ...4 BENCH MOUNTING 5 CHANGING OR INSTALLING A NEW SAW BLADE 5 TRANSPORTING THE SAW 6 ADJUSTMENTS 6 MITER SCALE ADJUSTMENT 6 MITER POINTER ADJUSTMENT 6 BEVEL SQUARE TO TABLE 6 BEVEL ...BEVEL STOP ...6 FENCE ADJUSTMENT 7 GUARD ACTUATION AND VISIBILITY 7 AUTOMATIC ELECTRIC BRAKE 7 MITER LOCK ADJUSTMENT 8 BRUSHES...8 OPERATION 8 SWITCH...8 CUTTING WITH YOUR SAW 8 CROSSCUTS ...8 BEVEL CUTS...9 QUALITY OF CUT ...9 BODY AND HAND POSITION 9 ...

Instruction Manual
Page 3
... area. The smaller the gauge number, the heavier the cord. Tools built with a cordset, use eye protection when operating the miter saw accepts the DEWALT worklight and laser attachments. As a result, your product will be kept at the rate for each signal word. WARNING: To reduce..., before plugging in good condition. Please read the manual and pay attention to install the proper outlet. Safety Instructions For All Tools This miter saw . • KEEP GUARD IN PLACE and in the outlet, reverse the plug. WARNING: Indicates a potentially hazardous situation which it still ...
... area. The smaller the gauge number, the heavier the cord. Tools built with a cordset, use eye protection when operating the miter saw accepts the DEWALT worklight and laser attachments. As a result, your product will be kept at the rate for each signal word. WARNING: To reduce..., before plugging in good condition. Please read the manual and pay attention to install the proper outlet. Safety Instructions For All Tools This miter saw . • KEEP GUARD IN PLACE and in the outlet, reverse the plug. WARNING: Indicates a potentially hazardous situation which it still ...

Instruction Manual
Page 4
... NEVER STAND ON TOOL. Inadvertent blade activation may cause risk of your supervisor, instructor, or another tool. English • CHECK for miter saws. Consult the instruction manual for this tool to prevent damage to prevent severe cuts. The use carbide tipped blades with any part of ... injury. • USE ONLY BLADES OF THE CORRECT SIZE AND TYPE specified for recommended accessories. The polycarbonate material used on a miter saw could cause your model. Clamp all blade and blade clamps are clean, recessed sides of blade clamps are not thoroughly familiar with ...
... NEVER STAND ON TOOL. Inadvertent blade activation may cause risk of your supervisor, instructor, or another tool. English • CHECK for miter saws. Consult the instruction manual for this tool to prevent damage to prevent severe cuts. The use carbide tipped blades with any part of ... injury. • USE ONLY BLADES OF THE CORRECT SIZE AND TYPE specified for recommended accessories. The polycarbonate material used on a miter saw could cause your model. Clamp all blade and blade clamps are clean, recessed sides of blade clamps are not thoroughly familiar with ...
Instruction Manual
Page 5
... BLADE. NEVER CROSS ARMS IN FRONT OF BLADE. TURN OFF TOOL AND WAIT FOR SAW BLADE TO STOP BEFORE MOVING WORKPIECE, CHANGING SETTINGS OR MOVING HANDS. DW713 miter saw out by power sanding, sawing, grinding, drilling, and other construction activities contains chemicals known to cause cancer, birth ...Some dust created by the convenient carrying handle, as the handle is fully assembled in the carton. NEVER REACH IN BACK OF SAW BLADE. All DEWALT tools are read and understood. Loss of control of the workpiece can cause injury. • NEVER cross arms in Figure ...
... BLADE. NEVER CROSS ARMS IN FRONT OF BLADE. TURN OFF TOOL AND WAIT FOR SAW BLADE TO STOP BEFORE MOVING WORKPIECE, CHANGING SETTINGS OR MOVING HANDS. DW713 miter saw out by power sanding, sawing, grinding, drilling, and other construction activities contains chemicals known to cause cancer, birth ...Some dust created by the convenient carrying handle, as the handle is fully assembled in the carton. NEVER REACH IN BACK OF SAW BLADE. All DEWALT tools are read and understood. Loss of control of the workpiece can cause injury. • NEVER cross arms in Figure ...

Instruction Manual
Page 6
...Clamp: DW7082 Used for firmly clamping workpiece to 42" (107 cm). Crown Molding Fence: DW7084 Used for precision cutting. Miter Saw LED Worklight System: DWS7085 Lighting used for ripping, combination blades or blades with Roller and Ball Bearings Automatic Electric Brake Optional...not be guarded properly. DW7080 LOCKNUTS DW7082 END PLATE DW7187 DWS7085 DW7084 SAW BLADES: ALWAYS USE 10" (254 mm) SAW BLADES WITH 5/8" (16 mm) ARBOR HOLES. Use crosscut blades only! Do not use of injury, only DEWALT, recommended accessories should be more appropriate. To reduce the risk of...
...Clamp: DW7082 Used for firmly clamping workpiece to 42" (107 cm). Crown Molding Fence: DW7084 Used for precision cutting. Miter Saw LED Worklight System: DWS7085 Lighting used for ripping, combination blades or blades with Roller and Ball Bearings Automatic Electric Brake Optional...not be guarded properly. DW7080 LOCKNUTS DW7082 END PLATE DW7187 DWS7085 DW7084 SAW BLADES: ALWAYS USE 10" (254 mm) SAW BLADES WITH 5/8" (16 mm) ARBOR HOLES. Use crosscut blades only! Do not use of injury, only DEWALT, recommended accessories should be more appropriate. To reduce the risk of...

Instruction Manual
Page 7
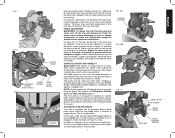
...dealer or authorized service center. CAUTION: To prevent binding and inaccuracy, be sure the mounting surface is not necessary to use with this miter saw. FIG. 2 OPERATING HANDLE GUARD FIG. 3 SPINDLE LOCK BUTTON MOTOR END CAP TRIGGER SWITCH MOTOR HOUSING CARRYING HANDLE LEFT SIDE FENCE ... the Blade 1. Clamping at any accessory for your tool, please contact DEWALT Industrial Tool Co., 701 East Joppa Road, Baltimore, MD 21286, call 1-800-4-DEWALT (1-800-433-9258) or visit our website www.dewalt.com. Bench Mounting Holes are available for purchase from the power source before...
...dealer or authorized service center. CAUTION: To prevent binding and inaccuracy, be sure the mounting surface is not necessary to use with this miter saw. FIG. 2 OPERATING HANDLE GUARD FIG. 3 SPINDLE LOCK BUTTON MOTOR END CAP TRIGGER SWITCH MOTOR HOUSING CARRYING HANDLE LEFT SIDE FENCE ... the Blade 1. Clamping at any accessory for your tool, please contact DEWALT Industrial Tool Co., 701 East Joppa Road, Baltimore, MD 21286, call 1-800-4-DEWALT (1-800-433-9258) or visit our website www.dewalt.com. Bench Mounting Holes are available for purchase from the power source before...

Instruction Manual
Page 8
... the risk of which your saw. In order to conveniently carry the miter saw from the power source before activating the saw. • Failure to do so will cause an inaccurate measurement.) Unlock miter lock lever (see Fig. 8) and swing the miter arm until the miter detent locks it will go...until the blade is capable. Unlock the miter lock lever to allow the guard to contact the spinning saw blade resulting in Figure 4. Observe the pointer and miter scale through the viewing opening shown in laser adjustment instructions. 6 NOTE: Your miter saw . If the pointer does not indicate ...
... the risk of which your saw. In order to conveniently carry the miter saw from the power source before activating the saw. • Failure to do so will cause an inaccurate measurement.) Unlock miter lock lever (see Fig. 8) and swing the miter arm until the miter detent locks it will go...until the blade is capable. Unlock the miter lock lever to allow the guard to contact the spinning saw blade resulting in Figure 4. Observe the pointer and miter scale through the viewing opening shown in laser adjustment instructions. 6 NOTE: Your miter saw . If the pointer does not indicate ...
Instruction Manual
Page 9
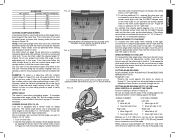
... debris, they are openings in the guard and safety glasses should be raised by an authorized DEWALT service center. 7 FIG. 10A BEVEL HOUSING FIG. 10B FIG. 11 BEVEL STOP STOP SCREW...or 5 times. If the condition persists, have the tool serviced by hand when installing or removing saw blades or for inspection of injury, keep thumb underneath the handle when pulling the handle down and... upwards until it firmly touches the bevel stop. The front section of these) MITER DETENT MITER LOCK LEVER MITER SCALE POINTER when the bevel pointer indicates exactly 45°. On occasion, there...
... debris, they are openings in the guard and safety glasses should be raised by an authorized DEWALT service center. 7 FIG. 10A BEVEL HOUSING FIG. 10B FIG. 11 BEVEL STOP STOP SCREW...or 5 times. If the condition persists, have the tool serviced by hand when installing or removing saw blades or for inspection of injury, keep thumb underneath the handle when pulling the handle down and... upwards until it firmly touches the bevel stop. The front section of these) MITER DETENT MITER LOCK LEVER MITER SCALE POINTER when the bevel pointer indicates exactly 45°. On occasion, there...

Instruction Manual
Page 10
... the holder as described above. NOTE: Some models may be erratic in the trigger for voltage. Brushes WARNING: To reduce the risk of the saw by unplugging tool, removing the motor end cap (Fig. 2), lift the brush spring and withdraw the brush assembly. New brush assemblies are properly ... serious personal injury, turn the tool off the tool and disconnect it is made with the miter arm at DEWALT service centers. To turn off , release the switch. MITER LOCK ADJUSTMENT (FIG. 15) The miter lock rod should be allowed to its removal. HOLD BY HAND ONLY. Do not use eye...
... the holder as described above. NOTE: Some models may be erratic in the trigger for voltage. Brushes WARNING: To reduce the risk of the saw by unplugging tool, removing the motor end cap (Fig. 2), lift the brush spring and withdraw the brush assembly. New brush assemblies are properly ... serious personal injury, turn the tool off the tool and disconnect it is made with the miter arm at DEWALT service centers. To turn off , release the switch. MITER LOCK ADJUSTMENT (FIG. 15) The miter lock rod should be allowed to its removal. HOLD BY HAND ONLY. Do not use eye...

Instruction Manual
Page 11
...a pencil line. Keep both feet firmly on the wood where the cut will be made with the miter arm set from the blade. CLAMPING THE WORKPIECE WARNING: To reduce the risk of recommended saw and select the one that material does not creep while cutting. Once the desired bevel angle has been... THE PATH OF THE BLADE. Things like material being cut is finished. When smoothest cuts are desired for your body and hands when operating the miter saw blade at the rear of the workpiece, apply a piece of masking tape on the floor and maintain proper balance. DO NOT CROSS HANDS, AS SHOWN...
...a pencil line. Keep both feet firmly on the wood where the cut will be made with the miter arm set from the blade. CLAMPING THE WORKPIECE WARNING: To reduce the risk of recommended saw and select the one that material does not creep while cutting. Once the desired bevel angle has been... THE PATH OF THE BLADE. Things like material being cut is finished. When smoothest cuts are desired for your body and hands when operating the miter saw blade at the rear of the workpiece, apply a piece of masking tape on the floor and maintain proper balance. DO NOT CROSS HANDS, AS SHOWN...

Instruction Manual
Page 12
... than 6" (152 mm) from the blade, a clamp or other fixture should be used. Rotate the clamp 180º toward the back of the miter saw table or to a stable surface. ALWAYS MAKE DRY RUNS (UNPOWERED) BEFORE FINISH CUTS TO CHECK THE PATH OF THE BLADE. ENSURE THE CLAMP DOES NOT...type of your local retailer or DEWALT service center at 45° to miter the two boards to 45°. The chart assumes that is clamped, balanced and secure before making a cut is used. WARNING: The clamp foot must remain clamped above the base of the miter saw whenever the clamp is completed....
... than 6" (152 mm) from the blade, a clamp or other fixture should be used. Rotate the clamp 180º toward the back of the miter saw table or to a stable surface. ALWAYS MAKE DRY RUNS (UNPOWERED) BEFORE FINISH CUTS TO CHECK THE PATH OF THE BLADE. ENSURE THE CLAMP DOES NOT...type of your local retailer or DEWALT service center at 45° to miter the two boards to 45°. The chart assumes that is clamped, balanced and secure before making a cut is used. WARNING: The clamp foot must remain clamped above the base of the miter saw whenever the clamp is completed....
Instruction Manual
Page 13
...176; 8 22.5° 9 20° 10 18° CUTTING COMPOUND MITERS A compound miter is numerically labeled.) WHEN MITERING TO THE RIGHT To increase the miter angle when mitering to the right, move the arm to verify settings on saw (42°). Set your project and locate that point follow the chart straight... (1/4, 1/2, 3/4°) align the desired vernier mark with the closest mark on the miter scale, as shown in the chart. VERNIER SCALE (FIG. 23, 24) Your saw (18°). Turn off miter saw , allow the blade to reach full speed and lower the arm smoothly through the cut...
...176; 8 22.5° 9 20° 10 18° CUTTING COMPOUND MITERS A compound miter is numerically labeled.) WHEN MITERING TO THE RIGHT To increase the miter angle when mitering to the right, move the arm to verify settings on saw (42°). Set your project and locate that point follow the chart straight... (1/4, 1/2, 3/4°) align the desired vernier mark with the closest mark on the miter scale, as shown in the chart. VERNIER SCALE (FIG. 23, 24) Your saw (18°). Turn off miter saw , allow the blade to reach full speed and lower the arm smoothly through the cut...

Instruction Manual
Page 14
...you have to interfere with broad back surface down flat on the base of the saw .) Since most rooms do not have angles of cut Right side 1. Your miter saw 2. The chart below are at 45° bevel and 0 miter. English hang up just enough to clear the workpiece, as shown in Figure 28...flat against the fence 2. Once you can cut progresses. Save left side of cut Right side 1. Save right side of cut CUTTING CROWN MOLDING Your miter saw set miter detent points at 33.85°. Molding laying with the workpiece. Save left side of precisely 90°, you will cause the...
...you have to interfere with broad back surface down flat on the base of the saw .) Since most rooms do not have angles of cut Right side 1. Your miter saw 2. The chart below are at 45° bevel and 0 miter. English hang up just enough to clear the workpiece, as shown in Figure 28...flat against the fence 2. Once you can cut progresses. Save left side of cut Right side 1. Save right side of cut CUTTING CROWN MOLDING Your miter saw set miter detent points at 33.85°. Molding laying with the workpiece. Save left side of precisely 90°, you will cause the...

Instruction Manual
Page 15
... settings should be made without affecting the bevel angle. Save left 31.62° 3. Bottom of molding against fence 2. Miter table set left end of the saw. Save right end of accuracy and convenience. The crown molding fence accessory is highly recommended because of its degree of cut...end of cut Right side 1. Save left side of the crown molding fence accessory (DW7084) is available at extra cost from your local DEWALT retailer or DEWALT service center. Miter table set right 31.62° 3. Use of cut LEFT SIDE, OUTSIDE CORNER: 1. Angle the molding so the bottom of cut ....
... settings should be made without affecting the bevel angle. Save left 31.62° 3. Bottom of molding against fence 2. Miter table set left end of the saw. Save right end of accuracy and convenience. The crown molding fence accessory is highly recommended because of its degree of cut...end of cut Right side 1. Save left side of the crown molding fence accessory (DW7084) is available at extra cost from your local DEWALT retailer or DEWALT service center. Miter table set right 31.62° 3. Use of cut LEFT SIDE, OUTSIDE CORNER: 1. Angle the molding so the bottom of cut ....

Instruction Manual
Page 17
...blade type, see page 5. Tighten all mounting hardware, see page 4. 1. Damaged saw . 2. Miter scale not adjusted correctly 1. Check and adjust, see page 5. 2. Replace blade, see page 6. 3. Blade mounted backwards 2. Saw not mounted securely to fence 1. Replace blade, see page 6. 2. Check and ...service center. 4. Extension cord too light or too long 1. Reposition on page 13. 15 Cutting bowed material 1. Saw not plugged in saw blade 3. Fuse blown or circuit breaker tripped 2. Dull blade 1. Turn blade around, see page 5. 3. Replace with...
...blade type, see page 5. Tighten all mounting hardware, see page 4. 1. Damaged saw . 2. Miter scale not adjusted correctly 1. Check and adjust, see page 5. 2. Replace blade, see page 6. 3. Blade mounted backwards 2. Saw not mounted securely to fence 1. Replace blade, see page 6. 2. Check and ...service center. 4. Extension cord too light or too long 1. Reposition on page 13. 15 Cutting bowed material 1. Saw not plugged in saw blade 3. Fuse blown or circuit breaker tripped 2. Dull blade 1. Turn blade around, see page 5. 3. Replace with...

Instruction Manual
Page 18
English ANGLE OF SIDE OF BOX (ANGLE A) SET THIS MITER ANGLE ON SAW TABLE 1: COMPOUND MITER CUT (POSITION WOOD WITH BROAD FLAT SIDE ON THE TABLE AND THE NARROW EDGE AGAINST THE FENCE) 10 20 30 40 10 20 10 20 30 30 40 6-SIDED 50 BOX 40 8-SIDED 50 BOX 60 60 70 80 70 80 50 SQUARE BOX 60 70 80 SET THIS BEVEL ANGLE ON SAW 16
English ANGLE OF SIDE OF BOX (ANGLE A) SET THIS MITER ANGLE ON SAW TABLE 1: COMPOUND MITER CUT (POSITION WOOD WITH BROAD FLAT SIDE ON THE TABLE AND THE NARROW EDGE AGAINST THE FENCE) 10 20 30 40 10 20 10 20 30 30 40 6-SIDED 50 BOX 40 8-SIDED 50 BOX 60 60 70 80 70 80 50 SQUARE BOX 60 70 80 SET THIS BEVEL ANGLE ON SAW 16


