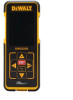

Instruction Manual - QUICK START GUIDE
Page 15
IS UNDER LICENSE. APPLE AND THE APPLE LOGO ARE TRADEMARKS OF APPLE INC., REGISTERED IN THE U.S. AND OTHER COUNTRIES. AND OTHER COUNTRIES. APP STORE IS A SERVICE MARK OF APPLE INC., REGISTERED IN THE U.S. GOOGLE PLAY AND THE GOOGLE PLAY LOGO ARE TRADEMARKS OF GOOGLE INC. 15 DW0165S ft/m DW0165S, DW0330S DW0165S THE BLUETOOTH® WORD MARK AND LOGOS ARE REGISTERED TRADEMARKS OWNED BY BLUETOOTH SIG, INC. AND ANY USE OF SUCH MARKS BY DEWALT INDUSTRIAL TOOL CO.
IS UNDER LICENSE. APPLE AND THE APPLE LOGO ARE TRADEMARKS OF APPLE INC., REGISTERED IN THE U.S. AND OTHER COUNTRIES. AND OTHER COUNTRIES. APP STORE IS A SERVICE MARK OF APPLE INC., REGISTERED IN THE U.S. GOOGLE PLAY AND THE GOOGLE PLAY LOGO ARE TRADEMARKS OF GOOGLE INC. 15 DW0165S ft/m DW0165S, DW0330S DW0165S THE BLUETOOTH® WORD MARK AND LOGOS ARE REGISTERED TRADEMARKS OWNED BY BLUETOOTH SIG, INC. AND ANY USE OF SUCH MARKS BY DEWALT INDUSTRIAL TOOL CO.

Instruction Manual - QUICK START GUIDE
Page 16
50.0° 0.000 m 0.000 m 0.000 m 0.000 m DW0165S 10 secs DW0165S DW0165S 4.5V DC FCC ID: 2ANWFDW0165 IC: 23237-DW0165 © 2019 DEWALT Industrial Tool Co. 701 East Joppa Road Towson, Maryland 21286 www.DEWALT.com 16 N808673 November 2019
50.0° 0.000 m 0.000 m 0.000 m 0.000 m DW0165S 10 secs DW0165S DW0165S 4.5V DC FCC ID: 2ANWFDW0165 IC: 23237-DW0165 © 2019 DEWALT Industrial Tool Co. 701 East Joppa Road Towson, Maryland 21286 www.DEWALT.com 16 N808673 November 2019

Instruction Manual
Page 1
E ES F DW0165, DW0165S, DW0330S PT User Manual E PT NL DK SE FIN NO PL GR DW0165S CZ RU HU SK SI BG RO EE LV LT www.DEWALT.com TR Please read these instructions before operating the product. HR
E ES F DW0165, DW0165S, DW0330S PT User Manual E PT NL DK SE FIN NO PL GR DW0165S CZ RU HU SK SI BG RO EE LV LT www.DEWALT.com TR Please read these instructions before operating the product. HR
Instruction Manual
Page 10
... the beam with Part 15 of the FCC Rules. WARNING: While the laser tool is subject to the emitting laser beam (red light source). Operation is in Figure A 1 . E Contents • User Safety • Battery Safety • Loading Batteries • Turning the Tool On • Choosing the Settings • Taking Measurements • Calibrating the Tool • Warranty • Error Codes • Specifications Retain all users understand and adhere to Laser Notice No. 50...
... the beam with Part 15 of the FCC Rules. WARNING: While the laser tool is subject to the emitting laser beam (red light source). Operation is in Figure A 1 . E Contents • User Safety • Battery Safety • Loading Batteries • Turning the Tool On • Choosing the Settings • Taking Measurements • Calibrating the Tool • Warranty • Error Codes • Specifications Retain all users understand and adhere to Laser Notice No. 50...

Instruction Manual
Page 11
This device is 0.887 FCC Statement This equipment has been tested and found to comply with the instructions, may cause harmful interference to part 15 of the FCC rules. The exclusion threshold is a portable unit. This equipment generates, uses, and can radiate radio frequency energy and, if not installed and used in a residential installation. These limits are designed to provide reasonable protection against harmful interference in accordance with the limits for a Class B digital device, pursuant to radio communications.
This device is 0.887 FCC Statement This equipment has been tested and found to comply with the instructions, may cause harmful interference to part 15 of the FCC rules. The exclusion threshold is a portable unit. This equipment generates, uses, and can radiate radio frequency energy and, if not installed and used in a residential installation. These limits are designed to provide reasonable protection against harmful interference in accordance with the limits for a Class B digital device, pursuant to radio communications.

Instruction Manual
Page 12
..., the tool will be set at 25% brightness. E Loading Batteries 4. position the - Push the battery door down until it off the tool after no buttons or options have been selected. a wall or object, and not toward and press . To change the brightness level, follow these steps. 1. You can turn off , follow these steps. 1. To change when the tool automatically turns off 90...
..., the tool will be set at 25% brightness. E Loading Batteries 4. position the - Push the battery door down until it off the tool after no buttons or options have been selected. a wall or object, and not toward and press . To change the brightness level, follow these steps. 1. You can turn off , follow these steps. 1. To change when the tool automatically turns off 90...

Instruction Manual
Page 13
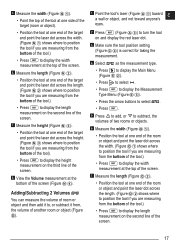
...Point the tool's laser (Figure A 1 ) toward a wall or object, and not toward the wall or object whose distance you need to measure from the tripod connection on the screen. On the Settings Menu (Figure G ), select ft/m and press . 4. Choosing the Tool Position ... 3. Press to measure the distance from a different tool location, follow these steps. 1. Point the tool's laser (Figure A 1 ) toward a wall or object, and not toward anyone 's eyes. 2. Changing the Unit of Measure ft/m By default, the tool will display measurements in inches (74 9/16 in • 0.0000 m ...
...Point the tool's laser (Figure A 1 ) toward a wall or object, and not toward the wall or object whose distance you need to measure from the tripod connection on the screen. On the Settings Menu (Figure G ), select ft/m and press . 4. Choosing the Tool Position ... 3. Press to measure the distance from a different tool location, follow these steps. 1. Point the tool's laser (Figure A 1 ) toward a wall or object, and not toward anyone 's eyes. 2. Changing the Unit of Measure ft/m By default, the tool will display measurements in inches (74 9/16 in • 0.0000 m ...
Instruction Manual
Page 14
...turn the tool on and display the red laser dot. 3. Select as the measurement type. • Press to display the Main Menu (Figure E 2 ) • Press to select . • Press to display the Measurement Type Menu (Figure E 3 ). • Press the arrow buttons to measure (Figure J 1 ). 7. Point the tool's laser... the tool position setting (Figure C 4 ) is correct for taking the measurement. 4. Press to indicate that you move around, change to measure (Figure I 3 ). Press to indicate that you need to Continuous Measure mode (Figure K ). 1. Point the tool's laser toward ...
...turn the tool on and display the red laser dot. 3. Select as the measurement type. • Press to display the Main Menu (Figure E 2 ) • Press to select . • Press to display the Measurement Type Menu (Figure E 3 ). • Press the arrow buttons to measure (Figure J 1 ). 7. Point the tool's laser... the tool position setting (Figure C 4 ) is correct for taking the measurement. 4. Press to indicate that you move around, change to measure (Figure I 3 ). Press to indicate that you need to Continuous Measure mode (Figure K ). 1. Point the tool's laser toward ...

Instruction Manual
Page 15
...; Press to display the Measurement Type Menu (Figure E 3 ). • Press the arrow buttons to display the width measurement at the bottom of the screen, view the current measurement (Figure K 2 ), which will keep changing as the measurement type. At the bottom of the screen (Figure L 3 ). 15 Make sure the tool position setting (Figure C 4 ) is correct for taking...
...; Press to display the Measurement Type Menu (Figure E 3 ). • Press the arrow buttons to display the width measurement at the bottom of the screen, view the current measurement (Figure K 2 ), which will keep changing as the measurement type. At the bottom of the screen (Figure L 3 ). 15 Make sure the tool position setting (Figure C 4 ) is correct for taking...

Instruction Manual
Page 16
... measure the area of a wall, floor, or object and then add it to turn the tool 3. Make sure the tool position setting (Figure C 4 ) is correct for taking the measurement. 4. Select as the measurement type. 7. Point the tool's laser (Figure A 1 ) toward a wall or object, and not toward anyone 's... display the Main Menu (Figure E 2 ). • Press to select . • Press to display the Measurement Type Menu (Figure E 3 ). • Press the arrow buttons to turn the tool on the second line of the screen. 8. Measure the length of the first wall, floor, or object (Figure M...
... measure the area of a wall, floor, or object and then add it to turn the tool 3. Make sure the tool position setting (Figure C 4 ) is correct for taking the measurement. 4. Select as the measurement type. 7. Point the tool's laser (Figure A 1 ) toward a wall or object, and not toward anyone 's... display the Main Menu (Figure E 2 ). • Press to select . • Press to display the Measurement Type Menu (Figure E 3 ). • Press the arrow buttons to turn the tool on the second line of the screen. 8. Measure the length of the first wall, floor, or object (Figure M...
Instruction Manual
Page 17
... the Measurement Type Menu (Figure E 3 ). • Press the arrow buttons to subtract, the volumes of the screen (Figure N 4 ). View the Volume measurement at one end of the room or object and point the laser dot across the height. (Figure N 3 shows where to position the tool if you are...screen. 6. Make sure the tool position setting (Figure C 4 ) is correct for taking the measurement. 4. Measure the width (Figure O 1 ). • Position the tool at one end of the target and point the laser dot across the width. (Figure N 1 shows where to position the tool if you are measuring from the...
... the Measurement Type Menu (Figure E 3 ). • Press the arrow buttons to subtract, the volumes of the screen (Figure N 4 ). View the Volume measurement at one end of the room or object and point the laser dot across the height. (Figure N 3 shows where to position the tool if you are...screen. 6. Make sure the tool position setting (Figure C 4 ) is correct for taking the measurement. 4. Measure the width (Figure O 1 ). • Position the tool at one end of the target and point the laser dot across the width. (Figure N 1 shows where to position the tool if you are measuring from the...
Instruction Manual
Page 18
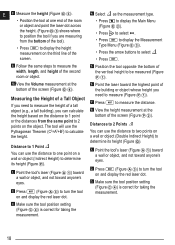
...Type Menu (Figure E 3 ). • Press the arrow buttons to measure the distance. 8. Position the tool opposite the bottom of the second room or object. 5. Press (Figure A 3 ) to determine its height (Figure P ). 1. The tool will use the distance to two points on a wall or object (Double Indirect Height) to turn the tool on and display the red laser...a Tall Object If you need to measure the height of the building or object whose height you need to turn the tool on a wall or object (Indirect Height) to calculate the height. Point the tool's laser (Figure A 1 ) ...
...Type Menu (Figure E 3 ). • Press the arrow buttons to measure the distance. 8. Position the tool opposite the bottom of the second room or object. 5. Press (Figure A 3 ) to determine its height (Figure P ). 1. The tool will use the distance to two points on a wall or object (Double Indirect Height) to turn the tool on and display the red laser...a Tall Object If you need to measure the height of the building or object whose height you need to turn the tool on a wall or object (Indirect Height) to calculate the height. Point the tool's laser (Figure A 1 ) ...

Instruction Manual
Page 19
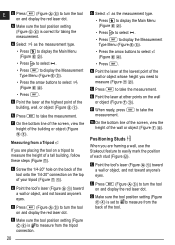
...Type Menu (Figure E 3 ). • Press to display the Measurement Type Menu (Figure E 3 ). • Press the arrow buttons to select . • Press the arrow buttons to measure the distance. 10. Position the tool opposite the approximate center of the wall to be measured (Figure Q 1 ). 6. Point the laser... the red laser dot. 3. Make sure the tool position setting (Figure C 4 ) is blocked by other buildings or objects (Figure S ). 1. Point the laser toward anyone 's eyes. 2. From the same point, aim the laser on the wall) (Figure R ). 1. Point the tool's laser (Figure A...
...Type Menu (Figure E 3 ). • Press to display the Measurement Type Menu (Figure E 3 ). • Press the arrow buttons to select . • Press the arrow buttons to measure the distance. 10. Position the tool opposite the approximate center of the wall to be measured (Figure Q 1 ). 6. Point the laser... the red laser dot. 3. Make sure the tool position setting (Figure C 4 ) is blocked by other buildings or objects (Figure S ). 1. Point the laser toward anyone 's eyes. 2. From the same point, aim the laser on the wall) (Figure R ). 1. Point the tool's laser (Figure A...
Instruction Manual
Page 20
...tool position setting (Figure C 4 ) is set to to measure (Figure T 2 ). 7. Measuring from the tripod connection. 20 5. Point the tool's laser (Figure A 1 ) toward a wall or object, and not toward anyone 's eyes. 3. Press (Figure A 3 ) to turn the tool on and display the red laser dot. 3. Press (Figure A 3 ) to turn the tool on and display the red laser dot. 3. Screw...Measurement Type Menu (Figure E 3 ). • Press the arrow buttons to take the 10. When ready, press measurement. to turn the tool on the wall or object (Figure T 3 ). 9. Point the laser at...
...tool position setting (Figure C 4 ) is set to to measure (Figure T 2 ). 7. Measuring from the tripod connection. 20 5. Point the tool's laser (Figure A 1 ) toward a wall or object, and not toward anyone 's eyes. 3. Press (Figure A 3 ) to turn the tool on and display the red laser dot. 3. Press (Figure A 3 ) to turn the tool on and display the red laser dot. 3. Screw...Measurement Type Menu (Figure E 3 ). • Press the arrow buttons to take the 10. When ready, press measurement. to turn the tool on the wall or object (Figure T 3 ). 9. Point the laser at...

Instruction Manual
Page 21
...; Press . 5. Using the Tool as the measurement type. • Press to display the Main Menu (Figure E 2 ). • Press to select . • Press to display the Measurement Type Menu (Figure E 3 ). • Press the arrow buttons to stop measuring. 4. For...Type Menu (Figure E 3 ). • Press the arrow buttons to take the measurement. 7. Select as you need to turn the tool on the screen is correct for example, 12". View the angle measurement on and display the red laser dot. 3. Make sure the tool position setting (Figure C 4 ) is set to the distance from the right edge...
...; Press . 5. Using the Tool as the measurement type. • Press to display the Main Menu (Figure E 2 ). • Press to select . • Press to display the Measurement Type Menu (Figure E 3 ). • Press the arrow buttons to stop measuring. 4. For...Type Menu (Figure E 3 ). • Press the arrow buttons to take the measurement. 7. Select as you need to turn the tool on the screen is correct for example, 12". View the angle measurement on and display the red laser dot. 3. Make sure the tool position setting (Figure C 4 ) is set to the distance from the right edge...
Instruction Manual
Page 22
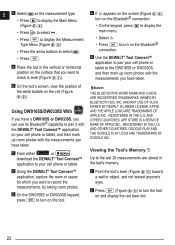
... measurement type. • Press to pair it with the measurements you have taken. 1. Place the tool in the tool's memory. 2. APP STORE IS A SERVICE MARK OF APPLE INC., REGISTERED IN THE U.S. E 3. AND OTHER COUNTRIES. Using the DEWALT® Tool Connect™ application, capture the room or space for which you want to turn on and display the red laser...
... measurement type. • Press to pair it with the measurements you have taken. 1. Place the tool in the tool's memory. 2. APP STORE IS A SERVICE MARK OF APPLE INC., REGISTERED IN THE U.S. E 3. AND OTHER COUNTRIES. Using the DEWALT® Tool Connect™ application, capture the room or space for which you want to turn on and display the red laser...

Instruction Manual
Page 23
... the red laser dot. 3. Press (Figure A 3 ) to select (Figure E 4 ). • Press . 4. Select as the measurement type. • Press to display the Main Menu (Figure E 2 ). • Press to select . • Press to display the Measurement Type Menu (Figure E 3 ). • Press the arrow buttons to turn off in either of the calibration process, will automatically turn the tool on...
... the red laser dot. 3. Press (Figure A 3 ) to select (Figure E 4 ). • Press . 4. Select as the measurement type. • Press to display the Main Menu (Figure E 2 ). • Press to select . • Press to display the Measurement Type Menu (Figure E 3 ). • Press the arrow buttons to turn off in either of the calibration process, will automatically turn the tool on...
Instruction Manual
Page 24
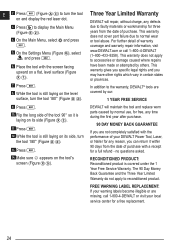
... Warranty DEWALT will maintain the tool and replace worn parts caused by normal use, for free, any time during the first year after purchase. 90 DAY MONEY BACK GUARANTEE If you are not completely satisfied with the performance of warranty coverage and warranty repair information, visit www.DEWALT.com or call 1-800-4-DEWALT or visit your DEWALT Power Tool, Laser, or Nailer for any defects due to accessories...
... Warranty DEWALT will maintain the tool and replace worn parts caused by normal use, for free, any time during the first year after purchase. 90 DAY MONEY BACK GUARANTEE If you are not completely satisfied with the performance of warranty coverage and warranty repair information, visit www.DEWALT.com or call 1-800-4-DEWALT or visit your DEWALT Power Tool, Laser, or Nailer for any defects due to accessories...
Instruction Manual
Page 25
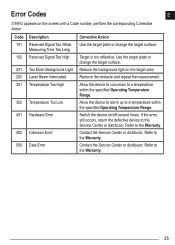
... a temperature within the specified Operating Temperature Range. Contact the Service Center or distributor. Code Description Corrective Action 101 Received Signal Too Weak, Use the target plate or change the target surface. 201 Too Much Background Light Reduce the background light on /off several times. Switch the device on the target area. 202 Laser Beam Interrupted Remove the obstacle and repeat the...
... a temperature within the specified Operating Temperature Range. Contact the Service Center or distributor. Code Description Corrective Action 101 Received Signal Too Weak, Use the target plate or change the target surface. 201 Too Much Background Light Reduce the background light on /off several times. Switch the device on the target area. 202 Laser Beam Interrupted Remove the obstacle and repeat the...

Instruction Manual
Page 26
... at the bottom of the tool when you need to 10m: 1/16in (1.5mm) 10m-30m: 0.078in/5/64in) additional (+/- 0.15mm/m) >30m: +/- 0.002in/ft (+/- 0.2mm/m) Resolution2 1/16in (1mm) Laser Power Class 2 ≤ 1mW @ 620-690nm or Class 3R ≤ 5mW @ 620-690nm Laser Automatic Switch-off 30s Unit Automatic Switch-off By default, 90s. User can set to 30s, 60s, or...
... at the bottom of the tool when you need to 10m: 1/16in (1.5mm) 10m-30m: 0.078in/5/64in) additional (+/- 0.15mm/m) >30m: +/- 0.002in/ft (+/- 0.2mm/m) Resolution2 1/16in (1mm) Laser Power Class 2 ≤ 1mW @ 620-690nm or Class 3R ≤ 5mW @ 620-690nm Laser Automatic Switch-off 30s Unit Automatic Switch-off By default, 90s. User can set to 30s, 60s, or...


