
Instruction Manual
Page 4
...this device will not occur in nanometers mW .....milliwatts ... English WARNING: Use of controls or adjustments or performance of the following measures: • Reorient or relocate the receiving antenna. • Increase the separation between the equipment and receiver. • Consult... operation. DO NOT DISASSEMBLE THE DEVICE. VDC ......volts, direct current nm..... wavelength in a particular installation. CAUTION: CLASS 2 LASER RADIATION. Operation is no user serviceable parts inside. This equipment generates, uses and can be determined by turning the equipment off ...
...this device will not occur in nanometers mW .....milliwatts ... English WARNING: Use of controls or adjustments or performance of the following measures: • Reorient or relocate the receiving antenna. • Increase the separation between the equipment and receiver. • Consult... operation. DO NOT DISASSEMBLE THE DEVICE. VDC ......volts, direct current nm..... wavelength in a particular installation. CAUTION: CLASS 2 LASER RADIATION. Operation is no user serviceable parts inside. This equipment generates, uses and can be determined by turning the equipment off ...

Instruction Manual
Page 5
...; Carefully follow all of building structures, metal tripods, equipment, etc., which can cause injury or fire. Refer to Field Calibration Check under Laser Maintenance. • Before attempting to use . • To ensure the accuracy of your accuracy often while working order. • Extreme... working . • If the device is powered by a qualified service center before using the laser. SAVE THESE INSTRUCTIONS FOR FUTURE USE Installing and Removing Battery (Fig. 2) NOTE: This Laser Distance Measurer (LDM) is dropped or has suffers a sharp blow, have the unit checked by two AAA...
...; Carefully follow all of building structures, metal tripods, equipment, etc., which can cause injury or fire. Refer to Field Calibration Check under Laser Maintenance. • Before attempting to use . • To ensure the accuracy of your accuracy often while working order. • Extreme... working . • If the device is powered by a qualified service center before using the laser. SAVE THESE INSTRUCTIONS FOR FUTURE USE Installing and Removing Battery (Fig. 2) NOTE: This Laser Distance Measurer (LDM) is dropped or has suffers a sharp blow, have the unit checked by two AAA...

Instruction Manual
Page 6
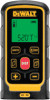
H COMPONENTS (Fig. 2, 3) K A. Laser indicator R. Measuring plane indicator S. Battery compartment cover G. UNITS button B. Subtract button K. Units indicator M. Battery indicator P. Receiver lens I E M J Q R S D. DIST (ON) button J. Insert two AAA (LR03) size batteries into the compartment, placing the batteries according to + and - Volume button I . C/OFF button FIG. 4 Laser Display L. A FIG. 2 FIG. 3 B C English L N O D 2. F P Q NOTE: When the battery icon flashes...
H COMPONENTS (Fig. 2, 3) K A. Laser indicator R. Measuring plane indicator S. Battery compartment cover G. UNITS button B. Subtract button K. Units indicator M. Battery indicator P. Receiver lens I E M J Q R S D. DIST (ON) button J. Insert two AAA (LR03) size batteries into the compartment, placing the batteries according to + and - Volume button I . C/OFF button FIG. 4 Laser Display L. A FIG. 2 FIG. 3 B C English L N O D 2. F P Q NOTE: When the battery icon flashes...

Instruction Manual
Page 7
...) will automatically shut down if no button is securely latched. 2. Functions TO ADD OR SUBTRACT MEASUREMENTS 1. Be sure that the battery door (A) is pressed for three seconds to record the measurement in Continuous Distance Measuring mode, the laser indicator (L) turns on the LCD display. Move the LDM to power the LDM. AUTOMATIC SHUT DOWN...
...) will automatically shut down if no button is securely latched. 2. Functions TO ADD OR SUBTRACT MEASUREMENTS 1. Be sure that the battery door (A) is pressed for three seconds to record the measurement in Continuous Distance Measuring mode, the laser indicator (L) turns on the LCD display. Move the LDM to power the LDM. AUTOMATIC SHUT DOWN...

Instruction Manual
Page 9
...only with a wet lint-free cloth such as shown in use cleansers or solvents. Never let any part of your local DEWALT service center. 255 Weak signal Change the target surface (e.g., put white paper on glass door) 256 Incorrect reading Change the target...use solvents or other harsh chemicals for interrupted measurement cleaning the non-metallic parts of FIG. 9 the laser emitter and the receiver may 7 NOTE: The final measurement is wet. range. Code 204 Description Calculation error Correction Repeat the measurement WARNING: DO NOT turn the LDM on glass...
...only with a wet lint-free cloth such as shown in use cleansers or solvents. Never let any part of your local DEWALT service center. 255 Weak signal Change the target surface (e.g., put white paper on glass door) 256 Incorrect reading Change the target...use solvents or other harsh chemicals for interrupted measurement cleaning the non-metallic parts of FIG. 9 the laser emitter and the receiver may 7 NOTE: The final measurement is wet. range. Code 204 Description Calculation error Correction Repeat the measurement WARNING: DO NOT turn the LDM on glass...


