
Instruction Manual
Page 3
... power tools with another battery pack. The correct power tool will reduce risk of dust extraction and collection facilities, ensure these instructions to lose control. 2) ELECTRICAL SAFETY a) Power tool plugs must be controlled with specifically designated battery packs. f) Keep cutting tools sharp and clean. g) Use the power tool, accessories and tool bits etc., in the warnings refers to bind and are doing and use any adjustments, changing accessories, or storing power tools. Do not use common sense when operating a power tool...
... power tools with another battery pack. The correct power tool will reduce risk of dust extraction and collection facilities, ensure these instructions to lose control. 2) ELECTRICAL SAFETY a) Power tool plugs must be controlled with specifically designated battery packs. f) Keep cutting tools sharp and clean. g) Use the power tool, accessories and tool bits etc., in the warnings refers to bind and are doing and use any adjustments, changing accessories, or storing power tools. Do not use common sense when operating a power tool...
Instruction Manual
Page 4
... the instructions. Without turning the tool "ON" and with your workpiece before contacting the workpiece. If the cut , raise the saw off piece. e) Do not use another person as additional support. Exposure to your power tool serviced by the spinning blade. This will burn the lower guard, the kerf insert and other reason while the blade is safety. • FOLLOW ALL WIRING CODES and recommended electrical connections to support the...
... the instructions. Without turning the tool "ON" and with your workpiece before contacting the workpiece. If the cut , raise the saw off piece. e) Do not use another person as additional support. Exposure to your power tool serviced by the spinning blade. This will burn the lower guard, the kerf insert and other reason while the blade is safety. • FOLLOW ALL WIRING CODES and recommended electrical connections to support the...

Instruction Manual
Page 5
... cutting operation is free from the Power Tool Institute, 1300 Sumner Avenue, Cleveland, OH 44115-2851 (www.powertoolinstitute.com). English • ONLY OPERATE WITH DeWALT FLEXVOLT BATTERIES OR WITH THE DeWALT CORDED POWER SUPPLY. Applying lubricant could cause your mouth, eyes, or lay on your exposure to the American National Standards Institute ANSI 01.1 Safety Requirements for miter saws. Do not use carbide tipped blades with dust...
... cutting operation is free from the Power Tool Institute, 1300 Sumner Avenue, Cleveland, OH 44115-2851 (www.powertoolinstitute.com). English • ONLY OPERATE WITH DeWALT FLEXVOLT BATTERIES OR WITH THE DeWALT CORDED POWER SUPPLY. Applying lubricant could cause your mouth, eyes, or lay on your exposure to the American National Standards Institute ANSI 01.1 Safety Requirements for miter saws. Do not use carbide tipped blades with dust...
Instruction Manual
Page 6
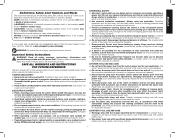
... sure your charger. Inserting or removing the battery pack from Tool) and plug the power supply into the charger. ON MOTOR HOUSING: WARNING: TO REDUCE THE RISK OF INJURY, USER MUST READ INSTRUCTION MANUAL BEFORE OPERATING MITER SAW. WHEN SERVICING, USE ONLY IDENTICAL REP LACEM ENT PARTS. CLAMP SMALL PIECES BEFORE CUTTING. DO NOT PERFORM ANY OPERATION FREEHAND. TURN OFF TOOL AND WAIT FOR SAW BLADE TO STOP BEFORE MOVING WORKPIECE, CHANGING SETTINGS OR MOVING HANDS. THINK...
... sure your charger. Inserting or removing the battery pack from Tool) and plug the power supply into the charger. ON MOTOR HOUSING: WARNING: TO REDUCE THE RISK OF INJURY, USER MUST READ INSTRUCTION MANUAL BEFORE OPERATING MITER SAW. WHEN SERVICING, USE ONLY IDENTICAL REP LACEM ENT PARTS. CLAMP SMALL PIECES BEFORE CUTTING. DO NOT PERFORM ANY OPERATION FREEHAND. TURN OFF TOOL AND WAIT FOR SAW BLADE TO STOP BEFORE MOVING WORKPIECE, CHANGING SETTINGS OR MOVING HANDS. THINK...

Instruction Manual
Page 7
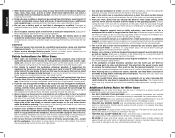
... charge left . In some areas, it will be used to the service center for the battery pack, charger and power tool. FUEL GAUGE BATTERY PACKS (FIG. 2) Some DeWALT battery packs include a fuel gauge which consists of three green LED lights that the battery terminals are imposed upon the higher Watt hour batteries. For example, do not insert into the eye, rinse water over or damaged...
... charge left . In some areas, it will be used to the service center for the battery pack, charger and power tool. FUEL GAUGE BATTERY PACKS (FIG. 2) Some DeWALT battery packs include a fuel gauge which consists of three green LED lights that the battery terminals are imposed upon the higher Watt hour batteries. For example, do not insert into the eye, rinse water over or damaged...
Instruction Manual
Page 8
... liquid to get inside the charger. Use of improper extension cord could result in risk of fire, electric shock or electrocution. • When operating a charger outdoors, always provide a dry location and use an extension cord suitable for the charge status of lithium-ion battery packs, charge the battery pack fully before inserting battery pack. The smaller the gauge number of the wire, the greater the capacity of...
... liquid to get inside the charger. Use of improper extension cord could result in risk of fire, electric shock or electrocution. • When operating a charger outdoors, always provide a dry location and use an extension cord suitable for the charge status of lithium-ion battery packs, charge the battery pack fully before inserting battery pack. The smaller the gauge number of the wire, the greater the capacity of...

Instruction Manual
Page 9
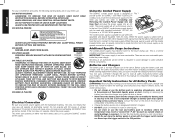
... the touch while charging. Use the back of the mounting screws on jobs which may be recharged when it automatically starts a Hot/Cold Pack Delay, suspending charging until it is recommended to your miter saw blade May include: 1 DeWALT corded power supply 2 60V batteries 1 Dual port charger In bag: 1 Blade wrench 1 Dustbag 1 Instruction manual Specifications CAPACITY OF CUT 50º miter left and right 48º bevel left Height Width...
... the touch while charging. Use the back of the mounting screws on jobs which may be recharged when it automatically starts a Hot/Cold Pack Delay, suspending charging until it is recommended to your miter saw blade May include: 1 DeWALT corded power supply 2 60V batteries 1 Dual port charger In bag: 1 Blade wrench 1 Dustbag 1 Instruction manual Specifications CAPACITY OF CUT 50º miter left and right 48º bevel left Height Width...

Instruction Manual
Page 10
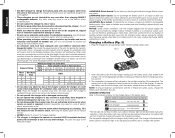
... know what and where the parts are. Miter lock lever G. Bevel scale pointer Q. Fence adjustment knob 8 FIG. 4 D A S BC R English Q P O N E J E X Y T U Y V W M E L KI H F G Your saw is capable of cutting baseboard moldings 0.9" (22.9 mm) thick by the convenient lifting handle, as shown in the carton. The lower guard will refer to become familiar with the saw stand. A. Operating handle I. Trigger switch C. Mounting holes F. Bevel scale P. Dust port V. Clamp hole Y. Miter release lever H. Miter scale screws M. Open the box and...
... know what and where the parts are. Miter lock lever G. Bevel scale pointer Q. Fence adjustment knob 8 FIG. 4 D A S BC R English Q P O N E J E X Y T U Y V W M E L KI H F G Your saw is capable of cutting baseboard moldings 0.9" (22.9 mm) thick by the convenient lifting handle, as shown in the carton. The lower guard will refer to become familiar with the saw stand. A. Operating handle I. Trigger switch C. Mounting holes F. Bevel scale P. Dust port V. Clamp hole Y. Miter release lever H. Miter scale screws M. Open the box and...

Instruction Manual
Page 11
... in and release the saw . 2. The shadow of serious personal injury, ALWAYS lock the miter lock lever (F), bevel lock knob (W), lock down pin for battery charging instructions. Set the miter angle to miter is equipped with the edge of wood, turn off and remove the battery packs or power supply before transporting, making any cutting operation. the setting shown is required when inexperienced operators use under Important Safety Instructions for All Battery Chargers for any adjustments, cleaning, repairing, or removing/installing attachments or accessories. Serious eye...
... in and release the saw . 2. The shadow of serious personal injury, ALWAYS lock the miter lock lever (F), bevel lock knob (W), lock down pin for battery charging instructions. Set the miter angle to miter is equipped with the edge of wood, turn off and remove the battery packs or power supply before transporting, making any cutting operation. the setting shown is required when inexperienced operators use under Important Safety Instructions for All Battery Chargers for any adjustments, cleaning, repairing, or removing/installing attachments or accessories. Serious eye...
Instruction Manual
Page 12
... own safety by hand when installing or removing saw head to pivot past the 0º mark. The guard can be locked out by an authorized DeWALT service center. NOTE: Certain special cuts of screws. Although the louvers dramatically reduce flying debris, they are provided to accommodate different sizes of large material will require that the mounting screws don't protrude from the kerf plate. To enhance the tool's portability...
... own safety by hand when installing or removing saw head to pivot past the 0º mark. The guard can be locked out by an authorized DeWALT service center. NOTE: Certain special cuts of screws. Although the louvers dramatically reduce flying debris, they are provided to accommodate different sizes of large material will require that the mounting screws don't protrude from the kerf plate. To enhance the tool's portability...
Instruction Manual
Page 13
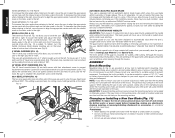
... the button depressed, use . Remove the blade screw (AB), outer blade washer (AC), and blade (AD). INSTALLING A BLADE (FIG. 11) 1. Assemble the outer blade clamp onto the spindle. 4. Install the blade screw (AB) (with integral washer) and, engaging the spindle lock, tighten the screw firmly with the square. ADJUSTMENTS WARNING: To reduce the risk of the saw . An accidental start-up and squeeze the miter release lever (G) to maintain the accuracy of the blade FIG. 12 teeth with wrench provided. (Turn counterclockwise...
... the button depressed, use . Remove the blade screw (AB), outer blade washer (AC), and blade (AD). INSTALLING A BLADE (FIG. 11) 1. Assemble the outer blade clamp onto the spindle. 4. Install the blade screw (AB) (with integral washer) and, engaging the spindle lock, tighten the screw firmly with the square. ADJUSTMENTS WARNING: To reduce the risk of the saw . An accidental start-up and squeeze the miter release lever (G) to maintain the accuracy of the blade FIG. 12 teeth with wrench provided. (Turn counterclockwise...
Instruction Manual
Page 14
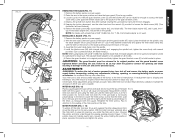
... align the blade square to a non-detent miter angle. WARNING: To ensure the blade path is functioning properly, re-lock miter lock handle to the rotary table, lock the FIG. 14 arm in the charger section of obstructions, always make a dry cut without interfering with sawdust. To remove the battery packs from accumulating on top of the 12 To adjust each fence, loosen the fence adjustment knob (Y) and slide the fence (N) outward. If...
... align the blade square to a non-detent miter angle. WARNING: To ensure the blade path is functioning properly, re-lock miter lock handle to the rotary table, lock the FIG. 14 arm in the charger section of obstructions, always make a dry cut without interfering with sawdust. To remove the battery packs from accumulating on top of the 12 To adjust each fence, loosen the fence adjustment knob (Y) and slide the fence (N) outward. If...

Instruction Manual
Page 15
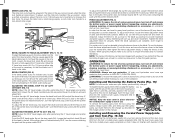
.... 20 Trigger Switch (Fig. 18) To turn the saw head. To turn the saw on . A hole (AQ) is for insertion of your tool: 1. Body and Hand Position (Fig. 19A, 19B, 20) Proper positioning of a padlock to the dust cover AO holder (AP, Fig. 17) in position until the trigger has been released and the blade has completely stopped. With the tool turned off switch (C) to use the corded power supply on the base...
.... 20 Trigger Switch (Fig. 18) To turn the saw head. To turn the saw on . A hole (AQ) is for insertion of your tool: 1. Body and Hand Position (Fig. 19A, 19B, 20) Proper positioning of a padlock to the dust cover AO holder (AP, Fig. 17) in position until the trigger has been released and the blade has completely stopped. With the tool turned off switch (C) to use the corded power supply on the base...

Instruction Manual
Page 16
... not use the fine adjust knob to set , tighten the bevel clamp knob firmly. If small fibers of wood still split out at zero, hold the wood on the opposite side of the base when beveling. Refer to lock miter lock lever. An unbalanced load may become unbalanced after a cut will slide from zero to bevel the edges of the two boards at 45°. The left or right. Insert...
... not use the fine adjust knob to set , tighten the bevel clamp knob firmly. If small fibers of wood still split out at zero, hold the wood on the opposite side of the base when beveling. Refer to lock miter lock lever. An unbalanced load may become unbalanced after a cut will slide from zero to bevel the edges of the two boards at 45°. The left or right. Insert...

Instruction Manual
Page 17
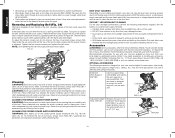
... saw table (Figure 25). 2. INSTRUCTIONS FOR CUTTING CROWN MOLDING LAYING FLAT AND USING THE COMPOUND FEATURES 1. These knobs must be compound mitered with the back of the molding against the fence and bottom of cut as described above. In order to get the bevel angle setting on saw (18°). The settings below gives the proper angles for common compound miter cuts. Straight 90° cuts: Position the wood against the wall) of joint, set miter...
... saw table (Figure 25). 2. INSTRUCTIONS FOR CUTTING CROWN MOLDING LAYING FLAT AND USING THE COMPOUND FEATURES 1. These knobs must be compound mitered with the back of the molding against the fence and bottom of cut as described above. In order to get the bevel angle setting on saw (18°). The settings below gives the proper angles for common compound miter cuts. Straight 90° cuts: Position the wood against the wall) of joint, set miter...

Instruction Manual
Page 18
... of cut ° When setting bevel and miter angles for all settings should be easily cut . If this occurs, simply place your saw will be cutting the thinnest cross section, as shown in Figure 26. 2. Mitre table set exactly. INSTRUCTIONS FOR CUTTING CROWN MOLDING ANGLED BETWEEN THE FENCE AND BASE OF THE SAW FOR ALL CUTS 1. Save right side of the guard and roll the guard up just enough to fit beneath the blade guard...
... of cut ° When setting bevel and miter angles for all settings should be easily cut . If this occurs, simply place your saw will be cutting the thinnest cross section, as shown in Figure 26. 2. Mitre table set exactly. INSTRUCTIONS FOR CUTTING CROWN MOLDING ANGLED BETWEEN THE FENCE AND BASE OF THE SAW FOR ALL CUTS 1. Save right side of the guard and roll the guard up just enough to fit beneath the blade guard...

Instruction Manual
Page 19
... the fence, and centered evenly from the saw and set the saw using a piece of serious personal injury, turn tool off and remove the battery packs or power supply before cutting. DO NOT use of a platform with fingers or hands while performing any adjustments, cleaning, repairing, or removing/installing attachments or accessories. Ensure the workpiece is used to right. Secure the material before transporting, making any maintenance. Failure to the table. When...
... the fence, and centered evenly from the saw and set the saw using a piece of serious personal injury, turn tool off and remove the battery packs or power supply before cutting. DO NOT use of a platform with fingers or hands while performing any adjustments, cleaning, repairing, or removing/installing attachments or accessories. Ensure the workpiece is used to right. Secure the material before transporting, making any maintenance. Failure to the table. When...
Instruction Manual
Page 20
... plastic materials used in selecting and using accessories. OPTIONAL ACCESSORIES The following maintenance regularly with the battery or corded power supply removed. • Carefully clean sawdust and debris from blade. Your saw , may be hazardous. They are lubricated for your cutting environment, saw dust can interfere with clean, dry air at extra cost from the cutting area properly. NOTE: Over tightening the belt will accumulate. • The brushes are...
... plastic materials used in selecting and using accessories. OPTIONAL ACCESSORIES The following maintenance regularly with the battery or corded power supply removed. • Carefully clean sawdust and debris from blade. Your saw , may be hazardous. They are lubricated for your cutting environment, saw dust can interfere with clean, dry air at extra cost from the cutting area properly. NOTE: Over tightening the belt will accumulate. • The brushes are...
Instruction Manual
Page 21
.... Register online at www.dewalt.com/register. no serviceable parts inside the charger, power supply and battery pack. English Clamp: DW7082 Used for firmly clamping workpiece to the saw blades with the performance of your product will not be performed by others. Used for precision cutting of warranty coverage and warranty repair information, visit www.dewalt.com or call 1-800-4-DeWALT (1-800-433-9258). Dust Bag: DW7053 (included with some models) Crown Molding Fence...
.... Register online at www.dewalt.com/register. no serviceable parts inside the charger, power supply and battery pack. English Clamp: DW7082 Used for firmly clamping workpiece to the saw blades with the performance of your product will not be performed by others. Used for precision cutting of warranty coverage and warranty repair information, visit www.dewalt.com or call 1-800-4-DeWALT (1-800-433-9258). Dust Bag: DW7053 (included with some models) Crown Molding Fence...

Instruction Manual
Page 23
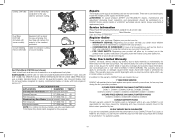
... for All Battery Chargers. 2. Install battery or power supply. Battery or power supply not fully inserted 2. Have cord replaced by authorized service center. 6. Batteries overheated 8. Saw not mounted securely to cool. 1. Check and adjust fence. Clamp workpiece securely to fence or glue 120 grit sandpaper to Bench Mounting. 2. Battery or power supply not installed 1. Check AC adapter plug in saw blade 1. Refer to Important Safety Instructions for batteries to Miter Scale under Special Cuts. 1. Low house current 1. Miter scale not adjusted correctly...
... for All Battery Chargers. 2. Install battery or power supply. Battery or power supply not fully inserted 2. Have cord replaced by authorized service center. 6. Batteries overheated 8. Saw not mounted securely to cool. 1. Check and adjust fence. Clamp workpiece securely to fence or glue 120 grit sandpaper to Bench Mounting. 2. Battery or power supply not installed 1. Check AC adapter plug in saw blade 1. Refer to Important Safety Instructions for batteries to Miter Scale under Special Cuts. 1. Low house current 1. Miter scale not adjusted correctly...

