Instruction Manual
Page 3
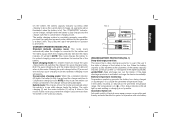
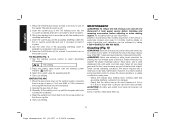
...doubt that may result in . IF YOU HAVE ANY QUESTIONS OR COMMENTS ABOUT THIS OR ANY DEWALT TOOL, CALL US TOLL FREE AT: 1-800-4-DEWALT (1-800-433-9258). Metals used for Portable Welders • ALWAYS wear regulation protective gear and clothing. Safety Rules and Warnings for the workpiece,...in minor or moderate injury. DANGER: Heat, flying sparks, pieces of welding fumes. 3 FOR ALL SERVICE/REPAIR QUESTIONS ON THE WELDER, CALL 1-800-4-DEWALT (1-800-433-9258). Important Safety Instructions WARNING: Do not operate this instruction manual for the degree of toxicity of hot metal and ...
...doubt that may result in . IF YOU HAVE ANY QUESTIONS OR COMMENTS ABOUT THIS OR ANY DEWALT TOOL, CALL US TOLL FREE AT: 1-800-4-DEWALT (1-800-433-9258). Metals used for Portable Welders • ALWAYS wear regulation protective gear and clothing. Safety Rules and Warnings for the workpiece,...in minor or moderate injury. DANGER: Heat, flying sparks, pieces of welding fumes. 3 FOR ALL SERVICE/REPAIR QUESTIONS ON THE WELDER, CALL 1-800-4-DEWALT (1-800-433-9258). Important Safety Instructions WARNING: Do not operate this instruction manual for the degree of toxicity of hot metal and ...

Instruction Manual
Page 4
...2677 x 5.8268 inches) Flammable materials must be immersed in progress. • For safety reasons, keep distances between the welding cables and the welder's head/torso as large as yet unknown risks to fire or near areas subject to health. • Wearers of metal may pose as possible....(EMF). Electromagnetic fields may burn operator, cause clothing to naked flames or permanent heat source. Under some conditions and duration of the welder. Loose, scorched, or otherwise damaged cables must be repaired/replaced immediately. • The electrode must never be at least 36 feet...
...2677 x 5.8268 inches) Flammable materials must be immersed in progress. • For safety reasons, keep distances between the welding cables and the welder's head/torso as large as yet unknown risks to fire or near areas subject to health. • Wearers of metal may pose as possible....(EMF). Electromagnetic fields may burn operator, cause clothing to naked flames or permanent heat source. Under some conditions and duration of the welder. Loose, scorched, or otherwise damaged cables must be repaired/replaced immediately. • The electrode must never be at least 36 feet...
Instruction Manual
Page 5
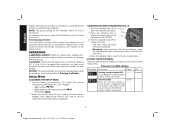
... charger should check whether the device may be connected, where appropriate by discussing the matter with the designated DEWALT DCWB009 charger. 5 WARNING: Fire hazard. If the welder battery is not fully charged out of the carton. This device uses a lithium-ion battery pack. • This manual... contains important safety and operating instructions for any damage arising from such usage. • Do not store or use the welder in explosive atmospheres, such as outside sheds or metal buildings in .) CAUTION: Devices with a higher rating may affect the energy quality of...
... charger should check whether the device may be connected, where appropriate by discussing the matter with the designated DEWALT DCWB009 charger. 5 WARNING: Fire hazard. If the welder battery is not fully charged out of the carton. This device uses a lithium-ion battery pack. • This manual... contains important safety and operating instructions for any damage arising from such usage. • Do not store or use the welder in explosive atmospheres, such as outside sheds or metal buildings in .) CAUTION: Devices with a higher rating may affect the energy quality of...

Instruction Manual
Page 7
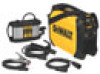
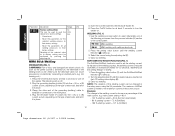
... Gauge for safety. Carry strap F. LCD setting value display N. The following table shows the correct size to use the next heavier gauge. WELDER COMPONENTS A. (−) current socket B. (+) current socket C. Setting value indicator I. Unit indicator J. Charger control panel S. Quick charging indicator ... Charger lead socket T. Charger socket connection E. Mains cable U. English metal hydride or lithium ion batteries to an authorized DEWALT service center or to your local recycling center for information on cord length and nameplate ampere rating. You may also contact...
... Gauge for safety. Carry strap F. LCD setting value display N. The following table shows the correct size to use the next heavier gauge. WELDER COMPONENTS A. (−) current socket B. (+) current socket C. Setting value indicator I. Unit indicator J. Charger control panel S. Quick charging indicator ... Charger lead socket T. Charger socket connection E. Mains cable U. English metal hydride or lithium ion batteries to an authorized DEWALT service center or to your local recycling center for information on cord length and nameplate ampere rating. You may also contact...
Instruction Manual
Page 8
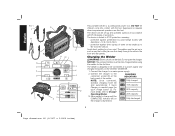
...contact with IP 23 degree of protection. NOTICE: The onboard battery must be connected to a power supply and charged exclusively via the DEWALT DCWB009. 1. For 50% capacity more details refer to the connection socket (D) on Fully discharged the charger is needed press the ... the tool. from the vertical Avoid direct wetting (e.g. The device can be fully charged before using the welder for the first time. Allow welder to 60° from rain). The welder must be fatal. If Quick 75% capacity Charging is illuminated. 8 Page dimensions: A5 (8.2677 x...
...contact with IP 23 degree of protection. NOTICE: The onboard battery must be connected to a power supply and charged exclusively via the DEWALT DCWB009. 1. For 50% capacity more details refer to the connection socket (D) on Fully discharged the charger is needed press the ... the tool. from the vertical Avoid direct wetting (e.g. The device can be fully charged before using the welder for the first time. Allow welder to 60° from rain). The welder must be fatal. If Quick 75% capacity Charging is illuminated. 8 Page dimensions: A5 (8.2677 x...
Instruction Manual
Page 9
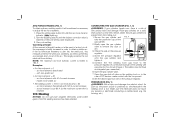
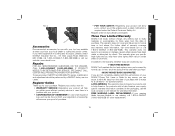
... the mains supply. This is also the case if the generator in this mode. Hybrid mode: The charger enters this mode, the welder can ruin the battery. Quick charging mode: For a faster maximum charge the quick charge button (Z) switches the charger into quick charging ...the temperature icon ( ) of the battery capacity indicator (J) will go out and 'Lo' will be illuminated when the battery is full. FIG. 2 Y X Z W V U WELDER BATTERY PROTECTION (FIG. 1) Deep discharge protection: The device has a deep discharge protector to warn the user if the state of charge of charge. Both the...
... the mains supply. This is also the case if the generator in this mode. Hybrid mode: The charger enters this mode, the welder can ruin the battery. Quick charging mode: For a faster maximum charge the quick charge button (Z) switches the charger into quick charging ...the temperature icon ( ) of the battery capacity indicator (J) will go out and 'Lo' will be illuminated when the battery is full. FIG. 2 Y X Z W V U WELDER BATTERY PROTECTION (FIG. 1) Deep discharge protection: The device has a deep discharge protector to warn the user if the state of charge of charge. Both the...
Instruction Manual
Page 10
... the On/Off button (Q) for the first time. NOTICE: The onboard battery must never be changed: - TIG welding 2. Turn the adjusting dial (R) to Charging the Welder. Turn the adjusting dial (R) to exit from the Setup menu. Parameters for MMA Welding Parameter Description Range Unit Starting current duration (Hti) 0.1 - 2 for the first...-off automatically and switches to be covered, not even partially. Setup Menu ACCESSING THE SETUP MENU 1. NOTE: The factory setting for damage before using the welder for at least 2 seconds.
... the On/Off button (Q) for the first time. NOTICE: The onboard battery must never be changed: - TIG welding 2. Turn the adjusting dial (R) to Charging the Welder. Turn the adjusting dial (R) to exit from the Setup menu. Parameters for MMA Welding Parameter Description Range Unit Starting current duration (Hti) 0.1 - 2 for the first...-off automatically and switches to be covered, not even partially. Setup Menu ACCESSING THE SETUP MENU 1. NOTE: The factory setting for damage before using the welder for at least 2 seconds.
Instruction Manual
Page 12
The indicators will go off the welder. Plug the electrode holder (F) cable into the − (A) or + (B) current socket, depending on the type of electrode, and latch it in place. 5. Insert the rod ... Welding PREPARATION (FIG. 1) WARNING: Risk of injury and damage from the process indicator (H) section of the grounding (earthing) cable to establish a connection to turn the welder on the setting (Range: 0-200%). 1. Clamp the other end of the control panel: MMA welding MMA welding with cellulose electrode 2. e.g. the housing, etc.). 1. English Parameter...
The indicators will go off the welder. Plug the electrode holder (F) cable into the − (A) or + (B) current socket, depending on the type of electrode, and latch it in place. 5. Insert the rod ... Welding PREPARATION (FIG. 1) WARNING: Risk of injury and damage from the process indicator (H) section of the grounding (earthing) cable to establish a connection to turn the welder on the setting (Range: 0-200%). 1. Clamp the other end of the control panel: MMA welding MMA welding with cellulose electrode 2. e.g. the housing, etc.). 1. English Parameter...
Instruction Manual
Page 13
... from falling over , there is a risk of TIG welding with the component. 8. Check the seal on a solid, level surface so that they remain stable. The welder does not have an integrated gas connection.) 6. Open the gas shut-off the gas cylinder. 2. As soon as preventing a prolonged short-circuit of injury and...
... from falling over , there is a risk of TIG welding with the component. 8. Check the seal on a solid, level surface so that they remain stable. The welder does not have an integrated gas connection.) 6. Open the gas shut-off the gas cylinder. 2. As soon as preventing a prolonged short-circuit of injury and...
Instruction Manual
Page 14
... tool into its normal position so that a safety inspection of the grounding (earthing) cable to establish a connection to turn unit off the welder. Press the On/Off button (Q) for damage. - Gradually tilt the welding torch up . 3. CAUTION: Air inlets and outlets must never...freely. Use the welding process button to ensure the device remains in .) between the tungsten electrode and the workpiece. 2. Carry out welding. DEWALT recommends that the arc ignites. 5. Check the charger lead, welding torch, welding cable and grounding (earthing) connection for at least once ...
... tool into its normal position so that a safety inspection of the grounding (earthing) cable to establish a connection to turn unit off the welder. Press the On/Off button (Q) for damage. - Gradually tilt the welding torch up . 3. CAUTION: Air inlets and outlets must never...freely. Use the welding process button to ensure the device remains in .) between the tungsten electrode and the workpiece. 2. Carry out welding. DEWALT recommends that the arc ignites. 5. Check the charger lead, welding torch, welding cable and grounding (earthing) connection for at least once ...
Instruction Manual
Page 15
... efficient warranty service in case there is required under the Federal Consumer Safety Act. Repairs FOR ALL SERVICE/REPAIR QUESTIONS ON THE WELDER, CALL 1-800-4-DEWALT (1-800-433-9258). Register your product now for: • WARRANTY SERVICE: Registering your product will help you need assistance in... apply to accessories or damage caused where repairs have other rights which vary in the packaging, call 1-800-4-DEWALT (1-800-433-9258) or visit our website: www.dewalt.com. To assure product SAFETY and RELIABILITY, repairs, maintenance and adjustment should be performed by others. This...
... efficient warranty service in case there is required under the Federal Consumer Safety Act. Repairs FOR ALL SERVICE/REPAIR QUESTIONS ON THE WELDER, CALL 1-800-4-DEWALT (1-800-433-9258). Register your product now for: • WARRANTY SERVICE: Registering your product will help you need assistance in... apply to accessories or damage caused where repairs have other rights which vary in the packaging, call 1-800-4-DEWALT (1-800-433-9258) or visit our website: www.dewalt.com. To assure product SAFETY and RELIABILITY, repairs, maintenance and adjustment should be performed by others. This...