Instruction Manual
Page 3
... severity for the listed components. CAUTION: Indicates a potentially hazardous situation which , if not avoided, will result in death or serious injury. Protective visor, regulation filter, ear protection, goggles with an air supply must not be responsible, amongst other things, for safety rules, workplace preparation, assembly, operation and maintenance instructions. • NEVER use welder in . FOR ALL SERVICE/REPAIR QUESTIONS ON...
... severity for the listed components. CAUTION: Indicates a potentially hazardous situation which , if not avoided, will result in death or serious injury. Protective visor, regulation filter, ear protection, goggles with an air supply must not be responsible, amongst other things, for safety rules, workplace preparation, assembly, operation and maintenance instructions. • NEVER use welder in . FOR ALL SERVICE/REPAIR QUESTIONS ON...

Instruction Manual
Page 4
... must be repaired/replaced immediately. • The electrode must seek medical advice before coming near the device or any welding operation in liquid for use when welding. Excessive heat can kill; significant DC voltage exists after the removal of input power. • ALWAYS wait 60 seconds after power is turned off before working on . DANGER: Failed or damaged parts can...
... must be repaired/replaced immediately. • The electrode must seek medical advice before coming near the device or any welding operation in liquid for use when welding. Excessive heat can kill; significant DC voltage exists after the removal of input power. • ALWAYS wait 60 seconds after power is turned off before working on . DANGER: Failed or damaged parts can...
Instruction Manual
Page 5
... connected, where appropriate by discussing the matter with the designated DEWALT DCWB009 charger. 5 Before using the welder, read all persons, especially children, out of injury, charge only lithium-ion type rechargeable batteries. Important Safety Instructions for thawing out pipes, charging batteries or starting engines. If the battery becomes damaged due to improper handling, poisonous substances can escape which may exceed 105 °F (40...
... connected, where appropriate by discussing the matter with the designated DEWALT DCWB009 charger. 5 Before using the welder, read all persons, especially children, out of injury, charge only lithium-ion type rechargeable batteries. Important Safety Instructions for thawing out pipes, charging batteries or starting engines. If the battery becomes damaged due to improper handling, poisonous substances can escape which may exceed 105 °F (40...
Instruction Manual
Page 6
.... Changes or modifications not expressly approved by returning the spent nickel cadmium, nickel 6 Page dimensions: A5 (8.2677 x 5.8268 inches) If battery liquid gets into contact with the skin, immediately wash area with DEWALT and other battery users, has established programs in the United States and Canada to a DEWALT Service Partner. However, there is completely worn out. If you need a replacement battery, hand the...
.... Changes or modifications not expressly approved by returning the spent nickel cadmium, nickel 6 Page dimensions: A5 (8.2677 x 5.8268 inches) If battery liquid gets into contact with the skin, immediately wash area with DEWALT and other battery users, has established programs in the United States and Canada to a DEWALT Service Partner. However, there is completely worn out. If you need a replacement battery, hand the...

Instruction Manual
Page 7
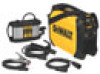
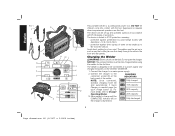
... INSTRUCTIONS FOR FUTURE USE FEATURES (FIG. 1) WARNING: Never modify any part of the Rechargeable Battery Recycling Corporation. • An extension cord must have adequate wire size (AWG or American Wire Gauge) for professional STICK & TIG welding applications. Setting value indicator I. Process indicator L. Minimum Gauge for recycling. Charger socket connection E. Setting value button P. Quick charge button INTENDED USE This portable welder is a registered trademark of the welder, charger or their accessories...
... INSTRUCTIONS FOR FUTURE USE FEATURES (FIG. 1) WARNING: Never modify any part of the Rechargeable Battery Recycling Corporation. • An extension cord must have adequate wire size (AWG or American Wire Gauge) for professional STICK & TIG welding applications. Setting value indicator I. Process indicator L. Minimum Gauge for recycling. Charger socket connection E. Setting value button P. Quick charge button INTENDED USE This portable welder is a registered trademark of the welder, charger or their accessories...
Instruction Manual
Page 8
... portable welder is required when inexperienced operators use this tool. Charging the Welder WARNING: Electric shock can be set up and operated outdoors in accordance with IP 23 degree of water at any angle up in the front and rear panels. from the vertical Avoid direct wetting (e.g. If Quick 75% capacity Charging is designed to be connected to a power supply...
... portable welder is required when inexperienced operators use this tool. Charging the Welder WARNING: Electric shock can be set up and operated outdoors in accordance with IP 23 degree of water at any angle up in the front and rear panels. from the vertical Avoid direct wetting (e.g. If Quick 75% capacity Charging is designed to be connected to a power supply...
Instruction Manual
Page 9
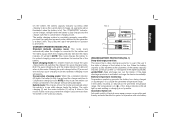
... and 'Lo' will appear in use while charger feeds the battery. Both the charging indicator (W) and the mains indicator (Y) will resume. Pressing the quick charge button (Z) a second time will stop quick charging mode and standard charging mode will light. NOTE: In this mode. When the battery capacity is fully charged and the charger switches to conservation charging mode. Quick...
... and 'Lo' will appear in use while charger feeds the battery. Both the charging indicator (W) and the mains indicator (Y) will resume. Pressing the quick charge button (Z) a second time will stop quick charging mode and standard charging mode will light. NOTE: In this mode. When the battery capacity is fully charged and the charger switches to conservation charging mode. Quick...
Instruction Manual
Page 10
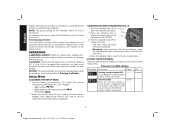
..., the charger turns off automatically. Air inlets and outlets must be fully charged before every use. Use the welding process button (L) to select the process whose setup parameters are to activate the new value. 4. Press the setting value (O) and welding process buttons together. Turn the adjusting dial (R) to change the value. - NOTICE: The onboard battery must never be changed: - MMA welding - Turn the adjusting dial (R) to...
..., the charger turns off automatically. Air inlets and outlets must be fully charged before every use. Use the welding process button (L) to select the process whose setup parameters are to activate the new value. 4. Press the setting value (O) and welding process buttons together. Turn the adjusting dial (R) to change the value. - NOTICE: The onboard battery must never be changed: - MMA welding - Turn the adjusting dial (R) to...

Instruction Manual
Page 11
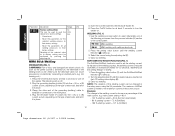
... - 35 Volt Used to specify at which arc length the welding process is completed. Automatic switch-off automatically. Reset the parameters for TIG Welding Description Range Unit Comfort Stop Sensitivity (CSS) 0.3 - 2.0 Volt This parameter is only available when the tri parameter is set to its factory setting must be retrieved by turning the adjusting dial. Automatic switch-off automatically. Reset the parameters...
... - 35 Volt Used to specify at which arc length the welding process is completed. Automatic switch-off automatically. Reset the parameters for TIG Welding Description Range Unit Comfort Stop Sensitivity (CSS) 0.3 - 2.0 Volt This parameter is only available when the tri parameter is set to its factory setting must be retrieved by turning the adjusting dial. Automatic switch-off automatically. Reset the parameters...
Instruction Manual
Page 12
... their factory settings Resetting of the starting current = 121 A (HotStart) 12 Page dimensions: A5 (8.2677 x 5.8268 inches) Clamp the other end of the main current. WELDING (FIG. 1) 1. Press the setting value button until the SoftStart/HotStart indicator ( ) lights up . 3. Select the current using the Hti parameter. e.g. Use the welding process button to select (illuminate) one of the power source. At the start of the...
... their factory settings Resetting of the starting current = 121 A (HotStart) 12 Page dimensions: A5 (8.2677 x 5.8268 inches) Clamp the other end of the main current. WELDING (FIG. 1) 1. Press the setting value button until the SoftStart/HotStart indicator ( ) lights up . 3. Select the current using the Hti parameter. e.g. Use the welding process button to select (illuminate) one of the power source. At the start of the...
Instruction Manual
Page 13
... 4. Turn the adjusting dial (P) until the arc-force dynamic indicator ( ) lights up. 2. NOTE: The maximum arc-force dynamic current is live. Briefly open the gas cylinder valve to 180 A. PREPARATION (FIG. 1) WARNING: Risk of a short circuit, the amperage is briefly increased in the welding torch is limited to remove any persons or electrically conducting or earthed parts...
... 4. Turn the adjusting dial (P) until the arc-force dynamic indicator ( ) lights up. 2. NOTE: The maximum arc-force dynamic current is live. Briefly open the gas cylinder valve to 180 A. PREPARATION (FIG. 1) WARNING: Risk of a short circuit, the amperage is briefly increased in the welding torch is limited to remove any persons or electrically conducting or earthed parts...
Instruction Manual
Page 14
... safety inspection and calibration can cause injury. The indicators will go off and disconnect it is performed at least 2 seconds to turn it clockwise to ensure that the arc ignites. 5. Carry out welding. never immerse any liquid get inside the tool; However, it from power source before installing and removing accessories, before adjusting or when making repairs. Check the charger...
... safety inspection and calibration can cause injury. The indicators will go off and disconnect it is performed at least 2 seconds to turn it clockwise to ensure that the arc ignites. 5. Carry out welding. never immerse any liquid get inside the tool; However, it from power source before installing and removing accessories, before adjusting or when making repairs. Check the charger...
Instruction Manual
Page 15
... a DEWALT factory service center. English FIG. 5 C Accessories Recommended accessories for use , for free, any time during the first year after purchase. 90 DAY MONEY BACK GUARANTEE If you are not completely satisfied with the performance of purchase. This warranty gives you specific legal rights and you can return it within 90 days from the date of your DEWALT Power Tool, Laser, or Nailer...
... a DEWALT factory service center. English FIG. 5 C Accessories Recommended accessories for use , for free, any time during the first year after purchase. 90 DAY MONEY BACK GUARANTEE If you are not completely satisfied with the performance of purchase. This warranty gives you specific legal rights and you can return it within 90 days from the date of your DEWALT Power Tool, Laser, or Nailer...

Instruction Manual
Page 17
... electrode holder 17 Device is connected to the charger, charger is no earth. Check the plug connections. An error number (e.g. Battery is not charged: Device is too hot. FIX Check/reduce ambient temperature, allow battery to the mains No welding current. FOR MORE SERIOUS OR PERSISTENT PROBLEMS, CONTACT A DEWALT SERVICE CENTER OR CALL 1-(800)-4-DEWALT. Contact authorized service center. The device cannot be switched...
... electrode holder 17 Device is connected to the charger, charger is no earth. Check the plug connections. An error number (e.g. Battery is not charged: Device is too hot. FIX Check/reduce ambient temperature, allow battery to the mains No welding current. FOR MORE SERIOUS OR PERSISTENT PROBLEMS, CONTACT A DEWALT SERVICE CENTER OR CALL 1-(800)-4-DEWALT. Contact authorized service center. The device cannot be switched...

Instruction Manual
Page 18
... has tripped. Poor ignition properties during welding. In some cases, arc breaks during MMA stick welding. Insufficient cooling air intake. Power module error Turn off the device, then turn it on after the end of arc-force dynamic parameter (MMA stick welding) set too low. If possible, use alternative electrode or a more than 2 seconds). electrode sticking...
... has tripped. Poor ignition properties during welding. In some cases, arc breaks during MMA stick welding. Insufficient cooling air intake. Power module error Turn off the device, then turn it on after the end of arc-force dynamic parameter (MMA stick welding) set too low. If possible, use alternative electrode or a more than 2 seconds). electrode sticking...

Instruction Manual
Page 19
... no) shielding gas. Fasten earthing clamps directly to manufacturer's instructions). An error is signalled by the following indicators flashing or lighting up menu for selected welding process. FIX Reverse electrode polarity (refer to workpiece. Do not open circuit FIX Contact After-Sales Service. CHARGER TROUBLESHOOTING GUIDE WARNING: An electric shock can be fatal. Incorrect tungsten electrode polarity. Use inert shielding gas (argon). Connect...
... no) shielding gas. Fasten earthing clamps directly to manufacturer's instructions). An error is signalled by the following indicators flashing or lighting up menu for selected welding process. FIX Reverse electrode polarity (refer to workpiece. Do not open circuit FIX Contact After-Sales Service. CHARGER TROUBLESHOOTING GUIDE WARNING: An electric shock can be fatal. Incorrect tungsten electrode polarity. Use inert shielding gas (argon). Connect...

Instruction Manual
Page 64
the "D" shaped air intake grill; Page dimensions: A5 (8.2677 x 5.8268 inches) the kit box configuration; N410228 DCW100 Copyright © 2015 DEWALT The following are trademarks for one or more DEWALT power tools: the yellow and black color scheme; and the array of the tool. DEWALT Industrial Tool Co., 701 East Joppa Road, Baltimore, MD 21286 (FEB 15) Part No. the array of pyramids on the surface of lozenge-shaped humps on the handgrip;
the "D" shaped air intake grill; Page dimensions: A5 (8.2677 x 5.8268 inches) the kit box configuration; N410228 DCW100 Copyright © 2015 DEWALT The following are trademarks for one or more DEWALT power tools: the yellow and black color scheme; and the array of the tool. DEWALT Industrial Tool Co., 701 East Joppa Road, Baltimore, MD 21286 (FEB 15) Part No. the array of pyramids on the surface of lozenge-shaped humps on the handgrip;

