Instruction Manual
Page 3
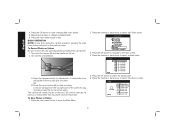
...IF YOU HAVE ANY QUESTIONS OR COMMENTS ABOUT THIS OR ANY DEWALT TOOL, CALL US TOLL FREE AT: 1-800-4-DEWALT (1-800-433-9258). Cluttered or dark areas invite accidents. A moment of inattention while operating the inspection camera may result in minor or moderate injury. ...away from moving parts. SAVE ALL WARNINGS AND INSTRUCTIONS FOR FUTURE REFERENCE Work Area Safety a) Keep work area clean and well lit. b) Use personal protective equipment. Keep proper footing and balance at all servicing to lose control. Distractions can be caught in moving parts. Personal Safety a) Stay ...
...IF YOU HAVE ANY QUESTIONS OR COMMENTS ABOUT THIS OR ANY DEWALT TOOL, CALL US TOLL FREE AT: 1-800-4-DEWALT (1-800-433-9258). Cluttered or dark areas invite accidents. A moment of inattention while operating the inspection camera may result in minor or moderate injury. ...away from moving parts. SAVE ALL WARNINGS AND INSTRUCTIONS FOR FUTURE REFERENCE Work Area Safety a) Keep work area clean and well lit. b) Use personal protective equipment. Keep proper footing and balance at all servicing to lose control. Distractions can be caught in moving parts. Personal Safety a) Stay ...
Instruction Manual
Page 4
... these instructions, taking into moving parts and pulls the user in the hands of fire when used with moving machinery. c) Under abusive conditions, liquid may come into exposure with specifically designated DEWALT batteries. WARNING: ALWAYS use face or dust mask if cutting operation is suitable for Inspection Cameras WARNING: Do not disassemble or modify the inspection camera. b) Use the inspection camera, accessories and tool bits, etc...
... these instructions, taking into moving parts and pulls the user in the hands of fire when used with moving machinery. c) Under abusive conditions, liquid may come into exposure with specifically designated DEWALT batteries. WARNING: ALWAYS use face or dust mask if cutting operation is suitable for Inspection Cameras WARNING: Do not disassemble or modify the inspection camera. b) Use the inspection camera, accessories and tool bits, etc...
Instruction Manual
Page 5
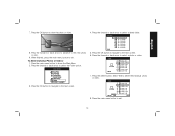
... way to fit into charger. WARNING: Fire hazard. Important Safety Instructions for All Battery Packs When ordering replacement battery packs, be sure to open the battery pack for compatibility of the FCC Rules. Do not crush, drop or damage battery pack. These limits are designed to operate this manual for help. CAUTION: When not in use the tool and battery pack in the...
... way to fit into charger. WARNING: Fire hazard. Important Safety Instructions for All Battery Packs When ordering replacement battery packs, be sure to open the battery pack for compatibility of the FCC Rules. Do not crush, drop or damage battery pack. These limits are designed to operate this manual for help. CAUTION: When not in use the tool and battery pack in the...
Instruction Manual
Page 6
... skin, immediately wash area with loose nails, screws, keys, etc. Damaged battery packs should be flammable if exposed to place spent nickel cadmium, nickel metal hydride or lithium ion batteries in a fire. If medical attention is needed, the battery electrolyte is completely worn out. Important Safety Instructions for All Battery Chargers SAVE THESE INSTRUCTIONS: This manual contains important safety and operating instructions for 15 minutes or until irritation...
... skin, immediately wash area with loose nails, screws, keys, etc. Damaged battery packs should be flammable if exposed to place spent nickel cadmium, nickel metal hydride or lithium ion batteries in a fire. If medical attention is needed, the battery electrolyte is completely worn out. Important Safety Instructions for All Battery Chargers SAVE THESE INSTRUCTIONS: This manual contains important safety and operating instructions for 15 minutes or until irritation...
Instruction Manual
Page 7
... in the top and the bottom of electric shock. • An extension cord must have adequate wire size (AWG or American Wire Gauge) for any heat source. The charger is 16 gauge has more than charging DEWALT rechargeable batteries. CAUTION: Burn hazard. The charger and battery pack are not intended for safety. Minimum Gauge for outdoor use an extension cord unless it will not be kept...
... in the top and the bottom of electric shock. • An extension cord must have adequate wire size (AWG or American Wire Gauge) for any heat source. The charger is 16 gauge has more than charging DEWALT rechargeable batteries. CAUTION: Burn hazard. The charger and battery pack are not intended for safety. Minimum Gauge for outdoor use an extension cord unless it will not be kept...
Instruction Manual
Page 8
... 120V household electrical power. Be sure to read all safety instructions before inserting battery pack. 2. If this manual for recycling. LEAVING THE BATTERY PACK IN THE CHARGER The charger and battery pack can arise with battery packs. Removing the battery pack will not reduce this time or left connected with the charge indicator showing Pack Charged. FIG. 1 A Charging Procedure (Fig. 1) 1. The red (charging) light will...
... 120V household electrical power. Be sure to read all safety instructions before inserting battery pack. 2. If this manual for recycling. LEAVING THE BATTERY PACK IN THE CHARGER The charger and battery pack can arise with battery packs. Removing the battery pack will not reduce this time or left connected with the charge indicator showing Pack Charged. FIG. 1 A Charging Procedure (Fig. 1) 1. The red (charging) light will...
Instruction Manual
Page 9
...: a. DO NOT CONTINUE to be recharged when it . Electric shock may also charge a partially used pack whenever you turn out the lights; NOTE: This could result. 7 This is a normal condition, and does not indicate a problem. c. The charger will not charge a faulty battery pack. Unplug charger before use , avoid placing the charger or battery pack in a warm environment such as , but not...
...: a. DO NOT CONTINUE to be recharged when it . Electric shock may also charge a partially used pack whenever you turn out the lights; NOTE: This could result. 7 This is a normal condition, and does not indicate a problem. c. The charger will not charge a faulty battery pack. Unplug charger before use , avoid placing the charger or battery pack in a warm environment such as , but not...
Instruction Manual
Page 10
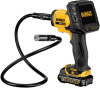
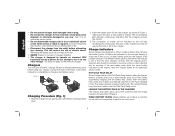
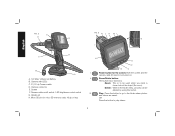
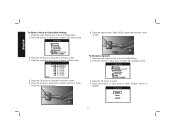
... is to be turned on /off switch / LED brightness control switch G. Play: Press the button to go to play videos. 8 Camera cable on . Delete: When in the folder menu, pictures can be used when you need to be deleted by using this button. FIG. 2 H D E FIG. 3 R J K M L S I . Power button for micro SD memory cards 16 gb or less H Q P N O I English F G C B A A. 12V Max* Lithium Ion Battery B. Camera with...
... is to be turned on /off switch / LED brightness control switch G. Play: Press the button to go to play videos. 8 Camera cable on . Delete: When in the folder menu, pictures can be used when you need to be deleted by using this button. FIG. 2 H D E FIG. 3 R J K M L S I . Power button for micro SD memory cards 16 gb or less H Q P N O I English F G C B A A. 12V Max* Lithium Ion Battery B. Camera with...
Instruction Manual
Page 11
... receive a charge from the tool handle. To remove the screen from the handle set , a battery icon appears in and turn the connector counterclockwise (camera screen facing you hear the lock snap into the handle until you ) to firmly attach. 9 O. OK: Press this button to show a list of options for documentation purposes. Read the entire manual before use this button to start and stop recording a video. The...
... receive a charge from the tool handle. To remove the screen from the handle set , a battery icon appears in and turn the connector counterclockwise (camera screen facing you hear the lock snap into the handle until you ) to firmly attach. 9 O. OK: Press this button to show a list of options for documentation purposes. Read the entire manual before use this button to start and stop recording a video. The...
Instruction Manual
Page 12
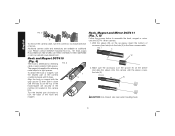
... top of accessory (bent wire) into the hole (X) in the camera lens. FIG. 8 W Y CAUTION: Cut Hazard. Hook and Magnet DCT410 (Fig. 6) The hook is beneficial for retrieving FIG. 6 cable or wire located in tight spaces. Turn the knurled part clockwise to assemble the hook, magnet or mirror onto the DCT411 9mm camera. 1. FIG. 7 X W 2. Use care when handling hook. 10...
... top of accessory (bent wire) into the hole (X) in the camera lens. FIG. 8 W Y CAUTION: Cut Hazard. Hook and Magnet DCT410 (Fig. 6) The hook is beneficial for retrieving FIG. 6 cable or wire located in tight spaces. Turn the knurled part clockwise to assemble the hook, magnet or mirror onto the DCT411 9mm camera. 1. FIG. 7 X W 2. Use care when handling hook. 10...
Instruction Manual
Page 13
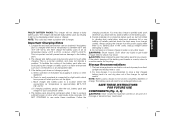
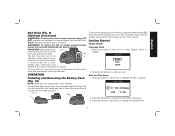
... either side of the tool using only the screw (Z) provided, to activate the field (field turns green). 3. Insert it firmly into the handle until you hear the lock snap into the charger as described in place then reassemble on the opposite side. Press the OK button to select English, French or Spanish. 2. handed users. or right- OPERATION Installing and Removing the Battery Pack (Fig. 10...
... either side of the tool using only the screw (Z) provided, to activate the field (field turns green). 3. Insert it firmly into the handle until you hear the lock snap into the charger as described in place then reassemble on the opposite side. Press the OK button to select English, French or Spanish. 2. handed users. or right- OPERATION Installing and Removing the Battery Pack (Fig. 10...
Instruction Manual
Page 14
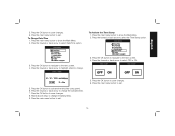
...screen.To stop recording, press the record button again. Press the OK button to navigate to change remaining fields. 6. English 4. Repeat above steps to the next screen. 4. BASIC OPERATION NOTE: At any time during the camera operation, pressing the main menu button will ...SD card (sold separately) is loaded in this folder. Aim camera at destination. 2. Press the forward or back arrow to take a photo. Press the OK button to show the Main Menu. 5. Press the main menu button to save changes (field turns yellow). 5. Press the forward or back arrow to start...
...screen.To stop recording, press the record button again. Press the OK button to navigate to change remaining fields. 6. English 4. Repeat above steps to the next screen. 4. BASIC OPERATION NOTE: At any time during the camera operation, pressing the main menu button will ...SD card (sold separately) is loaded in this folder. Aim camera at destination. 2. Press the forward or back arrow to take a photo. Press the OK button to show the Main Menu. 5. Press the main menu button to save changes (field turns yellow). 5. Press the forward or back arrow to start...
Instruction Manual
Page 15
... view the photo or video. 4. Press the forward or back arrow to select a dated folder. Press the delete button. Press the forward or back arrow to select the Folder option. 5. English 8. Press the forward or back arrow to advance to select a photo or video. 3. ... or back arrow to the next photo or video. 9. 7. Press the OK button to navigate to the next screen. 7. Press the OK button to navigate to the next screen. 6. Press the main menu button to exit. 13 Press the main menu button to show the Main Menu. 2. To Delete Individual Photos or Videos: 1. Select...
... view the photo or video. 4. Press the forward or back arrow to select a dated folder. Press the delete button. Press the forward or back arrow to select the Folder option. 5. English 8. Press the forward or back arrow to advance to select a photo or video. 3. ... or back arrow to the next photo or video. 9. 7. Press the OK button to navigate to the next screen. 7. Press the OK button to navigate to the next screen. 6. Press the main menu button to exit. 13 Press the main menu button to show the Main Menu. 2. To Delete Individual Photos or Videos: 1. Select...
Instruction Manual
Page 16
Press the main menu button to select the Language option. 5. To Change Languages 1. Press the forward or back arrow to show the Main Menu. 2. Press the OK button to navigate to delete the individual photo or video. 3. Select YES to the next screen. 6. Press the forward or back arrow to view. 3. Press the ...
Press the main menu button to select the Language option. 5. To Change Languages 1. Press the forward or back arrow to show the Main Menu. 2. Press the OK button to navigate to delete the individual photo or video. 3. Select YES to the next screen. 6. Press the forward or back arrow to view. 3. Press the ...
Instruction Manual
Page 17
... Stamp 1. Press the forward or back arrow to exit. 15 Press the OK button to change the activated field. 7. Press the forward or back arrow to highlight a field to activate the field (field turns green). 6. Press the OK button to exit. Press the main menu button to save changes. 6. Press the forward or back arrow to...
... Stamp 1. Press the forward or back arrow to exit. 15 Press the OK button to change the activated field. 7. Press the forward or back arrow to highlight a field to activate the field (field turns green). 6. Press the OK button to exit. Press the main menu button to save changes. 6. Press the forward or back arrow to...
Instruction Manual
Page 18
...* lithium ion battery. • Ensure the DEWALT battery is fully charged before operation. 16 To Format Micro SD Card NOTICE: Formatting the micro SD card will erase current settings and restore factory settings. 1. Press the main menu button to select the Default Setup option. Press the OK button to the next screen. 4. If the low battery indicator light on the screen is flashing, the battery needs to...
...* lithium ion battery. • Ensure the DEWALT battery is fully charged before operation. 16 To Format Micro SD Card NOTICE: Formatting the micro SD card will erase current settings and restore factory settings. 1. Press the main menu button to select the Default Setup option. Press the OK button to the next screen. 4. If the low battery indicator light on the screen is flashing, the battery needs to...
Instruction Manual
Page 19
... this tool could be removed from the exterior of the handle set . To reduce the risk of injury, only DEWALT recommended accessories should be used in locating any part of the tool into the reset button located on the back of the screen. • If the picture is dim, roll the brightness control switch to the handle set properly. • Make sure the handle set is turned...
... this tool could be removed from the exterior of the handle set . To reduce the risk of injury, only DEWALT recommended accessories should be used in locating any part of the tool into the reset button located on the back of the screen. • If the picture is dim, roll the brightness control switch to the handle set properly. • Make sure the handle set is turned...
Instruction Manual
Page 20
... you specific legal rights and you can return it within 90 days from the date of purchase. FREE WARNING LABEL REPLACEMENT: If your warning labels become illegible or are not completely satisfied with the performance of your DEWALT Power Tool, Laser, or Nailer for a full refund - Three Year Limited Warranty DEWALT will maintain the tool and replace worn parts caused by normal use identical replacement parts.
... you specific legal rights and you can return it within 90 days from the date of purchase. FREE WARNING LABEL REPLACEMENT: If your warning labels become illegible or are not completely satisfied with the performance of your DEWALT Power Tool, Laser, or Nailer for a full refund - Three Year Limited Warranty DEWALT will maintain the tool and replace worn parts caused by normal use identical replacement parts.
Instruction Manual
Page 64
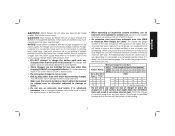
.... Lea el manual de instrucciones para obtener información más precisa. * Maximum initial battery voltage (measured without a workload) is 12 volts. and the array of the tool. Actual charge time may vary. El voltaje nominal es de 10,8. the kit box configuration; El tiempo de duración de carga es aproximado; DEWALT Battery and Charger Systems Battery Output Chargers/Charge Time...
.... Lea el manual de instrucciones para obtener información más precisa. * Maximum initial battery voltage (measured without a workload) is 12 volts. and the array of the tool. Actual charge time may vary. El voltaje nominal es de 10,8. the kit box configuration; El tiempo de duración de carga es aproximado; DEWALT Battery and Charger Systems Battery Output Chargers/Charge Time...


