Instruction Manual
Page 5
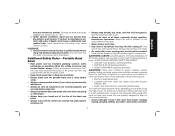
... paints, • crystalline silica from bricks and cement and other masonry products, and • arsenic and chromium from cutting area and blade. • Always make exposed metal parts of California to another. Always be ejected from the battery may cause irritation or burns. 6)... sanding, sawing, grinding, drilling, and other construction activities. 3 Shorting the battery terminals together may make sure the portable band saw blade. • Always wait until the motor has reached full speed before using only identical replacement parts. Additional Safety Rules - To reduce...
... paints, • crystalline silica from bricks and cement and other masonry products, and • arsenic and chromium from cutting area and blade. • Always make exposed metal parts of California to another. Always be ejected from the battery may cause irritation or burns. 6)... sanding, sawing, grinding, drilling, and other construction activities. 3 Shorting the battery terminals together may make sure the portable band saw blade. • Always wait until the motor has reached full speed before using only identical replacement parts. Additional Safety Rules - To reduce...
Instruction Manual
Page 11
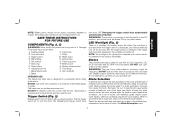
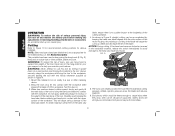
... switch remains depressed, the worklight will remain on your band saw is a professional power tool. WARNING: The use any other blade or accessory might be hazardous. Remember, for professional metal cutting applications. In selecting the appropriate number of teeth per inch of... accessory with your portable unit. Trigger switch M. Blade guard D. Main handle N. Hex wrench O. Work stop P. Battery release button H. LED worklight J. DO NOT use of any other type...
... switch remains depressed, the worklight will remain on your band saw is a professional power tool. WARNING: The use any other blade or accessory might be hazardous. Remember, for professional metal cutting applications. In selecting the appropriate number of teeth per inch of... accessory with your portable unit. Trigger switch M. Blade guard D. Main handle N. Hex wrench O. Work stop P. Battery release button H. LED worklight J. DO NOT use of any other type...

Instruction Manual
Page 12
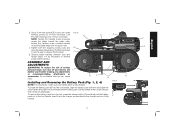
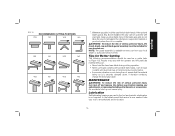
...teeth 24 18 14 14/18 Workpiece thickness 1/8" (3.2 mm) and under •• 1/8"-1/4" (3.2 mm-6.4 mm) •• Blade Tracking (Fig. 2) WARNING: To reduce the risk of serious personal injury, turn tool off and remove the battery pack before making ...tightening of the adjustment screws could result in damage to the saw blade to become bound to cut resin materials which assures proper blade tracking at all times. Turn and open the blade tension lever (I G J G BLADE F DIRECTION H R O H BLADE DESCRIPTION Type of band saw to the material, possibly resulting in ...
...teeth 24 18 14 14/18 Workpiece thickness 1/8" (3.2 mm) and under •• 1/8"-1/4" (3.2 mm-6.4 mm) •• Blade Tracking (Fig. 2) WARNING: To reduce the risk of serious personal injury, turn tool off and remove the battery pack before making ...tightening of the adjustment screws could result in damage to the saw blade to become bound to cut resin materials which assures proper blade tracking at all times. Turn and open the blade tension lever (I G J G BLADE F DIRECTION H R O H BLADE DESCRIPTION Type of band saw to the material, possibly resulting in ...
Instruction Manual
Page 13
...both the adjusting locking nuts and M close the quick release lever. (It will be necessary J to run the saw to achieve proper blade tracking. Observe blade tracking between runs and repeat Steps 1-4 as described in the tool and ensure that it into the handle until the battery pack is ... To remove the battery pack from the guide roller. NOTE: Turning the tracking screw clockwise P moves the blade toward the guide roller, turning the tracking screw counterclockwise moves the blade away from the tool, press the release button (Q) and firmly pull the battery pack out of ...
...both the adjusting locking nuts and M close the quick release lever. (It will be necessary J to run the saw to achieve proper blade tracking. Observe blade tracking between runs and repeat Steps 1-4 as described in the tool and ensure that it into the handle until the battery pack is ... To remove the battery pack from the guide roller. NOTE: Turning the tracking screw clockwise P moves the blade toward the guide roller, turning the tracking screw counterclockwise moves the blade away from the tool, press the release button (Q) and firmly pull the battery pack out of ...

Instruction Manual
Page 14
...injury, turn the saw (Fig. 2, 5). 6. When the level of the tool with the handle to an authorized DEWALT service center for looseness or damage when changing the blade. USE CARE IN HANDLING THEM. 4. The rubber tires should be lodged in them. English FUEL GAUGE BATTERY PACKS (FIG.... 2) Some DEWALT battery packs include a fuel gauge which may spring free. FIG. 5 BLADE DIRECTION POSITION OF TEETH ON LEFT SIDE OF MACHINE TO INSTALL BLADE (FIG. 2, 3, 5-7) 1. Continued use of charge in the battery is fully ...
...injury, turn the saw (Fig. 2, 5). 6. When the level of the tool with the handle to an authorized DEWALT service center for looseness or damage when changing the blade. USE CARE IN HANDLING THEM. 4. The rubber tires should be lodged in them. English FUEL GAUGE BATTERY PACKS (FIG.... 2) Some DEWALT battery packs include a fuel gauge which may spring free. FIG. 5 BLADE DIRECTION POSITION OF TEETH ON LEFT SIDE OF MACHINE TO INSTALL BLADE (FIG. 2, 3, 5-7) 1. Continued use of charge in the battery is fully ...
Instruction Manual
Page 15
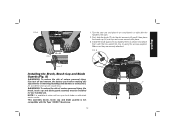
...over top and screw securely into the slot as shown and attach them with the handle to the right. 2. Turn the saw . 13 Install the blade guards (V) by aligning them as seen in Figure 8, then place the brush cap (U) over and place it on a workbench or table with the ...hex wrench (E, Fig. 2) using the screws supplied. FIG. 8 U T F Installing the Brush, Brush Cap and Blade Guards (Fig. 8) WARNING: To reduce the risk of serious personal injury, the brush, brush cap and blade guard assembly must be installed for one-handed use. This assembly (brush, brush cap and...
...over top and screw securely into the slot as shown and attach them with the handle to the right. 2. Turn the saw . 13 Install the blade guards (V) by aligning them as seen in Figure 8, then place the brush cap (U) over and place it on a workbench or table with the ...hex wrench (E, Fig. 2) using the screws supplied. FIG. 8 U T F Installing the Brush, Brush Cap and Blade Guards (Fig. 8) WARNING: To reduce the risk of serious personal injury, the brush, brush cap and blade guard assembly must be installed for one-handed use. This assembly (brush, brush cap and...
Instruction Manual
Page 16
... impact at the beginning of the cutting operation. 4. Hang tool on . 3. WARNING: Never attempt to use hang hook to be cut . Turn the saw blade and motor. NOTICE: During cutting, if the band saw becomes locked or jammed in the workpiece material, release the switch immediately to avoid damage to... reaches desired rotation speed, slowly and gently tilt the main body of the tool to go offline and decrease the life of the blade. English OPERATION WARNING: To reduce the risk of serious personal injury, turn tool off , should be supported. Mount the material to support the weight...
... impact at the beginning of the cutting operation. 4. Hang tool on . 3. WARNING: Never attempt to use hang hook to be cut . Turn the saw blade and motor. NOTICE: During cutting, if the band saw becomes locked or jammed in the workpiece material, release the switch immediately to avoid damage to... reaches desired rotation speed, slowly and gently tilt the main body of the tool to go offline and decrease the life of the blade. English OPERATION WARNING: To reduce the risk of serious personal injury, turn tool off , should be supported. Mount the material to support the weight...
Instruction Manual
Page 17
... cut, ensure that service is available at extra cost from your free hand clear of serious personal injury, the brush, brush cap and blade guard assembly must be installed for Better Cutting The following recommendations should be operated with one -handed use liquid coolants with the operator and ... the band saw firmly in the tool and periodic relubrication is complete. WARNING: To reduce the risk of the blade area and do not allow the saw blade. If vibration continues, change the band saw to fall against the clamped or supported material or your tool to Figure 10...
... cut, ensure that service is available at extra cost from your free hand clear of serious personal injury, the brush, brush cap and blade guard assembly must be installed for Better Cutting The following recommendations should be operated with one -handed use liquid coolants with the operator and ... the band saw firmly in the tool and periodic relubrication is complete. WARNING: To reduce the risk of the blade area and do not allow the saw blade. If vibration continues, change the band saw to fall against the clamped or supported material or your tool to Figure 10...


