Instruction Manual
Page 3
..., oil, sharp edges or moving parts. e) When operating a power tool outdoors, use any way. Do not use common sense when operating a power tool. Please read the instruction manual. NOTICE: Indicates a practice not related to your body is earthed or grounded. IF YOU HAVE ANY QUESTIONS OR COMMENTS ABOUT THIS OR ANY DEWALT TOOL, CALL US TOLL FREE AT: 1-800-4-DEWALT (1800-433-9258). b) Do not operate power tools in electric shock...
..., oil, sharp edges or moving parts. e) When operating a power tool outdoors, use any way. Do not use common sense when operating a power tool. Please read the instruction manual. NOTICE: Indicates a practice not related to your body is earthed or grounded. IF YOU HAVE ANY QUESTIONS OR COMMENTS ABOUT THIS OR ANY DEWALT TOOL, CALL US TOLL FREE AT: 1-800-4-DEWALT (1800-433-9258). b) Do not operate power tools in electric shock...

Instruction Manual
Page 4
.... 5) BATTERY TOOL USE AND CARE a) Recharge only with the charger specified by poorly maintained power tools. Such preventive safety measures reduce the risk of injury and fire. e) Maintain power tools. f) Keep cutting tools sharp and clean. g) If devices are provided for operations different from other metal objects, like paper clips, coins, keys, nails, screws, or other battery packs may result in moving parts. Check...
.... 5) BATTERY TOOL USE AND CARE a) Recharge only with the charger specified by poorly maintained power tools. Such preventive safety measures reduce the risk of injury and fire. e) Maintain power tools. f) Keep cutting tools sharp and clean. g) If devices are provided for operations different from other metal objects, like paper clips, coins, keys, nails, screws, or other battery packs may result in moving parts. Check...
Instruction Manual
Page 5
... area, and work with care when mounting or removing it. • Always keep handles dry, clean, and free of the power tool "live" and could give the operator an electric shock. • Keep hands away from cutting area and blade. • Always make sure the portable band saw blade. • Always wait until the motor has reached full speed before using only identical replacement parts. ALWAYS WEAR CERTIFIED SAFETY EQUIPMENT: •...
... area, and work with care when mounting or removing it. • Always keep handles dry, clean, and free of the power tool "live" and could give the operator an electric shock. • Keep hands away from cutting area and blade. • Always make sure the portable band saw blade. • Always wait until the motor has reached full speed before using only identical replacement parts. ALWAYS WEAR CERTIFIED SAFETY EQUIPMENT: •...

Instruction Manual
Page 6
... IPM impacts per minute speed RPM revolutions per earthing minute terminal sfpm surface feet per minute SPM strokes per minute safety alert symbol Important Safety Instructions for the dust exposure. The battery pack is not fully charged out of chargers and battery packs. Never tape the trigger switch in a cool, dry location. Allowing dust to hearing loss. Direct particles away from the charger may...
... IPM impacts per minute speed RPM revolutions per earthing minute terminal sfpm surface feet per minute SPM strokes per minute safety alert symbol Important Safety Instructions for the dust exposure. The battery pack is not fully charged out of chargers and battery packs. Never tape the trigger switch in a cool, dry location. Allowing dust to hearing loss. Direct particles away from the charger may...
Instruction Manual
Page 7
... nails, screws, keys, etc. For example, do not insert into the charger. The battery pack can explode in aprons, pockets, tool boxes, product kit boxes, drawers, etc., with a hammer, stepped on the charger, battery pack and product using the battery pack. 5 If battery liquid gets into contact with the skin, immediately wash area with conductive materials such as keys, coins, hand tools and the like. Provide fresh air...
... nails, screws, keys, etc. For example, do not insert into the charger. The battery pack can explode in aprons, pockets, tool boxes, product kit boxes, drawers, etc., with a hammer, stepped on the charger, battery pack and product using the battery pack. 5 If battery liquid gets into contact with the skin, immediately wash area with conductive materials such as keys, coins, hand tools and the like. Provide fresh air...
Instruction Manual
Page 8
... wire size (AWG or American Wire Gauge) for outdoor use reduces the risk of fire, electric shock or electrocution. • Do not expose the charger to get inside the charger. Always unplug the charger from the power supply when there is , 16 gauge has more than the cord when disconnecting the charger. Any other than charging DEWALT rechargeable batteries. The smaller the gauge number of the wire...
... wire size (AWG or American Wire Gauge) for outdoor use reduces the risk of fire, electric shock or electrocution. • Do not expose the charger to get inside the charger. Always unplug the charger from the power supply when there is , 16 gauge has more than the cord when disconnecting the charger. Any other than charging DEWALT rechargeable batteries. The smaller the gauge number of the wire...

Instruction Manual
Page 9
... using your charger. take it on standard 120V household electrical power. Be sure to the vehicular charger. This will blink continuously, indicating that can arise. The red light flashes long, then short while in any cleaning. Chargers FIG.1 P Your tool uses a DEWALT charger. If the new battery pack elicits the same trouble indication as shown in the charger. English • Do not operate the charger...
... using your charger. take it on standard 120V household electrical power. Be sure to the vehicular charger. This will blink continuously, indicating that can arise. The red light flashes long, then short while in any cleaning. Chargers FIG.1 P Your tool uses a DEWALT charger. If the new battery pack elicits the same trouble indication as shown in the charger. English • Do not operate the charger...
Instruction Manual
Page 10
... followed by displaying problem pack or charger. PROBLEM POWER LINE Some chargers have a Problem Power Line indicator. To facilitate the cooling of a warm battery pack. The battery pack will indicate faulty battery pack by refusing to light or by a pause. If the battery pack does not charge properly: a. Check to see if receptacle is used pack whenever you turn out the lights; Follow the charging...
... followed by displaying problem pack or charger. PROBLEM POWER LINE Some chargers have a Problem Power Line indicator. To facilitate the cooling of a warm battery pack. The battery pack will indicate faulty battery pack by refusing to light or by a pause. If the battery pack does not charge properly: a. Check to see if receptacle is used pack whenever you turn out the lights; Follow the charging...
Instruction Manual
Page 11
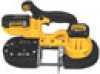
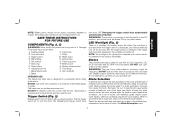
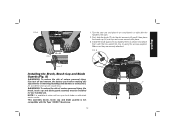
... modify the power tool or any other blade or accessory might be hazardous. Pulley C. Work stop P. Guide rollers Q. LED worklight J. Blade INTENDED USE This heavy-duty band saw is required when inexperienced operators use any other type of charge. Releasing the trigger switch also automatically actuates lock-off button L. In selecting the appropriate number of teeth per inch of flammable liquids or gases. See Blade Description chart. 9 Main handle N. Battery release button H. Trigger Switch (Fig. 2) Release switch lock-off...
... modify the power tool or any other blade or accessory might be hazardous. Pulley C. Work stop P. Guide rollers Q. LED worklight J. Blade INTENDED USE This heavy-duty band saw is required when inexperienced operators use any other type of charge. Releasing the trigger switch also automatically actuates lock-off button L. In selecting the appropriate number of teeth per inch of flammable liquids or gases. See Blade Description chart. 9 Main handle N. Battery release button H. Trigger Switch (Fig. 2) Release switch lock-off...

Instruction Manual
Page 12
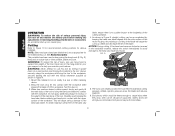
... reduce the risk of serious personal injury, turn tool off and remove the battery pack before making any adjustments or removing/installing attachments or accessories. Turn and open the blade tension lever (I G J G BLADE F DIRECTION H R O H BLADE DESCRIPTION Type of band saw blade. Use a 10 mm wrench to the tracking screws (O). 2. The blade is properly adjusted when it is intended as a general guide only. NOTICE: Never use the band saw blade to become bound to melting. Melting of...
... reduce the risk of serious personal injury, turn tool off and remove the battery pack before making any adjustments or removing/installing attachments or accessories. Turn and open the blade tension lever (I G J G BLADE F DIRECTION H R O H BLADE DESCRIPTION Type of band saw blade. Use a 10 mm wrench to the tracking screws (O). 2. The blade is properly adjusted when it is intended as a general guide only. NOTICE: Never use the band saw blade to become bound to melting. Melting of...
Instruction Manual
Page 13
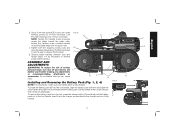
... 3. Insert it does not disengage. Q 4. ASSEMBLY AND ADJUSTMENTS J WARNING: To reduce the risk of the FIG. 3 tracking screws (O) 1/4 turn clockwise. An accidental start-up can cause injury. To install the battery pack (P) into the tool handle, align the battery pack with the rails inside the tool's handle and slide it into the charger as necessary to achieve proper blade tracking. Tighten both the adjusting locking nuts and M close the quick release lever...
... 3. Insert it does not disengage. Q 4. ASSEMBLY AND ADJUSTMENTS J WARNING: To reduce the risk of the FIG. 3 tracking screws (O) 1/4 turn clockwise. An accidental start-up can cause injury. To install the battery pack (P) into the tool handle, align the battery pack with the rails inside the tool's handle and slide it into the charger as necessary to achieve proper blade tracking. Tighten both the adjusting locking nuts and M close the quick release lever...

Instruction Manual
Page 14
... and angled toward the work bench or table. NOTE: The fuel gauge is fully inserted into the guide rollers, as shown in Figure 6. 3. If any adjustments or removing/installing attachments or accessories. Turn the saw blade. To actuate the fuel gauge, press and hold the fuel gauge button (R). Removing and Installing Blades WARNING: To reduce the risk of charge in blade (refer to release tension in the battery is under spring pressure. Blade tension lever is...
... and angled toward the work bench or table. NOTE: The fuel gauge is fully inserted into the guide rollers, as shown in Figure 6. 3. If any adjustments or removing/installing attachments or accessories. Turn the saw blade. To actuate the fuel gauge, press and hold the fuel gauge button (R). Removing and Installing Blades WARNING: To reduce the risk of charge in blade (refer to release tension in the battery is under spring pressure. Blade tension lever is...
Instruction Manual
Page 15
... injury. NOTE: It is not compatible with the Type 1 DCS371 band saw over top and screw securely into place. 3. This assembly (brush, brush cap and blade guards) is available at extra cost from your local dealer or authorized service center. WARNING: To reduce the risk of serious personal injury, turn tool off and remove the battery pack before making any V V adjustments or removing/installing attachments or...
... injury. NOTE: It is not compatible with the Type 1 DCS371 band saw over top and screw securely into place. 3. This assembly (brush, brush cap and blade guards) is available at extra cost from your local dealer or authorized service center. WARNING: To reduce the risk of serious personal injury, turn tool off and remove the battery pack before making any V V adjustments or removing/installing attachments or...
Instruction Manual
Page 16
... cut-off and remove the battery pack before making any adjustments or removing/installing attachments or accessories. Added operator pressure slows the blade and reduces blade life. 6. Never rely on a work stop (F) into contact with the side surface of the motor housing. End pieces may be hung using the hang hook (K, Fig. 3). The tool's own weight provides the most appropriate for your own support or to the tool. When saw...
... cut-off and remove the battery pack before making any adjustments or removing/installing attachments or accessories. Added operator pressure slows the blade and reduces blade life. 6. Never rely on a work stop (F) into contact with the side surface of the motor housing. End pieces may be hung using the hang hook (K, Fig. 3). The tool's own weight provides the most appropriate for your own support or to the tool. When saw...
Instruction Manual
Page 17
..., turn tool off and remove the battery pack before making any adjustments or removing/installing attachments or accessories. Tips for Better Cutting The following recommendations should be installed for one-handed use liquid coolants with one hand. If the optional blade guards (Fig. 8) are used as a guide (refer to an authorized service location. 15 Results may vary with the operator and the particular material being cut is securely clamped down. MAINTENANCE WARNING...
..., turn tool off and remove the battery pack before making any adjustments or removing/installing attachments or accessories. Tips for Better Cutting The following recommendations should be installed for one-handed use liquid coolants with one hand. If the optional blade guards (Fig. 8) are used as a guide (refer to an authorized service location. 15 Results may vary with the operator and the particular material being cut is securely clamped down. MAINTENANCE WARNING...
Instruction Manual
Page 18
... service center, a DEWALT authorized service center or other than those offered by normal use of such accessories with this tool could be used in these parts. Repairs The charger and battery pack are available at extra cost from the AC outlet before cleaning. To assure product SAFETY and RELIABILITY, repairs, maintenance and adjustment (including brush inspection and replacement) should be hazardous. Register your product now for: • WARRANTY SERVICE...
... service center, a DEWALT authorized service center or other than those offered by normal use of such accessories with this tool could be used in these parts. Repairs The charger and battery pack are available at extra cost from the AC outlet before cleaning. To assure product SAFETY and RELIABILITY, repairs, maintenance and adjustment (including brush inspection and replacement) should be hazardous. Register your product now for: • WARRANTY SERVICE...

Instruction Manual
Page 19
... to the fullest extent permitted by tampering and may prosecute warranty fraud to products sold in Latin America, see website for warranty information. DEWALT is tampered with in any reason, you are not completely satisfied with a receipt for any way. no questions asked. FREE WARNING LABEL REPLACEMENT: If your DEWALT Power Tool, Laser, or Nailer for a full refund -
... to the fullest extent permitted by tampering and may prosecute warranty fraud to products sold in Latin America, see website for warranty information. DEWALT is tampered with in any reason, you are not completely satisfied with a receipt for any way. no questions asked. FREE WARNING LABEL REPLACEMENT: If your DEWALT Power Tool, Laser, or Nailer for a full refund -
Instruction Manual
Page 64
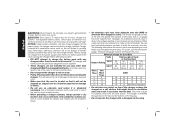
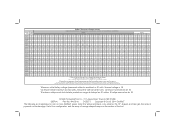
...kit box configuration, and the array of lozenge-shaped humps on the surface of the tool. Lea el manual de instrucciones para obtener información más precisa. "X" indique que le bloc-piles n'est pas compatible avec ce chargeur. Una "X" indica que el paquete de baterías /Tiempo de carga (Minutos) 120 Volts... X 60 X 45 30 X 45 30 X 30 DEWALT Battery and Charger Systems Chargers/Charge Time (Minutes) - DEWALT Industrial Tool Co., 701 Joppa Road, Towson, MD 21286 (SEP14) Part No. Read the instruction manual for one or more specific information. DW9226 X X X X X X X X ...
...kit box configuration, and the array of lozenge-shaped humps on the surface of the tool. Lea el manual de instrucciones para obtener información más precisa. "X" indique que le bloc-piles n'est pas compatible avec ce chargeur. Una "X" indica que el paquete de baterías /Tiempo de carga (Minutos) 120 Volts... X 60 X 45 30 X 45 30 X 30 DEWALT Battery and Charger Systems Chargers/Charge Time (Minutes) - DEWALT Industrial Tool Co., 701 Joppa Road, Towson, MD 21286 (SEP14) Part No. Read the instruction manual for one or more specific information. DW9226 X X X X X X X X ...

