
Instruction Manual
Page 1
... DC619 16 Gauge Cordless Nailer Cloueur sans fil de calibre 16 Clavadora inalámbrica de calibre 16 Questions? See us on the World Wide Web at www.dewalt.com INSTRUCTION MANUAL GUIDE D'UTILISATION MANUAL DE INSTRUCCIONES... INSTRUCTIVO DE OPERACIÓN, CENTROS DE SERVICIO Y PÓLIZA DE GARANTÍA. IF YOU HAVE A SUGGESTION OR COMMENT, GIVE US A CALL. Before returning this product call 1-800-4-DEWALT IF YOU SHOULD EXPERIENCE A PROBLEM WITH YOUR DEWALT PURCHASE, CALL 1-800-4 DEWALT IN MOST CASES, A DEWALT...
... DC619 16 Gauge Cordless Nailer Cloueur sans fil de calibre 16 Clavadora inalámbrica de calibre 16 Questions? See us on the World Wide Web at www.dewalt.com INSTRUCTION MANUAL GUIDE D'UTILISATION MANUAL DE INSTRUCCIONES... INSTRUCTIVO DE OPERACIÓN, CENTROS DE SERVICIO Y PÓLIZA DE GARANTÍA. IF YOU HAVE A SUGGESTION OR COMMENT, GIVE US A CALL. Before returning this product call 1-800-4-DEWALT IF YOU SHOULD EXPERIENCE A PROBLEM WITH YOUR DEWALT PURCHASE, CALL 1-800-4 DEWALT IN MOST CASES, A DEWALT...
Instruction Manual
Page 2
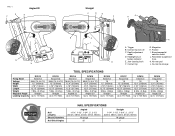
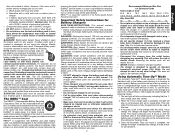
.../sequential wheel selector switch D. FIG. 1 E F Angled 20˚ D Straight C D E F E K I G A J L H B A H J I . Contact trip L. Contact trip lock-off H. Reversible suspension battery indicator hook G E. Headlights/Low J. No-mar tip storage DC612 Firing Mode Selective Voltage Multi (14.4 & 12) Height 12'' (305mm) Width 4.18'' (106mm) Length 12.75'' (324mm) Weight 7.8lbs. (3.57kg) Magazine Angle Straight Loading Capacity Up to 110 Nails TOOL SPECIFICATIONS DC613 Sequential...
.../sequential wheel selector switch D. FIG. 1 E F Angled 20˚ D Straight C D E F E K I G A J L H B A H J I . Contact trip L. Contact trip lock-off H. Reversible suspension battery indicator hook G E. Headlights/Low J. No-mar tip storage DC612 Firing Mode Selective Voltage Multi (14.4 & 12) Height 12'' (305mm) Width 4.18'' (106mm) Length 12.75'' (324mm) Weight 7.8lbs. (3.57kg) Magazine Angle Straight Loading Capacity Up to 110 Nails TOOL SPECIFICATIONS DC613 Sequential...
Instruction Manual
Page 3
... injury. F 1 • When servicing a tool, use tool while tired or under the influence of fire. It is dangerous and must be repaired. • Disconnect battery pack from one tool, may contribute to a loss of the tool, trigger, contact trip lock-off position before making any nailer, all instructions before using any adjustments, changing accessories, or storing the tool. ELECTRICAL SAFETY • Do not abuse the cord. Damaged cords may create a risk...
... injury. F 1 • When servicing a tool, use tool while tired or under the influence of fire. It is dangerous and must be repaired. • Disconnect battery pack from one tool, may contribute to a loss of the tool, trigger, contact trip lock-off position before making any nailer, all instructions before using any adjustments, changing accessories, or storing the tool. ELECTRICAL SAFETY • Do not abuse the cord. Damaged cords may create a risk...
Instruction Manual
Page 4
...; Do not drive nails onto the heads of other types of flammable dust, gases or fumes. Bump Action (Fig. Inaccurate placement of this tool can result in impact to include catalog number and voltage: Extended Run-Time battery packs deliver more run-time than standard battery packs. Do not use common sense when operating a power tool. Avoid inhaling vapors and dust, and wash hands after using. •...
...; Do not drive nails onto the heads of other types of flammable dust, gases or fumes. Bump Action (Fig. Inaccurate placement of this tool can result in impact to include catalog number and voltage: Extended Run-Time battery packs deliver more run-time than standard battery packs. Do not use common sense when operating a power tool. Avoid inhaling vapors and dust, and wash hands after using. •...
Instruction Manual
Page 5
... ventilation slots and result in suitcases and carry-on standard household electrical power (120 Volts). Important Safety Instructions for Battery Chargers SAVE THESE INSTRUCTIONS: This manual contains important safety instructions for at least 8 hours. Electric shock may result. The smaller the gauge number of the wire, the greater the capacity of charger or place the charger on a soft surface that is no longer blink. take it will...
... ventilation slots and result in suitcases and carry-on standard household electrical power (120 Volts). Important Safety Instructions for Battery Chargers SAVE THESE INSTRUCTIONS: This manual contains important safety instructions for at least 8 hours. Electric shock may result. The smaller the gauge number of the wire, the greater the capacity of charger or place the charger on a soft surface that is no longer blink. take it will...
Instruction Manual
Page 6
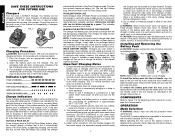
... battery pack to read all instructions before using your charger. If the plastic housing of the charger. The DEWALT cordless nailers are assembled in the charger manual (Fig. 4). Plug the charger into place. If this tool, look at a fast rate. FIG. 3 FIG. 4 M NOTE: Make sure your local service center. 4. Your battery can also detect a weak battery. HOT/COLD PACK DELAY Some chargers have a Problem Power Line indicator. The red light...
... battery pack to read all instructions before using your charger. If the plastic housing of the charger. The DEWALT cordless nailers are assembled in the charger manual (Fig. 4). Plug the charger into place. If this tool, look at a fast rate. FIG. 3 FIG. 4 M NOTE: Make sure your local service center. 4. Your battery can also detect a weak battery. HOT/COLD PACK DELAY Some chargers have a Problem Power Line indicator. The red light...
Instruction Manual
Page 7
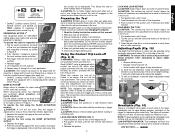
... allow the motor to drive multiple nails in a safe direction when loading nails. Pull trigger (nail will start upon battery insertion, activation of contact trip and pusher assemblies. Release trigger. 5. Repeat steps 2 through 4 for intermittent nailing where very careful and accurate placement is FIG. 9 folded in use . 1. To operate the tool using the depth adjustment wheel (C) on the pusher until the nail follower falls behind the nails. 3. Check for each nail followed by a release of both...
... allow the motor to drive multiple nails in a safe direction when loading nails. Pull trigger (nail will start upon battery insertion, activation of contact trip and pusher assemblies. Release trigger. 5. Repeat steps 2 through 4 for intermittent nailing where very careful and accurate placement is FIG. 9 folded in use . 1. To operate the tool using the depth adjustment wheel (C) on the pusher until the nail follower falls behind the nails. 3. Check for each nail followed by a release of both...
Instruction Manual
Page 8
... lock-off. 2. J TO REMOVE SUSPENSION HOOK 1. Replace battery pack. The use . WHY Prevents jams and premature failure of the tool into scrap lumber before making any adjustments or servicing this tool. never immerse any adjustments, changing accessories, servicing, or moving the tool. CAUTION: Remove nails from the tool. Using a nail or punch, apply pressure to clear: 1. Remove the driver/return assembly (Fig. 15). 6. FIG. 16 FIG. 17 Y RETURN CORD X ASSEMBLY V Available by an authorized DEWALT service center. Remove battery...
... lock-off. 2. J TO REMOVE SUSPENSION HOOK 1. Replace battery pack. The use . WHY Prevents jams and premature failure of the tool into scrap lumber before making any adjustments or servicing this tool. never immerse any adjustments, changing accessories, servicing, or moving the tool. CAUTION: Remove nails from the tool. Using a nail or punch, apply pressure to clear: 1. Remove the driver/return assembly (Fig. 15). 6. FIG. 16 FIG. 17 Y RETURN CORD X ASSEMBLY V Available by an authorized DEWALT service center. Remove battery...

Instruction Manual
Page 9
... new return cord assembly with the performance of purchase. For further detail of the driver/return assembly blade into detents (Fig. 22). 4. then align the pivot holes (W) to housing, insert 3 T25 slotted screws and tighten. Insert the tip of warranty coverage and warranty repair information, visit www.dewalt.com or call the local company or see website for a free replacement. 7 This warranty gives you specific legal rights...
... new return cord assembly with the performance of purchase. For further detail of the driver/return assembly blade into detents (Fig. 22). 4. then align the pivot holes (W) to housing, insert 3 T25 slotted screws and tighten. Insert the tip of warranty coverage and warranty repair information, visit www.dewalt.com or call the local company or see website for a free replacement. 7 This warranty gives you specific legal rights...
Instruction Manual
Page 11
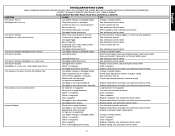
... lock Bent contact trip See authorized service center Tool internal electronics not reset Remove battery, wait 3 seconds and reinsert Damaged internal electronics See authorized service center Tool doesn't actuate Motor stops running after 2 seconds Normal operation; see authorized service center Damaged pusher spring Replace spring; see authorized service center Tool operates, but does not drive the fastener fully Low battery charge or damaged battery Charge or replace battery Depth adjustment set too shallow Rotate depth adjustment wheel to a deeper setting Tool...
... lock Bent contact trip See authorized service center Tool internal electronics not reset Remove battery, wait 3 seconds and reinsert Damaged internal electronics See authorized service center Tool doesn't actuate Motor stops running after 2 seconds Normal operation; see authorized service center Damaged pusher spring Replace spring; see authorized service center Tool operates, but does not drive the fastener fully Low battery charge or damaged battery Charge or replace battery Depth adjustment set too shallow Rotate depth adjustment wheel to a deeper setting Tool...
Instruction Manual
Page 36
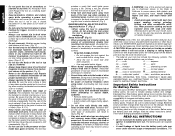
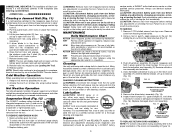
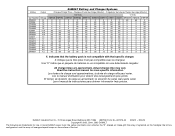
Una "X" indica que el paquete de baterías /Tiempo de carga (Minutos) 120 Volts 12 Volts Cat Number Voltage DW0242 24 DC9096 18 DW9096 18 DW9098 18 DW9099 18 DC9091 14.4 DW9091 14.4 DW9094 14.4 DC9071 12 ...the array of the tool. DEWALT Battery and Charger Systems Battery Output Chargers/Charge Time - Cargadores de baterías no es compatible con ese determinado cargador. All charge times are trademarks for more DEWALT power tools: the yellow and black color scheme; Actual charge time may vary. Lea el manual de instrucciones para obtener información...
Una "X" indica que el paquete de baterías /Tiempo de carga (Minutos) 120 Volts 12 Volts Cat Number Voltage DW0242 24 DC9096 18 DW9096 18 DW9098 18 DW9099 18 DC9091 14.4 DW9091 14.4 DW9094 14.4 DC9071 12 ...the array of the tool. DEWALT Battery and Charger Systems Battery Output Chargers/Charge Time - Cargadores de baterías no es compatible con ese determinado cargador. All charge times are trademarks for more DEWALT power tools: the yellow and black color scheme; Actual charge time may vary. Lea el manual de instrucciones para obtener información...


