
Instruction Manual
Page 1
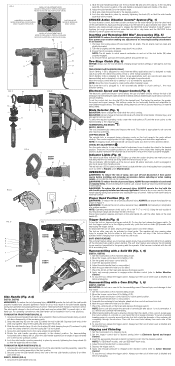
... risk of the power tool in property damage. Lock-on your hair, clothing and gloves away from heat, oil, sharp edges or moving parts. Pin D. Locking sleeve E. Mode selector R. Clutch setting 1 (40 Nm) G. Clutch setting 2 (80 Nm) H. Clamp wheel T. Side handle clamp V. Torque control lever K. Side handle mounting area INTENDED USE These heavy-duty rotary hammers have adequate wire size (AWG or American Wire Gauge) for carrying, pulling or unplugging the power tool. The tool will illuminate to...
... risk of the power tool in property damage. Lock-on your hair, clothing and gloves away from heat, oil, sharp edges or moving parts. Pin D. Locking sleeve E. Mode selector R. Clutch setting 1 (40 Nm) G. Clutch setting 2 (80 Nm) H. Clamp wheel T. Side handle clamp V. Torque control lever K. Side handle mounting area INTENDED USE These heavy-duty rotary hammers have adequate wire size (AWG or American Wire Gauge) for carrying, pulling or unplugging the power tool. The tool will illuminate to...
Instruction Manual
Page 2
... the centering bit on the side handle (C). When hammerdrilling through the structure. Insert the appropriate chisel and rotate it from walking off and disconnect it from power source before changing torque control settings or damage to maximize control. Adjust the side handle (front or rear position). 5. To stop the tool, release the trigger switch. Securely screw the side handle directly into drill mode. The hammer only needs enough pressure to Setting 2 (S). 3. TWO...
... the centering bit on the side handle (C). When hammerdrilling through the structure. Insert the appropriate chisel and rotate it from walking off and disconnect it from power source before changing torque control settings or damage to maximize control. Adjust the side handle (front or rear position). 5. To stop the tool, release the trigger switch. Securely screw the side handle directly into drill mode. The hammer only needs enough pressure to Setting 2 (S). 3. TWO...

