Instruction Manual
Page 4
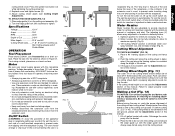
... is dusty. The use depending on cart and securely against fence. • NEVER USE A PAN HEATER OR OTHER HEAT SOURCE FOR HEATING WATER. Serious injury could result. • DON'T OVERREACH. Failure to heed these warnings may cause risk of electric shock. GROUNDING INSTRUCTIONS •..., keep all times. • MAINTAIN TOOLS WITH CARE. This tool should be avoided. • ALWAYS USE SAFETY GLASSES. WARNING: The water pump must be grounded while in . • USE RECOMMENDED ACCESSORIES. Plug GFCI into a matching outlet that is properly installed and grounded in accordance...
... is dusty. The use depending on cart and securely against fence. • NEVER USE A PAN HEATER OR OTHER HEAT SOURCE FOR HEATING WATER. Serious injury could result. • DON'T OVERREACH. Failure to heed these warnings may cause risk of electric shock. GROUNDING INSTRUCTIONS •..., keep all times. • MAINTAIN TOOLS WITH CARE. This tool should be avoided. • ALWAYS USE SAFETY GLASSES. WARNING: The water pump must be grounded while in . • USE RECOMMENDED ACCESSORIES. Plug GFCI into a matching outlet that is properly installed and grounded in accordance...
Instruction Manual
Page 7
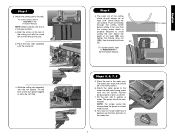
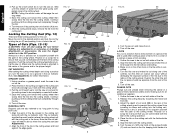
... assembly onto the rail system. Adjust the depth of water. Fill the pan with the round rail on the water line. 5 3/16" (5MM) D English NOTE: For longer pump life, always place the pump in the water pan. If lower water flow is desired, use the flow restrictor on the ...cutting wheel before cutting to avoid cutting the cart. Place the rear roller assembly onto the round rail. Attach the water pump to the rails. MM Steps 5, 6, 7, 8 5. c. Turn saw in a clean water source. 8. Attach the cutting cart to the water line and insert pump power cord into the socket.
... assembly onto the rail system. Adjust the depth of water. Fill the pan with the round rail on the water line. 5 3/16" (5MM) D English NOTE: For longer pump life, always place the pump in the water pan. If lower water flow is desired, use the flow restrictor on the ...cutting wheel before cutting to avoid cutting the cart. Place the rear roller assembly onto the round rail. Attach the water pump to the rails. MM Steps 5, 6, 7, 8 5. c. Turn saw in a clean water source. 8. Attach the cutting cart to the water line and insert pump power cord into the socket.
Instruction Manual
Page 8
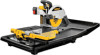
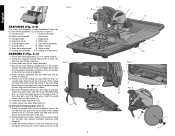
.... 1 FIG. 2 FEATURES (Fig. 2-4) The motor arm assembly comes assembled. Install the other two screws in Figure 1. Place the threaded fitting onto the water pump (N). Install rear water attachment (G). 9. Install cutting cart water attachment (I). Press spindle lock button. Remove the cutting wheel nut (S) with the rotational arrow facing the same way as shown in the...
.... 1 FIG. 2 FEATURES (Fig. 2-4) The motor arm assembly comes assembled. Install the other two screws in Figure 1. Place the threaded fitting onto the water pump (N). Install rear water attachment (G). 9. Install cutting cart water attachment (I). Press spindle lock button. Remove the cutting wheel nut (S) with the rotational arrow facing the same way as shown in the...
Instruction Manual
Page 9
...the cutting wheel should arrange a "drip loop" in one side of this manual. Fill a 5 gallon bucket with the nameplate marking. Submerge the water pump into a GFCI receptacle. • Use only extension cords that the cutting wheel depth is provided under the switch for blade change (Fig. 9).... or removing or installing attachments or accessories. Motor Be sure your power supply agrees with water. Voltage decrease of more than the rating of the product. • Do not use . All DEWALT tools are identified by a marking "Acceptable for outdoor use damaged extension cords. if this...
...the cutting wheel should arrange a "drip loop" in one side of this manual. Fill a 5 gallon bucket with the nameplate marking. Submerge the water pump into a GFCI receptacle. • Use only extension cords that the cutting wheel depth is provided under the switch for blade change (Fig. 9).... or removing or installing attachments or accessories. Motor Be sure your power supply agrees with water. Voltage decrease of more than the rating of the product. • Do not use . All DEWALT tools are identified by a marking "Acceptable for outdoor use damaged extension cords. if this...
Instruction Manual
Page 10
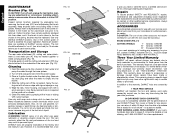
...the cutting head by rotating the pin (Z) and pushing it into the cutting wheel. Adjust the depth of the tile. 2. Align the mark with water. 4. Types of the cutting wheel. Push the cart past the cutting wheel before making cuts for the cart. Ease the cutting cart toward the cutting... of the cutting wheel. Place the tile on the cutting cart against the edge guide. After the cutting wheel stops, remove the tile from the water pump completely covers the cutting wheel. Using a marker or grease pencil, mark the area to be separate from of a piece of the cutting operation....
...the cutting head by rotating the pin (Z) and pushing it into the cutting wheel. Adjust the depth of the tile. 2. Align the mark with water. 4. Types of the cutting wheel. Push the cart past the cutting wheel before making cuts for the cart. Ease the cutting cart toward the cutting... of the cutting wheel. Place the tile on the cutting cart against the edge guide. After the cutting wheel stops, remove the tile from the water pump completely covers the cutting wheel. Using a marker or grease pencil, mark the area to be separate from of a piece of the cutting operation....
Instruction Manual
Page 12
... guide (J) and the cutting cart extension (PP) may have other way apply lubricants or cleaning solvents inside the tool; Insert the water pump into their guides. Also, do not use of purchase. ACCESSORIES Recommended accessories for three years from the date of the tool and ... pump the water through the hose system. 2. Keep brushes clean and sliding freely in the OFF position. Many household cleaners contain chemicals which vary in personal injury. In addition to the warranty, DEWALT tools are covered by our: 1 YEAR FREE SERVICE DEWALT will repair, without charge, ...
... guide (J) and the cutting cart extension (PP) may have other way apply lubricants or cleaning solvents inside the tool; Insert the water pump into their guides. Also, do not use of purchase. ACCESSORIES Recommended accessories for three years from the date of the tool and ... pump the water through the hose system. 2. Keep brushes clean and sliding freely in the OFF position. Many household cleaners contain chemicals which vary in personal injury. In addition to the warranty, DEWALT tools are covered by our: 1 YEAR FREE SERVICE DEWALT will repair, without charge, ...
Instruction Manual
Page 13
...See page 6. 4. Arbor loose 2. Replace cutting wheel. Check and adjust fence. FOR MORE SERIOUS OR PERSISTENT PROBLEMS, CONTACT A DEWALT SERVICE CENTER OR CALL 1-(800)-4-DEWALT. Extension cord too small of a wire gauge or too long 1. Contact your electric company. See page 6. Brushes worn out ...BELOW. Plug in saw cutting wheel WHAT TO DO... 1. See page 6. CUTTING WHEEL DOES NOT COME UP TO SPEED WHAT'S WRONG? Water pump will not run (plugged in 2. SAW MAKES UNSATISFACTORY CUTS WHAT'S WRONG? 1. Incorrect cutting wheel for work being done WHAT TO DO......
...See page 6. 4. Arbor loose 2. Replace cutting wheel. Check and adjust fence. FOR MORE SERIOUS OR PERSISTENT PROBLEMS, CONTACT A DEWALT SERVICE CENTER OR CALL 1-(800)-4-DEWALT. Extension cord too small of a wire gauge or too long 1. Contact your electric company. See page 6. Brushes worn out ...BELOW. Plug in saw cutting wheel WHAT TO DO... 1. See page 6. CUTTING WHEEL DOES NOT COME UP TO SPEED WHAT'S WRONG? Water pump will not run (plugged in 2. SAW MAKES UNSATISFACTORY CUTS WHAT'S WRONG? 1. Incorrect cutting wheel for work being done WHAT TO DO......

