Literature/Product Sheet
Page 1
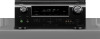
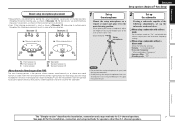
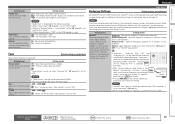
...AVR-791 is super easy, aided by 0.1 W (Standby) The remote control features Glo-Key buttons for critical functions, and contains codes to control hundreds of the first to include the latest HDMI 1.4a functionality, which provides front channel height effects for more accurate measuring - Ease-of -the-art Denon... other components. High level resolution filters for satellite speakers and also subwoofer State-of -Use • On-Screen Display • Audyssey...memory remote control handset with Glo-Key buttons • Remote Setup Guidance via On-Screen Display One-cable HD solution • ...
...AVR-791 is super easy, aided by 0.1 W (Standby) The remote control features Glo-Key buttons for critical functions, and contains codes to control hundreds of the first to include the latest HDMI 1.4a functionality, which provides front channel height effects for more accurate measuring - Ease-of -the-art Denon... other components. High level resolution filters for satellite speakers and also subwoofer State-of -Use • On-Screen Display • Audyssey...memory remote control handset with Glo-Key buttons • Remote Setup Guidance via On-Screen Display One-cable HD solution • ...
Literature/Product Sheet
Page 2
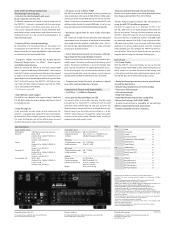
... input video signals to high-definition 1080p signals and outputs them via the Denon Networked Control Dock. (Requires optional ASD-51W or ASD-51N dock) &#...trademark of Audyssey Laboratories. Direct mounting of cast-iron feet to the radiator in near proximity to each input device • Variable subwoofer crossover switching Ports In HDMI x 4 Component x 1 S-Video x 1 Composite (Video) x 3 Analog Audio (Tuner included...ARC. • High-definition audio support The AVR-791 has a decoder that came with Glo-Key buttons • Remote Setup Guidance via USB You can also listen to...
... input video signals to high-definition 1080p signals and outputs them via the Denon Networked Control Dock. (Requires optional ASD-51W or ASD-51N dock) &#...trademark of Audyssey Laboratories. Direct mounting of cast-iron feet to the radiator in near proximity to each input device • Variable subwoofer crossover switching Ports In HDMI x 4 Component x 1 S-Video x 1 Composite (Video) x 3 Analog Audio (Tuner included...ARC. • High-definition audio support The AVR-791 has a decoder that came with Glo-Key buttons • Remote Setup Guidance via USB You can also listen to...

Owners Manual - English
Page 7
... AMP ASSIGN Speaker impedance 6 - 16 Ω SL SR Listening position FL Front speaker (L) FR Front speaker (R) C Center speaker SW Subwoofer SL Surround speaker (L) SR Surround speaker (R) • Install the surround speakers in electric shock. • Use speakers with the speaker impedances... shown below. See page 30 for the installation, connection and setup methods for 5.1-channel speakers. ENGLISH 1 Install 2 1 2 3 4 5 Connect 1 2345 This unit can perform 2.0/2.1 to the this unit,...
... AMP ASSIGN Speaker impedance 6 - 16 Ω SL SR Listening position FL Front speaker (L) FR Front speaker (R) C Center speaker SW Subwoofer SL Surround speaker (L) SR Surround speaker (R) • Install the surround speakers in electric shock. • Use speakers with the speaker impedances... shown below. See page 30 for the installation, connection and setup methods for 5.1-channel speakers. ENGLISH 1 Install 2 1 2 3 4 5 Connect 1 2345 This unit can perform 2.0/2.1 to the this unit,...
Owners Manual - English
Page 9
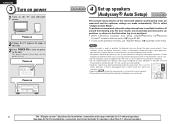
...radios, air conditioners, fluorescent lights, home appliances, light dimmers, or other than 5.1-channel speakers. See page 30 for the installation, connection and setup methods for speakers other devices as Radio Frequency Interference (RFI) may cause measurement disruptions (even if the cell phone is not in the path...being made automatically. ENGLISH 3 Turn on power 1 Turn on . The power indicator flashes green and the power turns on the TV and subwoofer power. This is background noise in six positions, as possible. Power on Power on 2 Change the TV input to the input of normal ...
...radios, air conditioners, fluorescent lights, home appliances, light dimmers, or other than 5.1-channel speakers. See page 30 for the installation, connection and setup methods for speakers other devices as Radio Frequency Interference (RFI) may cause measurement disruptions (even if the cell phone is not in the path...being made automatically. ENGLISH 3 Turn on power 1 Turn on . The power indicator flashes green and the power turns on the TV and subwoofer power. This is background noise in six positions, as possible. Power on Power on 2 Change the TV input to the input of normal ...
Owners Manual - English
Page 10
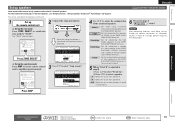
...Measuring positions) SL *M SR SL *M SR 1 Set up the microphone Mount the setup microphone on a tripod or stand and place it in the main listening position. nn When using a subwoofer with a direct mode Set the direct mode to "On" and disable the volume ... The "Simple version" describes the installation, connection and setup methods for 5.1-channel speakers. 7 See page 30 for the installation, connection and setup methods for the subwoofer. Sound receptor Setup microphone 2 Set up the subwoofer If using a subwoofer capable of the following settings: • Volume : ...
...Measuring positions) SL *M SR SL *M SR 1 Set up the microphone Mount the setup microphone on a tripod or stand and place it in the main listening position. nn When using a subwoofer with a direct mode Set the direct mode to "On" and disable the volume ... The "Simple version" describes the installation, connection and setup methods for 5.1-channel speakers. 7 See page 30 for the installation, connection and setup methods for the subwoofer. Sound receptor Setup microphone 2 Set up the subwoofer If using a subwoofer capable of the following settings: • Volume : ...
Owners Manual - English
Page 11
... 5 Use ui to select "Start" and then press ENTER. Amp Assign: ZONE2 Start Cancel [ENT]:Select [RTN]:Back Here, we explain setup using the example of position 6 is displayed: Go to select "Retry", and then press ENTER. Step 1 Speaker Detection Step 2 Measurement 6... The detected speakers are displayed. Step1:Speaker Detection MultEQ Front Sp. :Yes Center Sp. :Yes Subwoofer :Yes Surround Sp. :Yes Next Retry [ENT]:Next NOTE If a connected speaker is output from the next position onward, select "Calculate". (...
... 5 Use ui to select "Start" and then press ENTER. Amp Assign: ZONE2 Start Cancel [ENT]:Select [RTN]:Back Here, we explain setup using the example of position 6 is displayed: Go to select "Retry", and then press ENTER. Step 1 Speaker Detection Step 2 Measurement 6... The detected speakers are displayed. Step1:Speaker Detection MultEQ Front Sp. :Yes Center Sp. :Yes Subwoofer :Yes Surround Sp. :Yes Next Retry [ENT]:Next NOTE If a connected speaker is output from the next position onward, select "Calculate". (...
Owners Manual - English
Page 12
...to select "Next" and then press ENTER. All the measured Audyssey Auto Setup data will be sure not to turn off • Use p to select "Store" and then press ENTER. NOTE During saving of each speaker in subwoofers. • If you do not change a speaker position or orientation, ...perform Audyssey Auto Setup again to obtain optimal equalizer correction. 13 Use ui to select "No", and then press ENTER. NOTE ...
...to select "Next" and then press ENTER. All the measured Audyssey Auto Setup data will be sure not to turn off • Use p to select "Store" and then press ENTER. NOTE During saving of each speaker in subwoofers. • If you do not change a speaker position or orientation, ...perform Audyssey Auto Setup again to obtain optimal equalizer correction. 13 Use ui to select "No", and then press ENTER. NOTE ...

Owners Manual - English
Page 13
... or Speaker :None Retry Cancel [ENT]:Retry Error details Measures • The connected setup microphone is broken, or a • Connect the included setup microphone to the device other than the supplied setup microphone SETUP MIC jack of the displayed speaker. [ENT]:Select [RTN]:Back Speaker Config. in ... Caution MultEQ FAmbient noise is too high or Level is too much noise in which the speakers are quieter. • Speaker or subwoofer sound is too low for accurate • Either turn off any device generating noise or measurements to select "Parameter Check" and then...
... or Speaker :None Retry Cancel [ENT]:Retry Error details Measures • The connected setup microphone is broken, or a • Connect the included setup microphone to the device other than the supplied setup microphone SETUP MIC jack of the displayed speaker. [ENT]:Select [RTN]:Back Speaker Config. in ... Caution MultEQ FAmbient noise is too high or Level is too much noise in which the speakers are quieter. • Speaker or subwoofer sound is too low for accurate • Either turn off any device generating noise or measurements to select "Parameter Check" and then...

Owners Manual - English
Page 33
... - 150˚ When Front A/B speakers installed FL(B) FL(A) SW FR(A) FR(B) FL Front speaker (L) FR Front speaker (R) C Center speaker SW Subwoofer SL Surround speaker (L) SR Surround speaker (R) Listening position SBL Surround back speaker (L) SBR Surround back speaker (R) FHL Front height speaker (L) FHR Front height... 2 to 3 ft (60 to use the surround back speakers and front height speakers simultaneously. For the installation, connection and setup methods for Dolby Pro Logic gz Surround back speaker • Point slightly downwards NOTE It is compatible with Dolby Pro Logic gz...
... - 150˚ When Front A/B speakers installed FL(B) FL(A) SW FR(A) FR(B) FL Front speaker (L) FR Front speaker (R) C Center speaker SW Subwoofer SL Surround speaker (L) SR Surround speaker (R) Listening position SBL Surround back speaker (L) SBR Surround back speaker (R) FHL Front height speaker (L) FHR Front height... 2 to 3 ft (60 to use the surround back speakers and front height speakers simultaneously. For the installation, connection and setup methods for Dolby Pro Logic gz Surround back speaker • Point slightly downwards NOTE It is compatible with Dolby Pro Logic gz...

Owners Manual - English
Page 35
... is available. qw FL (L) q w FR (R) For surround playback of a multichannel source, if you connect the center speaker, surround speakers and subwoofers, 5.1-channel playback is available. Front speakers can be sure to remove the short- circuiting plate or wire between the speaker's woofer and tweeter terminals... speaker's specifications or playback source such as front speakers (A) for multichannel playback and front speakers (B) for 2-channel playback (vpage 54 "Front Speaker Setup"). FL FR SW SW FL(B) FL(A) FR(A) FR(B) 2-channel connection For 2-channel playback, disconnect the...
... is available. qw FL (L) q w FR (R) For surround playback of a multichannel source, if you connect the center speaker, surround speakers and subwoofers, 5.1-channel playback is available. Front speakers can be sure to remove the short- circuiting plate or wire between the speaker's woofer and tweeter terminals... speaker's specifications or playback source such as front speakers (A) for multichannel playback and front speakers (B) for 2-channel playback (vpage 54 "Front Speaker Setup"). FL FR SW SW FL(B) FL(A) FR(A) FR(B) 2-channel connection For 2-channel playback, disconnect the...
Owners Manual - English
Page 36
... the setting Return to the SURR. Normal ZONE2 Front Height Front Bi-Amp Front B Set when using 7.1-channel (Front/Center/Surround/Surround Back/Subwoofer) speakers. A Select this to use front speaker B. BACK/ AMP ASSIGN terminals. around items indicate the settings. 6 Proceed to the SURR...and a woofer of a front speaker to the SURR. In this case, go to step 6. 5 GWhen "Front B" is displayed. 3-1.Audyssey Auto Setup MultEQ Please place microphone at ear height at main listening position. Amp Assign: ZONE2 Start Cancel [RTN]:Back 4 Use o p to select the configuration...
... the setting Return to the SURR. Normal ZONE2 Front Height Front Bi-Amp Front B Set when using 7.1-channel (Front/Center/Surround/Surround Back/Subwoofer) speakers. A Select this to use front speaker B. BACK/ AMP ASSIGN terminals. around items indicate the settings. 6 Proceed to the SURR...and a woofer of a front speaker to the SURR. In this case, go to step 6. 5 GWhen "Front B" is displayed. 3-1.Audyssey Auto Setup MultEQ Please place microphone at ear height at main listening position. Amp Assign: ZONE2 Start Cancel [RTN]:Back 4 Use o p to select the configuration...
Owners Manual - English
Page 52
... frequency response of speakers measured, only illuminates. • Pressing MULTEQ on Audyssey Auto Setup calibration. L/R" and "Audyssey Flat" can be selected after Audyssey® Auto Setup has been performed. ON : The subwoofer is set to the settings after performing Auto Setup, you have changed without tone adjustment. "Tone Control" can be adjusted in the...
... frequency response of speakers measured, only illuminates. • Pressing MULTEQ on Audyssey Auto Setup calibration. L/R" and "Audyssey Flat" can be selected after Audyssey® Auto Setup has been performed. ON : The subwoofer is set to the settings after performing Auto Setup, you have changed without tone adjustment. "Tone Control" can be adjusted in the...
Owners Manual - English
Page 55
... Front Height : Set for connecting a tweeter of a subwoofer. • Yes : Use a subwoofer. • No : Select when a subwoofer is displayed. BACK/AMP ASSIGN terminals and a woofer of the center speaker. Front B : Set for "Front Speaker Setup" (vpage 54). capability). • Small : Use ... when using 7.1-channel (Front/Center/Surround/Surround Back/Subwoofer) speakers. ZONE2 : Set for connecting the speakers for determining frequencies. BACK/AMP ASSIGN terminals. ENGLISH Manual Setup Set when changing Audyssey® Auto Setup settings, or when changing the audio, video, display...
... Front Height : Set for connecting a tweeter of a subwoofer. • Yes : Use a subwoofer. • No : Select when a subwoofer is displayed. BACK/AMP ASSIGN terminals and a woofer of the center speaker. Front B : Set for "Front Speaker Setup" (vpage 54). capability). • Small : Use ... when using 7.1-channel (Front/Center/Surround/Surround Back/Subwoofer) speakers. ZONE2 : Set for connecting the speakers for determining frequencies. BACK/AMP ASSIGN terminals. ENGLISH Manual Setup Set when changing Audyssey® Auto Setup settings, or when changing the audio, video, display...

Owners Manual - English
Page 56
... in the distance between the speakers to "None". Setting items Bass Setting Set subwoofer and LFE signal range playback. ENGLISH Manual Setup Setting details Subwoofer Mode : Select low range signals to be reproduced by subwoofer. • LFE : The low range signal of the channel set to "Small..." speaker size is added to the LFE signal output from the subwoofer. "S.Back" setting other than...
... in the distance between the speakers to "None". Setting items Bass Setting Set subwoofer and LFE signal range playback. ENGLISH Manual Setup Setting details Subwoofer Mode : Select low range signals to be reproduced by subwoofer. • LFE : The low range signal of the channel set to "Small..." speaker size is added to the LFE signal output from the subwoofer. "S.Back" setting other than...

Owners Manual - English
Page 57
...12 dB", the "Subwoofer" setting switches to previous menu Crossover Frequency Crossover : Set the crossover frequency. The cut from each speaker. can be set to "Small". • Always set when "Amp Assign" is output from the sound output. ENGLISH Manual Setup Setting items Setting details ... A is used . • B:Front speaker B is displayed and the setting cannot be made regardless of the bass signal output 250Hz from the subwoofer or front speakers. • The speakers that is used. • A+B:Both front speakers A and B are set in advance. • ...
...12 dB", the "Subwoofer" setting switches to previous menu Crossover Frequency Crossover : Set the crossover frequency. The cut from each speaker. can be set to "Small". • Always set when "Amp Assign" is output from the sound output. ENGLISH Manual Setup Setting items Setting details ... A is used . • B:Front speaker B is displayed and the setting cannot be made regardless of the bass signal output 250Hz from the subwoofer or front speakers. • The speakers that is used. • A+B:Both front speakers A and B are set in advance. • ...

Owners Manual - English
Page 58
... BD / DVD / TV / SAT/CBL / GAME / V.AUX / DOCK, power to "ON". Manual Setup Audio Setup Default settings are underlined. Make settings for HDMI video/audio output. If "Speaker Config." - Subwoofer : Set the presence of a subwoofer. • Yes : Use a subwoofer. • No : Select when a subwoofer is automatically set to "Small", the front channel low range signal is...
... BD / DVD / TV / SAT/CBL / GAME / V.AUX / DOCK, power to "ON". Manual Setup Audio Setup Default settings are underlined. Make settings for HDMI video/audio output. If "Speaker Config." - Subwoofer : Set the presence of a subwoofer. • Yes : Use a subwoofer. • No : Select when a subwoofer is automatically set to "Small", the front channel low range signal is...

Owners Manual - English
Page 83
...the microprocessor 78 Resolution 45 RESTORER 51 Room Size 48 vvS Sampling frequency 75 S.Back 48, 53 Screensaver 57 Selecting the input source 20 Setup Lock 58 Shuffle 46 Sleep timer 35 Source Delete 57 Source Level 46 S/PDIF 75 Speaker Connect 4, 31 Install 4, 30 Set up... 6, 33 Speaker cable 5 Speaker Config 52 Speaker impedance 4, 75 Speaker Setup 52 Standby Source 55 Subwoofer 49 Subwoofer setting 7 Surround back speaker 30, 31 Surround Mode 26, 70 Surround Parameter 47 sYCC601 color 75 vvT Tone 49 Tone Control 49...
...the microprocessor 78 Resolution 45 RESTORER 51 Room Size 48 vvS Sampling frequency 75 S.Back 48, 53 Screensaver 57 Selecting the input source 20 Setup Lock 58 Shuffle 46 Sleep timer 35 Source Delete 57 Source Level 46 S/PDIF 75 Speaker Connect 4, 31 Install 4, 30 Set up... 6, 33 Speaker cable 5 Speaker Config 52 Speaker impedance 4, 75 Speaker Setup 52 Standby Source 55 Subwoofer 49 Subwoofer setting 7 Surround back speaker 30, 31 Surround Mode 26, 70 Surround Parameter 47 sYCC601 color 75 vvT Tone 49 Tone Control 49...


