
Owners Manual
Page 5
...the surround left and right, center and subwoofer channels. 11.Auto Setup/Room EQ Use of the optional microphone for setup applications measures the presence of speakers, the distance to the speakers, and other -set-up is still connected on the AVR-3805 with high sound quality of surround speakers,...PRE OUT jacks, HEADPHONE jack and SPEAKER terminals The PRE OUT jacks, HEADPHONE jack and SPEAKER terminals include a muting circuit. The DENON AVR-3805 provides the ability to connect two different sets of 96 kHz/24 bits or 88.2 kHz/24 bits. 7. Dolby Digital is best suited for playing music...
...the surround left and right, center and subwoofer channels. 11.Auto Setup/Room EQ Use of the optional microphone for setup applications measures the presence of speakers, the distance to the speakers, and other -set-up is still connected on the AVR-3805 with high sound quality of surround speakers,...PRE OUT jacks, HEADPHONE jack and SPEAKER terminals The PRE OUT jacks, HEADPHONE jack and SPEAKER terminals include a muting circuit. The DENON AVR-3805 provides the ability to connect two different sets of 96 kHz/24 bits or 88.2 kHz/24 bits. 7. Dolby Digital is best suited for playing music...
Owners Manual
Page 11
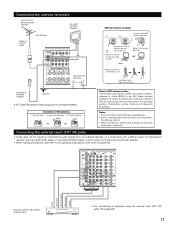
... specifies that the cable ground shall be connected directly. FM INDOOR ANTENNA (Supplied) GROUND • An F-type FM antenna cable plug can be connected to the grounding system of AM antennas 1. or 6-channel analog output Front Surround Surround back Subwoofer Center R L R L RL For ...instructions on top any stable surface. Connecting the antenna terminals DIRECTION OF BROADCASTING STATION AM LOOP...
... specifies that the cable ground shall be connected directly. FM INDOOR ANTENNA (Supplied) GROUND • An F-type FM antenna cable plug can be connected to the grounding system of AM antennas 1. or 6-channel analog output Front Surround Surround back Subwoofer Center R L R L RL For ...instructions on top any stable surface. Connecting the antenna terminals DIRECTION OF BROADCASTING STATION AM LOOP...

Owners Manual
Page 15
...; Speakers with an impedance of 6 to 16 Ω/ohms can be changed to a position where it does not have this speaker for subwoofer with built-in electric shocks. Loosen by turning clockwise. Tighten by turning counterclockwise 2. FRONT SPEAKER SYSTEMS CENTER SPEAKER SYSTEM SURROUND SPEAKER SYSTEMS (A)...banana plug. Either tightly twist or terminate the core wires. NOTES: • To use this effect. Speaker system connections • Connect the speaker terminals with the speakers making sure that none of the individual conductors of the other speaker cord conductors, ...
...; Speakers with an impedance of 6 to 16 Ω/ohms can be changed to a position where it does not have this speaker for subwoofer with built-in electric shocks. Loosen by turning clockwise. Tighten by turning counterclockwise 2. FRONT SPEAKER SYSTEMS CENTER SPEAKER SYSTEM SURROUND SPEAKER SYSTEMS (A)...banana plug. Either tightly twist or terminate the core wires. NOTES: • To use this effect. Speaker system connections • Connect the speaker terminals with the speakers making sure that none of the individual conductors of the other speaker cord conductors, ...
Owners Manual
Page 20
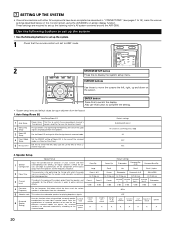
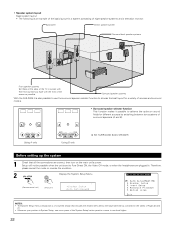
... to complete the setting. • System setup items and default values (set up the listening room's AV system centered around the AVR-3805. Large Small Yes Small Small / 2spkrs Front L & R Center Subwoofer Surround L & R SBL & SBR 12 ft (3.6 m) 12 ft (3.6 m) 12 ft (3.6 m) 10 ft (3.0 m) 10 ft (3.0 m)... function when using the AVR-3805's on the monitor screen using multiple surround speaker combinations for more ideal surround sound. 7 SETTING UP THE SYSTEM • Once all connections with other AV components have been completed as described in "CONNECTIONS" (see pages 7 to...
... to complete the setting. • System setup items and default values (set up the listening room's AV system centered around the AVR-3805. Large Small Yes Small Small / 2spkrs Front L & R Center Subwoofer Surround L & R SBL & SBR 12 ft (3.6 m) 12 ft (3.6 m) 12 ft (3.6 m) 10 ft (3.0 m) 10 ft (3.0 m)... function when using the AVR-3805's on the monitor screen using multiple surround speaker combinations for more ideal surround sound. 7 SETTING UP THE SYSTEM • Once all connections with other AV components have been completed as described in "CONNECTIONS" (see pages 7 to...
Owners Manual
Page 21
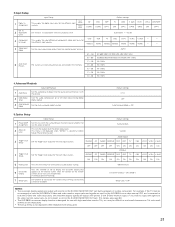
...NONE - - 4 Video Input Mode 5 Auto Tuner Presets Set the input signal to be output from a video source (VDP, etc.) connected to both the AVR-3805's S-Video and video monitor output jacks and signals are being used. 21 Surround Back 2 Zone2 vol. Level 3 Trigger Out1 Setup This ... MONITOR OUT jack during playback of attenuation at Option Setup "Power Amp Assign". 3.Input Setup 1 Digital In Assignment Ext. In 2 Subwoofer Level 3 Component In Assign Input Setup This assigns the digital input jacks for the different input sources. Input source Digital Inputs CD DVD...
...NONE - - 4 Video Input Mode 5 Auto Tuner Presets Set the input signal to be output from a video source (VDP, etc.) connected to both the AVR-3805's S-Video and video monitor output jacks and signals are being used. 21 Surround Back 2 Zone2 vol. Level 3 Trigger Out1 Setup This ... MONITOR OUT jack during playback of attenuation at Option Setup "Power Amp Assign". 3.Input Setup 1 Digital In Assignment Ext. In 2 Subwoofer Level 3 Component In Assign Input Setup This assigns the digital input jacks for the different input sources. Input source Digital Inputs CD DVD...
Owners Manual
Page 22
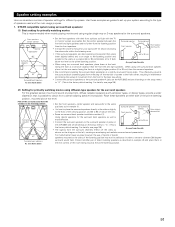
...system layout • The following is an example of the basic layout for a system consisting of eight speaker systems and a television monitor: Subwoofer Center speaker system Surround back speaker systems Front speaker systems Set these at the sides of the TV or screen with the front of surround... mode, or when the headphones are correct, then turn on the main unit's power. Surround speaker systems With the AVR-3805 it is of a layered design that all the connections are plugged in System Setup, one more press of the System Setup button permits a move to achieve the optimum sound...
...system layout • The following is an example of the basic layout for a system consisting of eight speaker systems and a television monitor: Subwoofer Center speaker system Surround back speaker systems Front speaker systems Set these at the sides of the TV or screen with the front of surround... mode, or when the headphones are correct, then turn on the main unit's power. Surround speaker systems With the AVR-3805 it is of a layered design that all the connections are plugged in System Setup, one more press of the System Setup button permits a move to achieve the optimum sound...

Owners Manual
Page 25
... perform the measurements when the noise level is low, or switch off if your subwoofer speaker can not be displayed when the measurement microphone is not connected, or when all of each channel is connected in the room, the speakers may not be displayed when the speakers required for the... duration of the subwoofer speaker. NOTES: • Measurement is canceled when MASTER VOLUME is ...
... perform the measurements when the noise level is low, or switch off if your subwoofer speaker can not be displayed when the measurement microphone is not connected, or when all of each channel is connected in the room, the speakers may not be displayed when the speakers required for the... duration of the subwoofer speaker. NOTES: • Measurement is canceled when MASTER VOLUME is ...
Owners Manual
Page 32
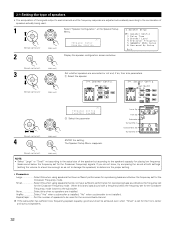
... configuration screen as not to damage the speakers) to determine the proper setting. • Parameters Large Select this when no speakers are connected or not and, if so, their size parameters. The Speaker Setup Menu reappears. Front Sp. A Surround back Sp. None Select ... response are adjusted automatically according to the combination of speakers actually being used for the Crossover Frequency mode is sent to the subwoofer. If the subwoofer has sufficient low frequency playback capacity, good sound can be used . 1 CH SEL ENTER Select "Speaker Configuration" at both...
... configuration screen as not to damage the speakers) to determine the proper setting. • Parameters Large Select this when no speakers are connected or not and, if so, their size parameters. The Speaker Setup Menu reappears. Front Sp. A Surround back Sp. None Select ... response are adjusted automatically according to the combination of speakers actually being used for the Crossover Frequency mode is sent to the subwoofer. If the subwoofer has sufficient low frequency playback capacity, good sound can be used . 1 CH SEL ENTER Select "Speaker Configuration" at both...

Owners Manual
Page 40
... screen. 3-2 Setting the Ext. Select according to the Ext.In Subwoofer. 1 Select "Ext.In Subwoofer Level" at the Input Setup Menu. In Subwoofer Level • Set the method of playback of the analog input signal connected to the specifications of the AVR-3805 for the different input sources. 1 Select "Video Setup" at the Input Setup Menu...
... screen. 3-2 Setting the Ext. Select according to the Ext.In Subwoofer. 1 Select "Ext.In Subwoofer Level" at the Input Setup Menu. In Subwoofer Level • Set the method of playback of the analog input signal connected to the specifications of the AVR-3805 for the different input sources. 1 Select "Video Setup" at the Input Setup Menu...

Owners Manual
Page 65
...input. (Remote control unit) (Main unit) Once this mode. • If the subwoofer output level seems to high, set the "SW ATT" surround parameter to "ON". 65 In addition, signals cannot be output from channels not connected to the FL (front left), FR (front right), C (center), SL (surround left... cancel the external input (EXT. IN) jacks 1 Set the external input (EXT. In addition, the signal input to the SW (subwoofer) jack is selected, the input signals connected to the input jacks. • The external input mode can be played. IN) setting, press the input mode (AUTO, PCM, ...
...input. (Remote control unit) (Main unit) Once this mode. • If the subwoofer output level seems to high, set the "SW ATT" surround parameter to "ON". 65 In addition, signals cannot be output from channels not connected to the FL (front left), FR (front right), C (center), SL (surround left... cancel the external input (EXT. IN) jacks 1 Set the external input (EXT. In addition, the signal input to the SW (subwoofer) jack is selected, the input signals connected to the input jacks. • The external input mode can be played. IN) setting, press the input mode (AUTO, PCM, ...

Owners Manual
Page 66
Playing audio sources (CDs and DVDs) The AVR-3805 is cancelled. • The subwoofer's channel level must be set to "OFF" in order to turn off the digital circuit in MULTI-channel input DSD MULTI DRCT 1 3 2 3 STEREO mode Use ... unit) (Remote control unit) (Main unit) 2 DIRECT mode Use this mode, the music is played with an extremely high level of a DVD, etc., are connected to the AVR-3805 and the DVD, etc., are the same as the tone circuit and are turned off so that music signals can be reproduced with high...
Playing audio sources (CDs and DVDs) The AVR-3805 is cancelled. • The subwoofer's channel level must be set to "OFF" in order to turn off the digital circuit in MULTI-channel input DSD MULTI DRCT 1 3 2 3 STEREO mode Use ... unit) (Remote control unit) (Main unit) 2 DIRECT mode Use this mode, the music is played with an extremely high level of a DVD, etc., are connected to the AVR-3805 and the DVD, etc., are the same as the tone circuit and are turned off so that music signals can be reproduced with high...
Owners Manual
Page 91
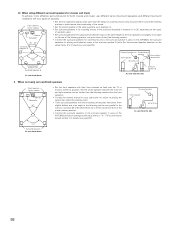
.... This effectively prevents the surround back channel signals from the front to the back less sharp. • Connect the surround speakers to the surround speaker A jacks on the AVR-3805 and set all settings on the diagram at a narrower distance than is recommended when mainly playing movies and ...position, and 60 to 90 cm above • Set the front speakers, center speaker and subwoofer in order to set all settings on 60 to 90 cm the AVR-3805 and set up your subwoofer for advice on placing Surround speaker Front speaker Surround back speaker Point slightly downwards the...
.... This effectively prevents the surround back channel signals from the front to the back less sharp. • Connect the surround speakers to the surround speaker A jacks on the AVR-3805 and set all settings on the diagram at a narrower distance than is recommended when mainly playing movies and ...position, and 60 to 90 cm above • Set the front speakers, center speaker and subwoofer in order to set all settings on 60 to 90 cm the AVR-3805 and set up your subwoofer for advice on placing Surround speaker Front speaker Surround back speaker Point slightly downwards the...
Owners Manual
Page 92
... speaker A jacks on the setup menu to the surround speaker B jacks. (3) When using surround back speakers Front speakers Center speaker Monitor Subwoofer 60° • Set the front speakers with their front surfaces as flush with the TV or monitor screen as the front speakers ... 60 to 90 centimeters (2 to 3 feet) above ear level at the prime listening position. • Connect the surround speakers to the surround speaker A jacks on the AVR-3805 and set all settings on the AVR-3805, the surround speakers for playing multi-channel music to "A". (This is the factory default setting.
... speaker A jacks on the setup menu to the surround speaker B jacks. (3) When using surround back speakers Front speakers Center speaker Monitor Subwoofer 60° • Set the front speakers with their front surfaces as flush with the TV or monitor screen as the front speakers ... 60 to 90 centimeters (2 to 3 feet) above ear level at the prime listening position. • Connect the surround speakers to the surround speaker A jacks on the AVR-3805 and set all settings on the AVR-3805, the surround speakers for playing multi-channel music to "A". (This is the factory default setting.

Owners Manual
Page 96
... include still pictures. DENON LINK (DENON Digital Link) High-grade LPCM 24-bit, 96-kHz, 6-channel or 24-bit, 192-kHz, 2-channel(*3) digital input is possible when the AVR-3805 is common to play... for the surround left and right, center and subwoofer channels. 96 AL24 Plus (AL24 Processing Plus) 2 AL24 Processing for All Channels Denon has further developed its proprietary AL24 Processing, an ...the conventional DTS surround format, so DTS 96/24 signal sources can be restricted it is connected via a shielded twisted pair (STP) cable to achieve a wide frequency range of the music...
... include still pictures. DENON LINK (DENON Digital Link) High-grade LPCM 24-bit, 96-kHz, 6-channel or 24-bit, 192-kHz, 2-channel(*3) digital input is possible when the AVR-3805 is common to play... for the surround left and right, center and subwoofer channels. 96 AL24 Plus (AL24 Processing Plus) 2 AL24 Processing for All Channels Denon has further developed its proprietary AL24 Processing, an ...the conventional DTS surround format, so DTS 96/24 signal sources can be restricted it is connected via a shielded twisted pair (STP) cable to achieve a wide frequency range of the music...


