Auto Setup Room EQ Features
Page 1
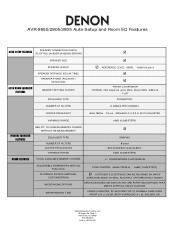
...MINUTES, 30 SECONDS FOR 10 CHANNEL ANALYZING FRONT L/R, C, SL/SR (BOTH SURROUND A + B), SBL/SBR, SW DENON Electronics (USA), LLC 19 Chapin Rd., Bldg. AVR-985S/2805/3805 Auto-Setup and Room EQ Features AUTO SETUP FEATURES SPEAKER CONNECTION CHECK (FL/C/FR/SL [A+B]/SR [A+B]/SBL/SBR/SW)...DELAY TIME) SPEAKER PHASE (POLARITY) DETECTION MEMORY SETTING CURVES EQUALIZER TYPE þ þ þ REFERENCE LEVEL - 65SPL : -10dB Vol point þ þ - Pine Brook, NJ. 07058 973-396-0810 www.usa.denon.com FRONT/NORMAL/FLAT/MANUAL ADJUSTABLE PARAMETERS WITH EQ FUNCTION PLAYBACK SOURCE MATERIAL ...
...MINUTES, 30 SECONDS FOR 10 CHANNEL ANALYZING FRONT L/R, C, SL/SR (BOTH SURROUND A + B), SBL/SBR, SW DENON Electronics (USA), LLC 19 Chapin Rd., Bldg. AVR-985S/2805/3805 Auto-Setup and Room EQ Features AUTO SETUP FEATURES SPEAKER CONNECTION CHECK (FL/C/FR/SL [A+B]/SR [A+B]/SBL/SBR/SW)...DELAY TIME) SPEAKER PHASE (POLARITY) DETECTION MEMORY SETTING CURVES EQUALIZER TYPE þ þ þ REFERENCE LEVEL - 65SPL : -10dB Vol point þ þ - Pine Brook, NJ. 07058 973-396-0810 www.usa.denon.com FRONT/NORMAL/FLAT/MANUAL ADJUSTABLE PARAMETERS WITH EQ FUNCTION PLAYBACK SOURCE MATERIAL ...
Serial Protocol
Page 9
... : CINEMA MODE : GAME MODE : PRO LOGIC ROOM EQ:NORMAL ROOM EQ:FRONT ROOM EQ:FLAT ROOM EQ:MANUAL ROOM EQ:OFF UP DOWN ****** (6 digits) UP DOWN **(PRESET No.) AM FM AUTO MANUAL function ---Invalid at AVR model ---Invalid at FM band ( PL can change DOLBY PL2,PL2x,NEO:6 mode.) ---SB=ON: PL2x mode... change ONLY DOLBY PL2 mode ROOM EQ mode direct change TUNER Frequency UP/DOWN , direct change --- ****.** kHz at AM band (>050000 is AM.) ****.** MHz at AVR model PARAMETER setting TONE DEFEAT ON/OFF SURROUND BACK SP MODE set ---MTRX ON = SURR.EX ON = DSCRT ON (@THX) (@ES DSCRT) CINEMA EQ.
... : CINEMA MODE : GAME MODE : PRO LOGIC ROOM EQ:NORMAL ROOM EQ:FRONT ROOM EQ:FLAT ROOM EQ:MANUAL ROOM EQ:OFF UP DOWN ****** (6 digits) UP DOWN **(PRESET No.) AM FM AUTO MANUAL function ---Invalid at AVR model ---Invalid at FM band ( PL can change DOLBY PL2,PL2x,NEO:6 mode.) ---SB=ON: PL2x mode... change ONLY DOLBY PL2 mode ROOM EQ mode direct change TUNER Frequency UP/DOWN , direct change --- ****.** kHz at AM band (>050000 is AM.) ****.** MHz at AVR model PARAMETER setting TONE DEFEAT ON/OFF SURROUND BACK SP MODE set ---MTRX ON = SURR.EX ON = DSCRT ON (@THX) (@ES DSCRT) CINEMA EQ.

Serial Protocol
Page 12
EVENT TF TP PARAMETER ****** (6 digits) **(PRESET No.) function TUNER Frequency change ---Band set to AM FM ---Band set to FM AUTO ---Tuning mode set to AUTO mode MANUAL ---Tuning mode set to MANUAL mode *RES. : NOT returns '? ' parameters as RESPONSE. example TF105000 (1050.00kHz at FM band TUNER PRESET change to No.** TM AM TUNER BAND , MODE change kHz at AM band ****.** MHz at AM) TPA1 (PRESET No."A1") TMAM TMFM TMAUTO TMMANUAL *RES. ? ? - 12 -
EVENT TF TP PARAMETER ****** (6 digits) **(PRESET No.) function TUNER Frequency change ---Band set to AM FM ---Band set to FM AUTO ---Tuning mode set to AUTO mode MANUAL ---Tuning mode set to MANUAL mode *RES. : NOT returns '? ' parameters as RESPONSE. example TF105000 (1050.00kHz at FM band TUNER PRESET change to No.** TM AM TUNER BAND , MODE change kHz at AM band ****.** MHz at AM) TPA1 (PRESET No."A1") TMAM TMFM TMAUTO TMMANUAL *RES. ? ? - 12 -

Auto Setup Specifications
Page 4
... Parameter "Test Tone" to 'Manual' and "Test Tone Start" to the RMS Volt Meter • Adjust the "microphone amplifier's gain" as the RMS Volt Meter becomes about 120[mV RMS] • Once set, exit out of 'System Setup' and turn off the AVR-3805 4 You do not have to check any of the other... channels. • Adjust the "Main Volume" so that the Sound Pressure Level measures 80 dB(C-weighted) • Once the 'Main Volume" as been set , connect the output of microphone amplifier to 'Yes' •...
... Parameter "Test Tone" to 'Manual' and "Test Tone Start" to the RMS Volt Meter • Adjust the "microphone amplifier's gain" as the RMS Volt Meter becomes about 120[mV RMS] • Once set, exit out of 'System Setup' and turn off the AVR-3805 4 You do not have to check any of the other... channels. • Adjust the "Main Volume" so that the Sound Pressure Level measures 80 dB(C-weighted) • Once the 'Main Volume" as been set , connect the output of microphone amplifier to 'Yes' •...

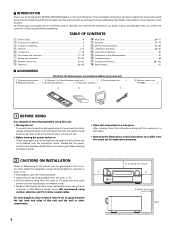
Owners Manual
Page 1
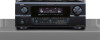
"SERIAL NO. Be sure to offer, read these instructions carefully and use the set properly. PLEASE RECORD UNIT SERIAL NUMBER ATTACHED TO THE REAR OF THE CABINET FOR FUTURE REFERENCE" AV SURROUND RECEIVER AVR-3805 OPERATING INSTRUCTIONS CH SEL ENTER 2 We greatly appreciate your purchase of the AVR-3805. 2 To be sure you take maximum advantage of all the features the AVR-3805 has to keep this manual for future reference, should any questions or problems arise.
"SERIAL NO. Be sure to offer, read these instructions carefully and use the set properly. PLEASE RECORD UNIT SERIAL NUMBER ATTACHED TO THE REAR OF THE CABINET FOR FUTURE REFERENCE" AV SURROUND RECEIVER AVR-3805 OPERATING INSTRUCTIONS CH SEL ENTER 2 We greatly appreciate your purchase of the AVR-3805. 2 To be sure you take maximum advantage of all the features the AVR-3805 has to keep this manual for future reference, should any questions or problems arise.
Owners Manual
Page 4
... in this instructions may differ from this unit as far as providing outstanding high fidelity reproduction of the picture may be generated if this manual before using microprocessors is provided with the warranty in a safe place. • Note that you for explanation purposes. 2 CAUTIONS ON...with home theater sources such as DVD, as well as possible from the tuner or TV. • Set the antenna wires from the tuner or TV away from the actual set for choosing the DENON AVR-3805 Digital A / V Surround Receiver. Operation 62~68 ⁄0 Multi Zone 69~71 ⁄1 Surround ...
... in this instructions may differ from this unit as far as providing outstanding high fidelity reproduction of the picture may be generated if this manual before using microprocessors is provided with the warranty in a safe place. • Note that you for explanation purposes. 2 CAUTIONS ON...with home theater sources such as DVD, as well as possible from the tuner or TV. • Set the antenna wires from the tuner or TV away from the actual set for choosing the DENON AVR-3805 Digital A / V Surround Receiver. Operation 62~68 ⁄0 Multi Zone 69~71 ⁄1 Surround ...
Owners Manual
Page 20
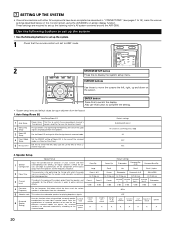
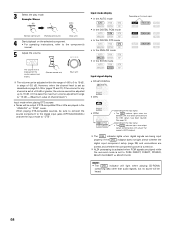
...system and their 1 Speaker Configuration corresponding sizes (SMALL for regular speakers, LARGE for fullsize, full-range) to automatically set to AMP mode. 2 SYSTEM SETUP button Press this function when using the AVR-3805's on-screen display function. A / B Surround Back Sp. CURSOR buttons Use these to move the cursors the... Sp. Auto Setup/Room EQ Auto Setup/Room EQ 1 Auto Setup Power Amp Set this to switch the surround back channel's Assignment power amplifier for use for zone2 or zone3. 2 Manual EQ Setup This parameter is for optimizing the Room EQ with which the bass so...
...system and their 1 Speaker Configuration corresponding sizes (SMALL for regular speakers, LARGE for fullsize, full-range) to automatically set to AMP mode. 2 SYSTEM SETUP button Press this function when using the AVR-3805's on-screen display function. A / B Surround Back Sp. CURSOR buttons Use these to move the cursors the... Sp. Auto Setup/Room EQ Auto Setup/Room EQ 1 Auto Setup Power Amp Set this to switch the surround back channel's Assignment power amplifier for use for zone2 or zone3. 2 Manual EQ Setup This parameter is for optimizing the Room EQ with which the bass so...
Owners Manual
Page 27
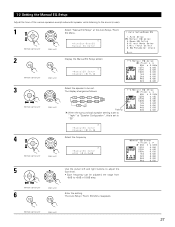
...63Hz : 0.0dB 5 CH SEL ENTER Use the cursor left and right buttons to adjust the Gain level. • Each frequency can be set to "1spkr" at the Auto Setup / Room EQ Menu. *AutoSet/RoomEQ Manual EQ Setup 2 CH SEL ENTER CH SEL ENTER (Remote control unit) (Main unit) Display the... -6dB to +6dB in 0.5dB step. (Remote control unit) 6 CH SEL ENTER (Main unit) CH SEL ENTER Enter the setting. The display changes as follows. 1-2 Setting the Manual EQ Setup Adjust the tone of the various speakers except subwoofer speaker while listening to the sound (music). 1 CH SEL ENTER CH...
...63Hz : 0.0dB 5 CH SEL ENTER Use the cursor left and right buttons to adjust the Gain level. • Each frequency can be set to "1spkr" at the Auto Setup / Room EQ Menu. *AutoSet/RoomEQ Manual EQ Setup 2 CH SEL ENTER CH SEL ENTER (Remote control unit) (Main unit) Display the... -6dB to +6dB in 0.5dB step. (Remote control unit) 6 CH SEL ENTER (Main unit) CH SEL ENTER Enter the setting. The display changes as follows. 1-2 Setting the Manual EQ Setup Adjust the tone of the various speakers except subwoofer speaker while listening to the sound (music). 1 CH SEL ENTER CH...
Owners Manual
Page 28
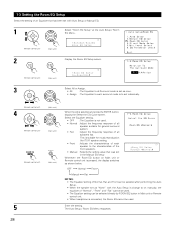
...:The Equalizer to each speaker to the characteristics of the front speakers. • Manual :Selects the setting value that has been set individually. Select the Equalizer setting. • OFF :The Equalizer is to set with the Auto Setup is change to all speakers flat. This is suitable for ...characteristics of "Normal", "Front" and "Flat" cannot be used. • The Equalizer setting can be selected directly by ROOM EQ button in the Manual EQ setup Whenever the Room EQ button on manually, the equalizer of each surround mode is not used . CH SEL ENTER (Remote control ...
...:The Equalizer to each speaker to the characteristics of the front speakers. • Manual :Selects the setting value that has been set individually. Select the Equalizer setting. • OFF :The Equalizer is to set with the Auto Setup is change to all speakers flat. This is suitable for ...characteristics of "Normal", "Front" and "Flat" cannot be used. • The Equalizer setting can be selected directly by ROOM EQ button in the Manual EQ setup Whenever the Room EQ button on manually, the equalizer of each surround mode is not used . CH SEL ENTER (Remote control ...

Owners Manual
Page 35
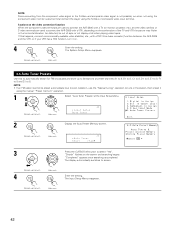
... SB Flashing FL C FR SR SBR SBL SL SW 2spkrs When the surround back speaker setting is set to "1spkr" for "Speaker Configuration", this is selected : TestTone Auto FL : -11.5dB q Select the speaker. When the "Manual" mode is set to "SB". Select "Test Tone Start". *Channel Level Tone Start:Yes Select "Yes". (Remote...
... SB Flashing FL C FR SR SBR SBL SL SW 2spkrs When the surround back speaker setting is set to "1spkr" for "Speaker Configuration", this is selected : TestTone Auto FL : -11.5dB q Select the speaker. When the "Manual" mode is set to "SB". Select "Test Tone Start". *Channel Level Tone Start:Yes Select "Yes". (Remote...
Owners Manual
Page 42
...is completed. "Completed" appears once searching is not possible, so when not using the component video monitor output terminal connect the player using the manual "Preset memory" operation. 1 Select "Auto Tuner Presets"at all when playing video tapes. If this to automatically search for FM broadcasts and ...AVR-3805 and the VTR, or if your VTR has a TBC function, turn it using the S-Video or composite video input terminal. NOTE: • If an FM station cannot be out of the TV and VTR the picture may flicker in the station, then preset it on. 4 CH SEL ENTER Enter the setting...
...is completed. "Completed" appears once searching is not possible, so when not using the component video monitor output terminal connect the player using the manual "Preset memory" operation. 1 Select "Auto Tuner Presets"at all when playing video tapes. If this to automatically search for FM broadcasts and ...AVR-3805 and the VTR, or if your VTR has a TBC function, turn it using the S-Video or composite video input terminal. NOTE: • If an FM station cannot be out of the TV and VTR the picture may flicker in the station, then preset it on. 4 CH SEL ENTER Enter the setting...

Owners Manual
Page 58
...you want to make the punch through setting, then press the ENTER button. 4 Press the mode button for the component you want to punch through, then press the ENTER button. • The punch through mode in the AMP mode, the CD mode's PLAY, STOP, MANUAL SEARCH, AUTO SEARCH, PAUSE and ...DISC SKIP buttons' signals are transmitted successively. For example, when the CD mode is set to the punch through is set and the set returns to the System Call registration screen. (3) Using the system call ...
...you want to make the punch through setting, then press the ENTER button. 4 Press the mode button for the component you want to punch through, then press the ENTER button. • The punch through mode in the AMP mode, the CD mode's PLAY, STOP, MANUAL SEARCH, AUTO SEARCH, PAUSE and ...DISC SKIP buttons' signals are transmitted successively. For example, when the CD mode is set to the punch through is set and the set returns to the System Call registration screen. (3) Using the system call ...
Owners Manual
Page 64
... In the DIGITAL DTS mode • In the ANALOG mode • In the EXT.IN mode The volume level is set the input mode to PURE DIRECT, DIRECT, STEREO, MULTI CH DIRECT or MULTI CH IN. Input signal display • ...DOLBY DIGITAL • DTS • PCM Depending on the input signal. • The DSD indicator lights when the DENON LINK have been connected and the DSD signals have been inputted. (See page 14) Depending on the selected component. •... when PCM signals are played in steps of -80 to 0 to the component's manual. 5 Adjust the volume. 3 Select the play mode.
... In the DIGITAL DTS mode • In the ANALOG mode • In the EXT.IN mode The volume level is set the input mode to PURE DIRECT, DIRECT, STEREO, MULTI CH DIRECT or MULTI CH IN. Input signal display • ...DOLBY DIGITAL • DTS • PCM Depending on the input signal. • The DSD indicator lights when the DENON LINK have been connected and the DSD signals have been inputted. (See page 14) Depending on the selected component. •... when PCM signals are played in steps of -80 to 0 to the component's manual. 5 Adjust the volume. 3 Select the play mode.

Owners Manual
Page 68
...FUNCTION goes around, it turn to the "REC" indicator and the indicator of the selected source light. 3 Set the recording mode. • For operating instructions, refer to the manual of the display. Such information as shown below each time the SPEAKER button is performed, a description of (Remote... control unit) the input selector and the surround parameter settings is made at "Speaker Config" in the REC ...
...FUNCTION goes around, it turn to the "REC" indicator and the indicator of the selected source light. 3 Set the recording mode. • For operating instructions, refer to the manual of the display. Such information as shown below each time the SPEAKER button is performed, a description of (Remote... control unit) the input selector and the surround parameter settings is made at "Speaker Config" in the REC ...

Owners Manual
Page 71
...page 69, 70 about the MULTI ZONE connections. [2] Remote control unit operations during multi-source playback (selecting the input source) This operation is set to TUNER, the preset channel can be selected using the VOLUME + and - level is not possible in the REC OUT mode. 1 Select...the source to be output. • For operating instructions, refer to the manuals of the respective components. • ZONE3 can also be set with a method similar to the above . 5 4 NOTE: • The main zone output can be set with a method similar to the above . 21 FUNCTION ZONE2 SOURCE NOTES:...
...page 69, 70 about the MULTI ZONE connections. [2] Remote control unit operations during multi-source playback (selecting the input source) This operation is set to TUNER, the preset channel can be selected using the VOLUME + and - level is not possible in the REC OUT mode. 1 Select...the source to be output. • For operating instructions, refer to the manuals of the respective components. • ZONE3 can also be set with a method similar to the above . 5 4 NOTE: • The main zone output can be set with a method similar to the above . 21 FUNCTION ZONE2 SOURCE NOTES:...

Owners Manual
Page 73
CH SEL ENTER CH SEL ENTER (Remote control unit) (Main unit) The channel switches in the PL IIx mode, set "Sp.Back" at the Power Amp Assign setting. 1 4~6 3 1 1 Select the Dolby Pro Logic IIx mode. (Remote control unit) (Remote control unit) (Main unit) 2 Play a program source with the mark...button on the remote control unit during playback in the PL IIx mode, set "Surround Back" at the Speaker Configuration setting to the manuals of the sound from each time this button is only displayed when setting the fader control. *Fader Vol. The fader function does not affect the ...
CH SEL ENTER CH SEL ENTER (Remote control unit) (Main unit) The channel switches in the PL IIx mode, set "Sp.Back" at the Power Amp Assign setting. 1 4~6 3 1 1 Select the Dolby Pro Logic IIx mode. (Remote control unit) (Remote control unit) (Main unit) 2 Play a program source with the mark...button on the remote control unit during playback in the PL IIx mode, set "Surround Back" at the Speaker Configuration setting to the manuals of the sound from each time this button is only displayed when setting the fader control. *Fader Vol. The fader function does not affect the ...

Owners Manual
Page 85
... the button is tuned in. (Remote control unit) If tuning does not stop at the desired station, use to the "Manual tuning" operation. 4 2 Manual tuning 1 Set the input function to set to tune in . At open frequencies, the noise is muted and the "TUNED" and (Remote control unit) "STEREO" ...indicators turn off. • When the manual tuning mode is set the auto tuning mode. (Remote control unit) "Auto" appears on the display when a stereo broadcast is tuned in the desired station. 13 ...
... the button is tuned in. (Remote control unit) If tuning does not stop at the desired station, use to the "Manual tuning" operation. 4 2 Manual tuning 1 Set the input function to set to tune in . At open frequencies, the noise is muted and the "TUNED" and (Remote control unit) "STEREO" ...indicators turn off. • When the manual tuning mode is set the auto tuning mode. (Remote control unit) "Auto" appears on the display when a stereo broadcast is tuned in the desired station. 13 ...
Owners Manual
Page 91
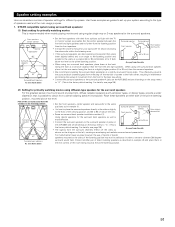
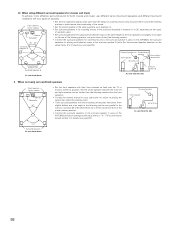
...as well is more effective. • Connect the surround speakers to the surround speaker A jacks on 60 to 90 cm the AVR-3805 and set all settings on the setup menu to obtain from a direct radiating speaker (monopolar). Using dipolar speakers for the surround back speakers as bipolar... wider dispersion than the front speakers. • Consult the owner's manual for different purposes. This effectively prevents the surround back channel signals from reflecting off the walls as As seen from above • Set the front speakers with their front surfaces as flush with the TV or...
...as well is more effective. • Connect the surround speakers to the surround speaker A jacks on 60 to 90 cm the AVR-3805 and set all settings on the setup menu to obtain from a direct radiating speaker (monopolar). Using dipolar speakers for the surround back speakers as bipolar... wider dispersion than the front speakers. • Consult the owner's manual for different purposes. This effectively prevents the surround back channel signals from reflecting off the walls as As seen from above • Set the front speakers with their front surfaces as flush with the TV or...
Owners Manual
Page 92
Front speakers Center speaker Monitor Subwoofer 45° ~ 60° Surround speakers A • Set the front speakers slightly wider apart than the front speakers. • Consult the owner's manual for your subwoofer for advice on placing the subwoofer within the listening room. • If the .... • Connect the surround speakers to the surround speaker A jacks on the AVR-3805 and set all settings on the AVR-3805, the surround speakers for playing multi-channel music to the surround speaker B jacks. Set the surround speaker selection on the setup menu. (For instructions, see page 38.)...
Front speakers Center speaker Monitor Subwoofer 45° ~ 60° Surround speakers A • Set the front speakers slightly wider apart than the front speakers. • Consult the owner's manual for your subwoofer for advice on placing the subwoofer within the listening room. • If the .... • Connect the surround speakers to the surround speaker A jacks on the AVR-3805 and set all settings on the AVR-3805, the surround speakers for playing multi-channel music to the surround speaker B jacks. Set the surround speaker selection on the setup menu. (For instructions, see page 38.)...

Owners Manual
Page 93
...both "bit stream + PCM" and "PCM only" digital outputs. Please refer to the instruction manual of the adapter when making connection. 2 Some DVD digital outputs have the function of home surround... stereo sources into up to 7.1 playback channels, including the surround back channel. Surround The AVR-3805 is equipped with conventional Dolby Pro Logic the surround channel playback frequency band was limited, Dolby...Dolby Digital consists of presence as stereo signals. • Various parameters can be set according to the type of source and the contents, so it is the multi-channel digital ...
...both "bit stream + PCM" and "PCM only" digital outputs. Please refer to the instruction manual of the adapter when making connection. 2 Some DVD digital outputs have the function of home surround... stereo sources into up to 7.1 playback channels, including the surround back channel. Surround The AVR-3805 is equipped with conventional Dolby Pro Logic the surround channel playback frequency band was limited, Dolby...Dolby Digital consists of presence as stereo signals. • Various parameters can be set according to the type of source and the contents, so it is the multi-channel digital ...


