
Owners Manual
Page 8
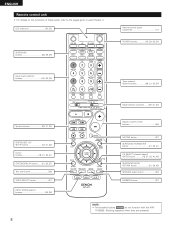
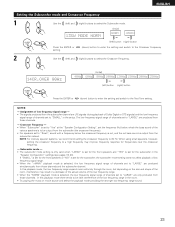
..., 34) Input source selector buttons 30~33, 35) Tuner system/ System buttons 29, 31, 32, 54) System buttons 29, 31, 32) SYSTEM SET UP/ SETUP button 18, 31, 32) Cursor buttons 18, 31, 32, 41) STATUS/DISPLAY button .......(31, 32, 37) Test tone button 39) VIDEO SELECT button 37)... SURROUND BACK/ RETURN button 31, 32, 45) SPEAKER select button 34) DIMMER button 37) NOTE: • The shaded buttons do not function with the AVR- 1705/685. (Nothing happens when they are pressed.) ENGLISH Remote control unit • For details on the functions of these parts, refer to the pages given...
..., 34) Input source selector buttons 30~33, 35) Tuner system/ System buttons 29, 31, 32, 54) System buttons 29, 31, 32) SYSTEM SET UP/ SETUP button 18, 31, 32) Cursor buttons 18, 31, 32, 41) STATUS/DISPLAY button .......(31, 32, 37) Test tone button 39) VIDEO SELECT button 37)... SURROUND BACK/ RETURN button 31, 32, 45) SPEAKER select button 34) DIMMER button 37) NOTE: • The shaded buttons do not function with the AVR- 1705/685. (Nothing happens when they are pressed.) ENGLISH Remote control unit • For details on the functions of these parts, refer to the pages given...
Owners Manual
Page 9
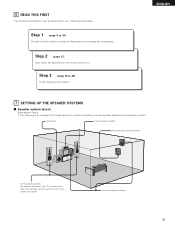
Step 1 (page 9 to 16) Choose the best location to 28) Finally, setting up the system. Step 3 (page 18 to setup the Speakers and connecting the components. ENGLISH 7 SETTING UP THE SPEAKER SYSTEMS 2 Speaker system layout Basic system layout • The following is an example of ... steps. Surround speaker systems 9 Step 2 (page 17) Next, insert the batteries into the remote control unit. 6 READ THIS FIRST This AV Surround Receiver must be setup before use. Following these at the sides of the TV or screen with their front surfaces as flush with the front of the screen as...
Step 1 (page 9 to 16) Choose the best location to 28) Finally, setting up the system. Step 3 (page 18 to setup the Speakers and connecting the components. ENGLISH 7 SETTING UP THE SPEAKER SYSTEMS 2 Speaker system layout Basic system layout • The following is an example of ... steps. Surround speaker systems 9 Step 2 (page 17) Next, insert the batteries into the remote control unit. 6 READ THIS FIRST This AV Surround Receiver must be setup before use. Following these at the sides of the TV or screen with their front surfaces as flush with the front of the screen as...
Owners Manual
Page 18
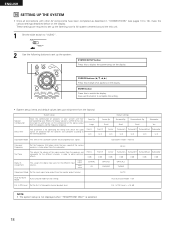
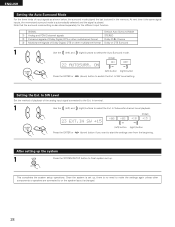
...1 Set the slide switch to "AUDIO". 2 Use the following buttons to set up the system: SYSTEM SETUP button Press this button to complete the setting. • System setup items and default values (set the composition of speakers in your system and their corresponding sizes (SMALL for ... the speakers and subwoofer for full-size, full-range) to automatically set upon shipment from the factory) Speaker Configuration Delay Time System setup Input the combination of the signals output from the monitor output terminal. ENGLISH 10 SETTING UP THE SYSTEM • Once all connections...
...1 Set the slide switch to "AUDIO". 2 Use the following buttons to set up the system: SYSTEM SETUP button Press this button to complete the setting. • System setup items and default values (set the composition of speakers in your system and their corresponding sizes (SMALL for ... the speakers and subwoofer for full-size, full-range) to automatically set upon shipment from the factory) Speaker Configuration Delay Time System setup Input the combination of the signals output from the monitor output terminal. ENGLISH 10 SETTING UP THE SYSTEM • Once all connections...
Owners Manual
Page 19
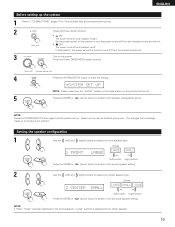
...the settings made up to that all connections are entered. Press the Power ON/STANDBY switch (button). (Main unit) (Remote control unit) 4 Press the SYSTEM SETUP button to enter the setting. *SYSTEM SET UP NOTE: Please make sure the "AUDIO" position of the slide switch on and indicator is off and... indicator is light. NOTE: Press the SYSTEM SETUP button again to this position, the power cannot be selected for the center speaker. 19 In this position to turn the power on the power...
...the settings made up to that all connections are entered. Press the Power ON/STANDBY switch (button). (Main unit) (Remote control unit) 4 Press the SYSTEM SETUP button to enter the setting. *SYSTEM SET UP NOTE: Please make sure the "AUDIO" position of the slide switch on and indicator is off and... indicator is light. NOTE: Press the SYSTEM SETUP button again to this position, the power cannot be selected for the center speaker. 19 In this position to turn the power on the power...
Owners Manual
Page 23
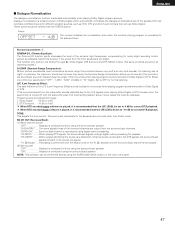
When using small speakers, however, setting the crossover frequency to a high frequency may result in the setup. Assignment of channels set to "SMALL" in a decrease of the actual volume of the low frequency range. • When the "NORM" playback mode is output ...
When using small speakers, however, setting the crossover frequency to a high frequency may result in the setup. Assignment of channels set to "SMALL" in a decrease of the actual volume of the low frequency range. • When the "NORM" playback mode is output ...
Owners Manual
Page 28
Note that the surround mode setting is played. Setting the Ext. This completes the system setup operations. Once the system is set up , there is no need to make the settings again unless other multichannel format Dolby or DTS Surround 1 Use ... SW Level setting. In terminal. 1 Use the (left ) button (right) button (down ) button to switch the Ext. After setting up the system 1 Press the SYSTEM SETUP button to finish system set up . At next time it the same signal inputs, the memorized surround mode is automatically selected and the signal is...
Note that the surround mode setting is played. Setting the Ext. This completes the system setup operations. Once the system is set up , there is no need to make the settings again unless other multichannel format Dolby or DTS Surround 1 Use ... SW Level setting. In terminal. 1 Use the (left ) button (right) button (down ) button to switch the Ext. After setting up the system 1 Press the SYSTEM SETUP button to finish system set up . At next time it the same signal inputs, the memorized surround mode is automatically selected and the signal is...
Owners Manual
Page 31
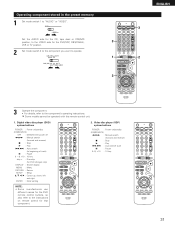
... buttons POWER : Power on /standby (ON/SOURCE) OFF : DENON DVD power off 6,7 : Manual search (forward and reverse) 2 : Stop 1 : Play 8,9 : Auto search (to beginning of track) 3 : Pause 0 ~ 9, +10 : 10 key skip + : Disc skip (for DVD changer only) DISPLAY : Switch display MENU : Menu RETURN : Return SETUP : Setup •, ª, 0, 1 : Cursor up, down, left and right...
... buttons POWER : Power on /standby (ON/SOURCE) OFF : DENON DVD power off 6,7 : Manual search (forward and reverse) 2 : Stop 1 : Play 8,9 : Auto search (to beginning of track) 3 : Pause 0 ~ 9, +10 : 10 key skip + : Disc skip (for DVD changer only) DISPLAY : Switch display MENU : Menu RETURN : Return SETUP : Setup •, ª, 0, 1 : Cursor up, down, left and right...

Owners Manual
Page 36
...'s power is displayed on the input signal. ENGLISH 3 Select the play mode. If the DIGITAL indicator does not light, check whether the digital input component setup (page 26) and connections are being input properly. After starting playback [1] Adjusting the sound quality (tone) 1 The tone switches as described on the tone defeat...
...'s power is displayed on the input signal. ENGLISH 3 Select the play mode. If the DIGITAL indicator does not light, check whether the digital input component setup (page 26) and connections are being input properly. After starting playback [1] Adjusting the sound quality (tone) 1 The tone switches as described on the tone defeat...
Owners Manual
Page 47
... maximum sound level is conducted without using the surround back speaker. "PL IIx Music" ....Processing is performed with the subwoofer peak limit level setting (system setup menu), adjust the level as a discrete 6.1-channel source is conducted using the surround back speaker. "ON Playback is included in the DTS signals, the surround...
... maximum sound level is conducted without using the surround back speaker. "PL IIx Music" ....Processing is performed with the subwoofer peak limit level setting (system setup menu), adjust the level as a discrete 6.1-channel source is conducted using the surround back speaker. "ON Playback is included in the DTS signals, the surround...

Owners Manual
Page 64
... it well to cool it down . When subwoofer effects are short-circuited. • Block the ventilation holes of battery inserted in the system setup "Speaker Configuration" settings. Making these settings will result in the table below. Should the problem persist, there may be weak, while in the system... setup mode try setting the subwoofer mode to "+MAIN", or the front speaker to on. • Power cord not plugged in securely. • Check...
... it well to cool it down . When subwoofer effects are short-circuited. • Block the ventilation holes of battery inserted in the system setup "Speaker Configuration" settings. Making these settings will result in the table below. Should the problem persist, there may be weak, while in the system... setup mode try setting the subwoofer mode to "+MAIN", or the front speaker to on. • Power cord not plugged in securely. • Check...


