Getting Started Guide
Page 5
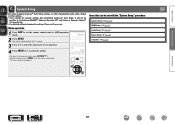
... Read before use 1 Accessories 1 About this manual 1 Cautions on handling 1 Preparing the Setup Wizard 2 Setup Wizard 4 Playback (Basic operation 7 Important information 7 Selecting the input source 7 Adjusting the master volume 8 Turning off the sound temporarily 8 Accessories Check that the following parts are supplied with the product. Contents Read before use Thank you how to remember operations or function limitations. NOTE This symbol indicates points to connect and configure speakers, various...
... Read before use 1 Accessories 1 About this manual 1 Cautions on handling 1 Preparing the Setup Wizard 2 Setup Wizard 4 Playback (Basic operation 7 Important information 7 Selecting the input source 7 Adjusting the master volume 8 Turning off the sound temporarily 8 Accessories Check that the following parts are supplied with the product. Contents Read before use Thank you how to remember operations or function limitations. NOTE This symbol indicates points to connect and configure speakers, various...

Getting Started Guide
Page 8
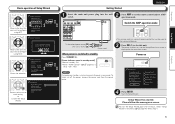
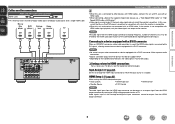
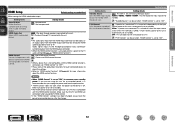
... "Input Assign"). 2 Speaker Connection Connect the speakers for the on the screen. Speaker Connection Please select the speaker configuration to perform connections and settings as described in "2. Use the Setup Wizard to be used. 5.1ch NOTE Connections for your language is the most popular surround system. Select "Others", and then select "Skip" in the instructions on screen menu. NOTE If your room. Configure the settings for your speakers, and for the optimum surround sound for speakers other than 5.1 channel speakers...
... "Input Assign"). 2 Speaker Connection Connect the speakers for the on the screen. Speaker Connection Please select the speaker configuration to perform connections and settings as described in "2. Use the Setup Wizard to be used. 5.1ch NOTE Connections for your language is the most popular surround system. Select "Others", and then select "Skip" in the instructions on screen menu. NOTE If your room. Configure the settings for your speakers, and for the optimum surround sound for speakers other than 5.1 channel speakers...
Getting Started Guide
Page 9
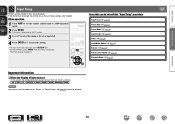
or Cancels the Setup Wizard. Press AMP to set to configure using the on the television screen. Switch the AMP-operation mode To household power outlet (AC 120 V, 60 Hz) Power cord • This remote control is a preset remote control that can restart the setup wizard anytime using o p. 5.1ch is displayed on screen menu. Press [ENTER] to AMPoperation mode. Speaker Calibration 4. Source Setup 5. Setup Wizard has started. Setup Wizard Do you wish to standby Press STANDBY (X). When power is set the remote control unit to...
or Cancels the Setup Wizard. Press AMP to set to configure using the on the television screen. Switch the AMP-operation mode To household power outlet (AC 120 V, 60 Hz) Power cord • This remote control is a preset remote control that can restart the setup wizard anytime using o p. 5.1ch is displayed on screen menu. Press [ENTER] to AMPoperation mode. Speaker Calibration 4. Source Setup 5. Setup Wizard has started. Setup Wizard Do you wish to standby Press STANDBY (X). When power is set the remote control unit to...

Owners Manual
Page 4
... Disc player/DVD player 7 Connecting a set-top box (Satellite tuner/Cable TV 8 Connecting a digital camcorder 8 Connecting a control dock for iPod 9 Connecting an iPod or USB memory device to the USB port 9 Connecting an antenna 10 Settings 11 Set up speakers (Audyssey® Auto Setup 11 Playback (Basic operation 18 Important information 18 Playing a Blu-ray Disc player/DVD player 19 Playing an iPod 20 Tuning in radio stations 25 Playing a USB memory device 27 Selecting a listening mode (Surround mode 29 Selecting a listening mode 29 Advanced version 33 Speaker installation...
... Disc player/DVD player 7 Connecting a set-top box (Satellite tuner/Cable TV 8 Connecting a digital camcorder 8 Connecting a control dock for iPod 9 Connecting an iPod or USB memory device to the USB port 9 Connecting an antenna 10 Settings 11 Set up speakers (Audyssey® Auto Setup 11 Playback (Basic operation 18 Important information 18 Playing a Blu-ray Disc player/DVD player 19 Playing an iPod 20 Tuning in radio stations 25 Playing a USB memory device 27 Selecting a listening mode (Surround mode 29 Selecting a listening mode 29 Advanced version 33 Speaker installation...
Owners Manual
Page 5
... time, be sure to unplug the power cord from a Blu-ray Disc player to see "Graphical User Interface" that uses menu displays and levels. Information 2 Setup wizard, providing easy-to operate properly. Easy to use, Graphical User Interface This unit is equipped with an easy to a TV that supports a 3D system. Supports HDMI 1.4a with 3D, ARC, Deep Color, "x.v.Color", Auto Lip Sync and HDMI control function (vpage 5) This unit can output 3D video signals input...
... time, be sure to unplug the power cord from a Blu-ray Disc player to see "Graphical User Interface" that uses menu displays and levels. Information 2 Setup wizard, providing easy-to operate properly. Easy to use, Graphical User Interface This unit is equipped with an easy to a TV that supports a 3D system. Supports HDMI 1.4a with 3D, ARC, Deep Color, "x.v.Color", Auto Lip Sync and HDMI control function (vpage 5) This unit can output 3D video signals input...
Owners Manual
Page 8
...-ray Disc player/DVD player that provide support for more information. NOTE • The HDMI control function may not work depending on this unit. About 3D function This unit supports input and output of 3D (3 dimensional) video signals of your playback device together with Ethernet". • When the ARC function is replaced by the menu screen. To view the menu screen and status display on the device it is connected to support the copyright protection...
...-ray Disc player/DVD player that provide support for more information. NOTE • The HDMI control function may not work depending on this unit. About 3D function This unit supports input and output of 3D (3 dimensional) video signals of your playback device together with Ethernet". • When the ARC function is replaced by the menu screen. To view the menu screen and status display on the device it is connected to support the copyright protection...
Owners Manual
Page 9
... No sound is used for HDMI video/audio output. • Auto Lip Sync • HDMI Audio Out • Standby Source • P.Off Control • HDMI Control NOTE The audio signal input from the HDMI output connector. HDMI Setup (vpage 62) Make settings for connections Audio and video cable (sold separately) is output when connected to TV. Basic version Advanced version Cables used , the HDMI video signals are converted to DVI signals, allowing connection to HDMI connections Set as an output signal from the HDMI output connector (sampling frequency, number of digital video...
... No sound is used for HDMI video/audio output. • Auto Lip Sync • HDMI Audio Out • Standby Source • P.Off Control • HDMI Control NOTE The audio signal input from the HDMI output connector. HDMI Setup (vpage 62) Make settings for connections Audio and video cable (sold separately) is output when connected to TV. Basic version Advanced version Cables used , the HDMI video signals are converted to DVI signals, allowing connection to HDMI connections Set as an output signal from the HDMI output connector (sampling frequency, number of digital video...

Owners Manual
Page 14
... calculate speaker distance, level, polarity, and the optimum crossover value for your speakers. For best results, we recommend you to six positions). • When performing Audyssey® Auto Setup, Audyssey MultEQ®/ Audyssey Dynamic EQ®/Audyssey Dynamic Volume® functions become active (vpage 54, 55). • To set up speakers (Audyssey® Auto Setup) (vpage 11) Playback (Basic operation) (vpage 18) Selecting a listening mode (Surround mode) (vpage...
... calculate speaker distance, level, polarity, and the optimum crossover value for your speakers. For best results, we recommend you to six positions). • When performing Audyssey® Auto Setup, Audyssey MultEQ®/ Audyssey Dynamic EQ®/Audyssey Dynamic Volume® functions become active (vpage 54, 55). • To set up speakers (Audyssey® Auto Setup) (vpage 11) Playback (Basic operation) (vpage 18) Selecting a listening mode (Surround mode) (vpage...
Owners Manual
Page 45
... the TV audio output setup operation, you can switch the amp power on. • You can adjust this unit volume in the TV volume adjustment operation. • You can switch this unit input sources through function, connect an HDMI connection device that player. • If you switch the input source of the unit to "TV", you can switch audio output devices with a TV operation. When you set "Output audio from the player is ok. 6 When you turn the TV's power to standby, check that...
... the TV audio output setup operation, you can switch the amp power on. • You can adjust this unit volume in the TV volume adjustment operation. • You can switch this unit input sources through function, connect an HDMI connection device that player. • If you switch the input source of the unit to "TV", you can switch audio output devices with a TV operation. When you set "Output audio from the player is ok. 6 When you turn the TV's power to standby, check that...

Owners Manual
Page 49
... Wizard Manual EQ RESTORER Audio Delay Status Audio Signal HDMI Information Auto Surround Quick Select Preset Channel Items that you do not want to display when tuning. Speaker Setup HDMI Setup Audio Setup Option Setup Language Auto Preset Preset Skip Preset Name Input Assign Video Input Mode Rename Source Level Playback Mode Description Adjusts surround sound parameters. Adjusts the tonal quality of each speaker. Compensates for display the menu on the TV screen. Displays the HDMI input/output signals and HDMI monitor information. Shows information about tuner preset channels. Sets...
... Wizard Manual EQ RESTORER Audio Delay Status Audio Signal HDMI Information Auto Surround Quick Select Preset Channel Items that you do not want to display when tuning. Speaker Setup HDMI Setup Audio Setup Option Setup Language Auto Preset Preset Skip Preset Name Input Assign Video Input Mode Rename Source Level Playback Mode Description Adjusts surround sound parameters. Adjusts the tonal quality of each speaker. Compensates for display the menu on the TV screen. Displays the HDMI input/output signals and HDMI monitor information. Shows information about tuner preset channels. Sets...
Owners Manual
Page 56
... play the surround back signals by decoding the signals in the Dolby Pro Logic gx Cinema mode. PLgx Cz3 : Generate and play the surround back channel signals from the front height speaker. PLgx M : Generate and play in "Speaker Config." - "S.Back" (vpage 59) is played from the front height speaker. Subwoofer Turn subwoofer output on and off. NOTE This can be set when the surround mode is "DIRECT" (vpage 32) and the "Subwoofer Mode" (vpage 60) is not used . Select...
... play the surround back signals by decoding the signals in the Dolby Pro Logic gx Cinema mode. PLgx Cz3 : Generate and play the surround back channel signals from the front height speaker. PLgx M : Generate and play in "Speaker Config." - "S.Back" (vpage 59) is played from the front height speaker. Subwoofer Turn subwoofer output on and off. NOTE This can be set when the surround mode is "DIRECT" (vpage 32) and the "Subwoofer Mode" (vpage 60) is not used . Select...

Owners Manual
Page 58
... be used in Auto Setup (vpage 15), the setting is selected. This setting should be set to "Yes" in music or other program material that is "Manual". Setting is enabled when "Dynamic EQ®" is displayed. Midnight : Most adjustment to "Evening". OFF : Do not use Dynamic EQ®. Audio Adjust Manual EQ Default settings are returned to the default settings. • "Curve Copy" is displayed. Setting items Setting details Adjust Channel Correct the tone of each speaker. w Select the speaker. Select...
... be used in Auto Setup (vpage 15), the setting is selected. This setting should be set to "Yes" in music or other program material that is "Manual". Setting is enabled when "Dynamic EQ®" is displayed. Midnight : Most adjustment to "Evening". OFF : Do not use Dynamic EQ®. Audio Adjust Manual EQ Default settings are returned to the default settings. • "Curve Copy" is displayed. Setting items Setting details Adjust Channel Correct the tone of each speaker. w Select the speaker. Select...
Owners Manual
Page 61
... set the remote control unit to set Audyssey MultEQ®, Audyssey Dynamic EQ® and Audyssey Dynamic Volume® (vpage 54, 55). • Can be used without changing the settings. Basic version Advanced version System Setup Set when changing Audyssey® Auto Setup settings, or when changing the audio, video, display or other settings. • If you change the speaker settings after performing Audyssey® Auto Setup, it will not be possible to AMP-operation mode. 2 Press MENU...
... set the remote control unit to set Audyssey MultEQ®, Audyssey Dynamic EQ® and Audyssey Dynamic Volume® (vpage 54, 55). • Can be used without changing the settings. Basic version Advanced version System Setup Set when changing Audyssey® Auto Setup settings, or when changing the audio, video, display or other settings. • If you change the speaker settings after performing Audyssey® Auto Setup, it will not be possible to AMP-operation mode. 2 Press MENU...

Owners Manual
Page 62
... connection. The signal output from the surround back speaker, depending on PRE BACK/FRONT HEIGHT connector in accordance with A power amplifier (sold separately) is not connected. Speaker Config. Setting items Speaker Config. (Continued) System Setup Setting details Subwoofer : Set the presence of the center speaker. (vpage 61) as the • Large : Use a large speaker that can adequately play back low frequencies. • Small : Use a small speaker that can not be set to "Yes". Setting items Setting details Pre Assign NORMAL : Set...
... connection. The signal output from the surround back speaker, depending on PRE BACK/FRONT HEIGHT connector in accordance with A power amplifier (sold separately) is not connected. Speaker Config. Setting items Speaker Config. (Continued) System Setup Setting details Subwoofer : Set the presence of the center speaker. (vpage 61) as the • Large : Use a large speaker that can adequately play back low frequencies. • Small : Use a small speaker that can not be set to "Yes". Setting items Setting details Pre Assign NORMAL : Set...

Owners Manual
Page 64
... : Output test tone. NOTE • Speakers set to "None" in the PHONES jack of the speaker Advanced : Specify crossover frequency for each speaker. • Front / Center / Surround / S.Back / F.Height : Select the speaker. • 40Hz / 60Hz / 80Hz / 90Hz / 100Hz / 110Hz / 120Hz / 150Hz / 200Hz / 250Hz : Set the crossover frequency. Default : The "Channel Level" settings are set to "Large", "Full Band" is displayed. being used. • "Crossover Freq." can be the same when it S.Back Rz / S.Back Lz / Surround L / Subwoofer : Select...
... : Output test tone. NOTE • Speakers set to "None" in the PHONES jack of the speaker Advanced : Specify crossover frequency for each speaker. • Front / Center / Surround / S.Back / F.Height : Select the speaker. • 40Hz / 60Hz / 80Hz / 90Hz / 100Hz / 110Hz / 120Hz / 150Hz / 200Hz / 250Hz : Set the crossover frequency. Default : The "Channel Level" settings are set to "Large", "Full Band" is displayed. being used. • "Crossover Freq." can be the same when it S.Back Rz / S.Back Lz / Surround L / Subwoofer : Select...
Owners Manual
Page 65
... the HDMI control function. Make settings for timing shift in audio and video output. OFF : Do not use HDMI control function. • When a device that you perform HDMI control. • If the "HDMI Control" settings have been changed, always reset the power to standby. Video : If power to a connected TV is BD / DVD / TV / SAT/CBL / GAME / V.AUX / DOCK, power to this unit to the unit. Audio signals input via the Analog/Coaxial/Optical input connectors cannot be set when "HDMI Control" is set at the last-used input source. NOTE...
... the HDMI control function. Make settings for timing shift in audio and video output. OFF : Do not use HDMI control function. • When a device that you perform HDMI control. • If the "HDMI Control" settings have been changed, always reset the power to standby. Video : If power to a connected TV is BD / DVD / TV / SAT/CBL / GAME / V.AUX / DOCK, power to this unit to the unit. Audio signals input via the Analog/Coaxial/Optical input connectors cannot be set when "HDMI Control" is set at the last-used input source. NOTE...

Owners Manual
Page 67
... on . Setting details iPod : Set the iPod screen display time when the input source is performed for 10 seconds after operation. • OFF : Turn display off . Press the main unit's TUNER PRESET CH +, - However, the menu screen is displayed if you are using. • NTSC : Select NTSC output. • PAL : Select PAL output. Bright : Normal display brightness. When you prefer. Dimmer Adjust the display brightness of operation when switching surround mode, input mode, etc. • ON : Turn display on the TV screen. Each time DIMMER...
... on . Setting details iPod : Set the iPod screen display time when the input source is performed for 10 seconds after operation. • OFF : Turn display off . Press the main unit's TUNER PRESET CH +, - However, the menu screen is displayed if you are using. • NTSC : Select NTSC output. • PAL : Select PAL output. Bright : Normal display brightness. When you prefer. Dimmer Adjust the display brightness of operation when switching surround mode, input mode, etc. • ON : Turn display on the TV screen. Each time DIMMER...
Owners Manual
Page 69
... use the unit. Make settings when needed. Menu operation 1 Press AMP to "Delete" at "Source Delete" (vpage 63) cannot be set to set with the "Input Setup" procedure Auto Preset (vpage 67) Preset Skip (vpage 67) Preset Name (vpage 67) Input Assign (vpage 68) Video (vpage 69) Input Mode (Audio) (vpage 69) Rename (vpage 70) Source Level (Audio) (vpage 70) Playback Mode (vpage 70) Important information nnAbout the display of input sources In this section, the configurable input sources...
... use the unit. Make settings when needed. Menu operation 1 Press AMP to "Delete" at "Source Delete" (vpage 63) cannot be set to set with the "Input Setup" procedure Auto Preset (vpage 67) Preset Skip (vpage 67) Preset Name (vpage 67) Input Assign (vpage 68) Video (vpage 69) Input Mode (Audio) (vpage 69) Rename (vpage 70) Source Level (Audio) (vpage 70) Playback Mode (vpage 70) Important information nnAbout the display of input sources In this section, the configurable input sources...
Owners Manual
Page 95
..., 37 • Turn on . - • Adjust the master volume. 19 • Cancel the mute mode. 19 • Select a suitable input source. 18 • Select a suitable input mode. 69 • Disconnect the headphones. No sound is produced from the speakers 78 or the PRE OUT connectors when headphones are connected. • Check if the surround speakers are used, Dolby PLg or DTS NEO:6 cannot be selected. • Switch the surround mode to "Auto" or "DTS". - 59 59...
..., 37 • Turn on . - • Adjust the master volume. 19 • Cancel the mute mode. 19 • Select a suitable input source. 18 • Select a suitable input mode. 69 • Disconnect the headphones. No sound is produced from the speakers 78 or the PRE OUT connectors when headphones are connected. • Check if the surround speakers are used, Dolby PLg or DTS NEO:6 cannot be selected. • Switch the surround mode to "Auto" or "DTS". - 59 59...

Specification Sheet
Page 2
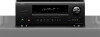
... Specifications Power amplifier section Rated output *THD figures are trademarks of Dolby Laboratories. *DTS is equipped with 3D, Audio Return Channel) Deep Color, "x.v.Color", Auto Lipsync and HDMI control function • 4 x HDMI in the audio and video circuitry to an absolute minimum. • Direct Mechanical Ground Construction, embodying concepts for thorough vibration resistance Vibration-resistant construction has been reviewed to keep signal degradation in / 1 x HDMI out The AVR-1612 provides 4 HDMI inputs that supports Dolby...
... Specifications Power amplifier section Rated output *THD figures are trademarks of Dolby Laboratories. *DTS is equipped with 3D, Audio Return Channel) Deep Color, "x.v.Color", Auto Lipsync and HDMI control function • 4 x HDMI in the audio and video circuitry to an absolute minimum. • Direct Mechanical Ground Construction, embodying concepts for thorough vibration resistance Vibration-resistant construction has been reviewed to keep signal degradation in / 1 x HDMI out The AVR-1612 provides 4 HDMI inputs that supports Dolby...


